Netdataは、無料のオープンソースのリアルタイムのパフォーマンスおよびヘルス監視ツールです。 Linux、MacOS、FreeBSDをサポートしています。 Netdataを使用して、クラウドベースのサーバー、コンテナー、およびITインフラストラクチャ全体のトラブルシューティングと監視を行うことができます。これは、メモリ使用量、CPU、帯域幅、ディスク使用率などを含むリアルタイムのシステムメトリックを提供します。 Prometheus、Graphite、OpenTSDB、Kafka、Grafanaなどの他の監視ツールと統合することもできます。
このチュートリアルでは、Ubuntu20.04サーバーにNetdata監視ツールをインストールする方法を示します。
- Ubuntu20.04を実行しているサーバー。
- ルートパスワードがサーバーに設定されます。
自動インストールスクリプトからNetdataをインストールする簡単で簡単な方法。
まず、次のコマンドを使用してcurlユーティリティをインストールします。
apt-get install curl -y
インストールが完了すると、次のコマンドを使用してNetdata自動インストールスクリプトをダウンロードして実行できます。
bash <(curl -Ss https://my-netdata.io/kickstart.sh)
以下に示すように、システムに必要な依存関係をインストールするように求められます。
NOTE: Running apt-get update and updating your APT caches ...
apt-get update
apt-get install autoconf autoconf-archive autogen automake cmake gcc git libelf-dev libjson-c-dev libjudy-dev liblz4-dev libmnl-dev libssl-dev libtool libuv1-dev make pkg-config uuid-dev zlib1g-dev


Press ENTER to run it >
Enterキーを押して、システムにすべての依存関係をインストールします。以下に示すように、Netdataを構築するように求められます。
 --- Installing netdata... ---
[/tmp/netdata-kickstart-LnvxPHJfuV/netdata-v1.26.0-292-gfbb5d8e2]# ./netdata-installer.sh --auto-update
  ^
  |.-.   .-.   .-.   .-.   .  netdata
  |   '-'   '-'   '-'   '-'   real-time performance monitoring, done right!
  +----+-----+-----+-----+-----+-----+-----+-----+-----+-----+-----+-----+--->


  You are about to build and install netdata to your system.

  The build process will use /tmp for
  any temporary files. You can override this by setting $TMPDIR to a
  writable directory where you can execute files.

  It will be installed at these locations:

   - the daemon     at /usr/sbin/netdata
   - config files   in /etc/netdata
   - web files      in /usr/share/netdata
   - plugins        in /usr/libexec/netdata
   - cache files    in /var/cache/netdata
   - db files       in /var/lib/netdata
   - log files      in /var/log/netdata
   - pid file       at /var/run/netdata.pid
   - logrotate file at /etc/logrotate.d/netdata

  This installer allows you to change the installation path.
  Press Control-C and run the same command with --help for help.


  NOTE:
  Anonymous usage stats will be collected and sent to Google Analytics.
  To opt-out, pass --disable-telemetry option to the installer or export
  the environment variable DO_NOT_TRACK to a non-zero or non-empty value
  (e.g: export DO_NOT_TRACK=1).

Press ENTER to build and install netdata to your system >
Enterキーを押して、Netdataをインストールします。インストールが完了すると、次の出力が表示されます。
Setting netdata.tarball.checksum to 'new_installation'

 --- We are done! ---

  ^
  |.-.   .-.   .-.   .-.   .-.   .  netdata                          .-.   .-
  |   '-'   '-'   '-'   '-'   '-'   is installed and running now!  -'   '-'
  +----+-----+-----+-----+-----+-----+-----+-----+-----+-----+-----+-----+--->

  enjoy real-time performance and health monitoring...

 OK
UbuntuリポジトリからNetdataをインストールする
デフォルトでは、NetdataはUbuntu20.04標準リポジトリで利用できます。次のコマンドを実行するだけでインストールできます:
apt-get install netdata -y
Netdataがインストールされたら、Netdataのデフォルト構成ファイルを編集し、server-ipでバインドアドレスを変更します。
nano /etc/netdata/netdata.conf
次の行を変更します:
[global]
        run as user = netdata
        web files owner = root
        web files group = root
        # Netdata is not designed to be exposed to potentially hostile
        # networks. See https://github.com/netdata/netdata/issues/164
        bind socket to IP = your-server-ip
終了したら、ファイルを保存して閉じます。次に、Netdataサービスを再起動して、変更を適用します。
systemctl restart netdata
次のコマンドを使用して、Netdataのステータスを確認できます。
systemctl status netdata
次の出力が得られるはずです:
? netdata.service - netdata - Real-time performance monitoring
     Loaded: loaded (/lib/systemd/system/netdata.service; enabled; vendor preset: enabled)
     Active: active (running) since Wed 2020-12-02 04:55:57 UTC; 9s ago
       Docs: man:netdata
             file:///usr/share/doc/netdata/html/index.html
             https://github.com/netdata/netdata
   Main PID: 18021 (netdata)
      Tasks: 22 (limit: 4691)
     Memory: 35.4M
     CGroup: /system.slice/netdata.service
             ??18021 /usr/sbin/netdata -D
             ??18100 /usr/bin/python3 /usr/lib/netdata/plugins.d/python.d.plugin 1
             ??18106 bash /usr/lib/netdata/plugins.d/tc-qos-helper.sh 1
             ??18108 /usr/lib/netdata/plugins.d/nfacct.plugin 1
             ??18109 /usr/lib/netdata/plugins.d/apps.plugin 1

Dec 02 04:55:57 ubuntu2004 systemd[1]: Started netdata - Real-time performance monitoring.
Dec 02 04:55:57 ubuntu2004 netdata[18021]: SIGNAL: Not enabling reaper
Dec 02 04:55:57 ubuntu2004 netdata[18021]: 2020-12-02 04:55:57: netdata INFO  : MAIN : SIGNAL: Not enabling reaper
この時点で、Netdataがインストールされ、ポート19999でリッスンしています。
ss -antpl | grep 19999
次の出力が得られるはずです:
LISTEN 0 4096 216.98.11.171:19999 0.0.0.0:* users:(("netdata",pid=18021,fd=4))
終了したら、次のステップに進むことができます。
NetdataWebインターフェイスにアクセス
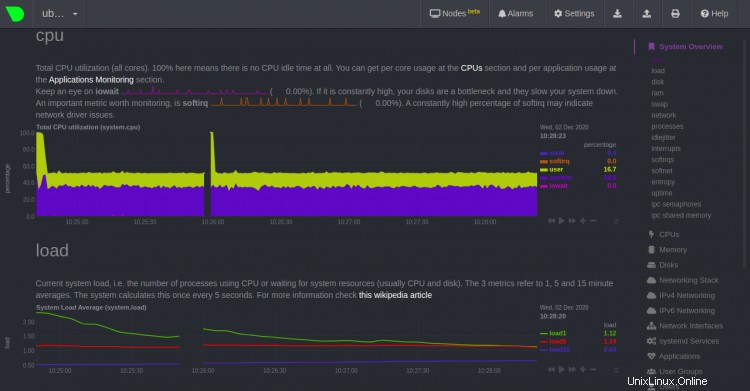
次に、Webブラウザーを開き、URL http:// your-server-ip:19999を使用してNetdataWebインターフェースにアクセスします。 。次の画面にNetdataWebインターフェイスが表示されます。

CPUと負荷
ディスクとRAMの使用量

スワップとネットワーク

おめでとう!これで、Ubuntu20.04サーバーにNetdataが正常にインストールされました。これで、クライアントマシンにNetdataエージェントをインストールし、NetdataWebダッシュボードからシステムリソースの監視を開始できます。ご不明な点がございましたら、お気軽にお問い合わせください。