LaTeXは、ドキュメントを植字するための無料のオープンソースソフトウェアです。 LaTeXは、高品質の植字のための準備システムであり、大規模な技術文書、コンピューターサイエンス、数学、および物理学の文書の事実上のものです。 TeXstudioを使用すると、LaTeXドキュメントの編集とフォーマットが簡単になります。 LaTeXを使用して、レポート、履歴書、カバーレターを作成したり、生徒が課題や論文を発表したり、講師がプレゼンテーション、シラバス、試験を編集したりできます。
技術的には、LaTeXはプログラミング言語TeX用のマクロとコマンドのセットです。レスリー・ランポートはもともと、ドナルド・クヌースによるTeX植字エンジンの機能を拡張するためにLaTeXを作成しました。
この記事のパート1は、TeXstudioアプリでLaTeXを使用して植字する紹介ドキュメントです。フォーマット、ページレイアウト、リスト、表、グラフィックについて説明します。パート2、FedoraでのLaTeXとTeXstudioによるドキュメントの植字–パート2では、数学の数式、コンテンツと参照の一覧表示、相互参照について説明します。
なぜLaTeXなのか?
- LaTeXは、科学的および技術的なプロジェクトに最適な、優れたタイポグラフィを備えた美しく高品質のドキュメントを作成します。控えめに言っても、伝説的な数式の植字に優れています!
- 無料で、高速で、柔軟性があり、非常に安定しており、複雑で大規模なものを簡単に処理できます。
- LaTeXには、コンテンツ、表、索引、図、用語集、および参考文献のリストの自動番号付けと生成を備えた広範な相互参照機能があります。
- LaTeXコミュニティは、手紙、請求書、プレゼンテーション、本、履歴書、法律文書、楽譜、チェスゲームの記法などの多くの書式設定拡張機能とテンプレートを作成しました。
- LaTeXは、Linux、macOS X、Windowsなどのすべてのオペレーティングシステム間で移植性が高くなっています。そのプレーンテキストファイル形式は、すべてのオペレーティングシステムで読み取りおよび編集可能です。
- LaTeXは、オペレーティングシステムに関係なく、印刷可能で読み取り可能で、同じように見え、一貫性のあるPDF出力を生成します。また、HTML、DVI、およびPostScript出力をサポートして、オンライン、画面上、電子書籍リーダー、またはスマートフォンを印刷および配布します。
- LaTeXドキュメントは下位互換性があり、ワープロ形式ではなく、人間が読める形式のテキスト形式で保存されます。
- LaTeXドキュメントはテキストファイルであり、ウイルスによる脅威に直面しません。
言語固有の機能を備えた多言語対応です。
課題は何ですか?
LaTeXの学習曲線は急なものになる可能性がありますが、この記事では、LaTeXで植字を習得するのに役立つ入門ガイドを提供することを目的としています。
LaTeXを書くことはプログラミングのように見えますが、試してみてください。 Fedoraまたはお気に入りのディストリビューションのTeXstudioアプリを使用すると、オートコンプリート、キーワードの強調表示、メニュー、およびコマンドを使用したダイアログで簡単にサポートできます。さらに、Comprehensive TeX Archive Network(CTAN)は、4,700を超えるLaTeXパッケージのデータベースを維持しています。パッケージは機能を追加し、ドキュメントの作成を容易にします。
LaTeXのインストール
Fedora Workstationを使用している場合は、ターミナルまたはソフトウェアアプリからTeXstudioをインストールできます。
ターミナルを使用する場合は、次のコマンドを実行してTeXstudioをインストールします。
##Fedora
sudo dnf install texstudio
sudo dnf install texlive-scheme-full #install standard TeXLive packages
##Ubuntu
sudo apt-add-repository ppa:blahota/texstudio
sudo apt-get install texstudio
最初のLaTeXドキュメントを作成する
LaTeXでドキュメントを作成するには、.texファイル拡張子で終わるファイルを作成および編集します。 LaTeXに.texファイルをタイプセットするように指示すると、.pdfファイルとその他の補助ファイルが作成されます。つまり、.texファイルに変更を加えた場合、PDFファイルで変更を有効にするには、ドキュメントを再度タイプセットする必要があります。
ルール:すべてのLaTeXファイルを独自のフォルダーに配置することをお勧めします。生成された補助ファイルがシステムを乱雑にするためです。
TeXstudioを開き、新しいファイル(FirstLaTeXdocument.texなど)を保存します
LaTeXコマンドは通常、円記号(\)で始まります。コマンドパラメータは中括弧{}で囲まれています。まず、ドキュメントクラスのタイプ(つまり、\ documentclass {article})を宣言します。
次に、ドキュメントの開始と終了を開始と終了でマークします(つまり、\ begin {document}、\ end {document})。 )。その後、間に段落を書くことができます。
最初のLaTeXドキュメント
\documentclass{article}
\begin{document}
LaTeX creates beautiful, high-quality documents with outstanding typography that are well suited for scientific and technical projects. It has superior typesetting for mathematical formulas, which is legendary, to say the least!
It is free, fast, flexible, incredibly stable, and can handle complex and large easily.
LaTeX has extensive cross-referencing capabilities, with automatic numbering and generation of lists of contents, tables, indexes, figures, glossaries, and bibliographies.
\end{document} 
\begin{document}と\end{document}の間のテキストはすべてドキュメントに組み込まれることに注意してください。したがって、\end{document}の後のテキストはすべて無視されます。
\documentclass{article}と\begin{document}の間のスペースは、前文またはトップマターと呼ばれます。書体やヘッダーやフッターの外観など、グローバルなドキュメントパラメータを変更するコマンドが含まれています。
LaTeXで植字を学ぶためのより良い方法は、例を使って作業し、新機能を試すことです。
1。フォーマット
スペースと改行
スペースと改行を処理するためのいくつかのガイドラインを次に示します。 2つの単語の間にスペースを作るには、それらの間にスペースを置きます。 (驚くことではありません!)LaTeXは2文字より長い単語間スペースを凝縮するため、1つのスペースで十分です。
植字「無料のオープンソースLinux!」 「無料のオープンソースLinux!」を提供しますLaTeXは、単一の改行を単語間のスペースのように扱います。次の行に2番目の単語を配置して、2つの単語の間にスペースを入れることもできます。
新しい段落を作成するには、たとえば、テキストブロックの前に空の行を配置します。
The best way to learn about open source software,
is through FossLinux.
The best Linux operating system is Fedora.
与える:
The best way to learn about open source software,
is through FossLinux.
The best Linux operating system is Fedora.
本質的に、スペースは単語を区切り、空の行は段落を区切ります。
フォントスタイル
ほとんどの書体は、さまざまな太さ、斜体、太字、スモールキャップ、およびその他のスタイルで構成されています。
次のコマンドでアクセスできます。
\textit{italic} %italic
\textbf{bold} %bold
\textsc{small caps} %small caps
\texttt{typewriter} %typewriter
例II:フォントの切り替え
\documentclass{article}
\begin{document}
\section{\textsf{\FOSS\ resources on the internet}}
The best place to learn Free and open source software is FOSSLinux.
Its address is \texttt{https://fosslinux.com}.
\end{document}
上記の例では、\textsfコマンドでより多くのフォントコマンドを使用しています。見出しセクションでsans-serifフォントを使用します。 \ textttコマンドを使用して、Webアドレスのタイプライターフォントを設定しました。
LaTeXの文字の標準フォントは、セリフフォントです。セリフは、読者の目を線に沿って導くことにより、読みやすさを大幅に向上させます。それらは本文で使用されます。ローマ字フォントとコマンド\textrmを使用します。ローマンフォントは、LaTeXのセリフを使用したデフォルトのフォントです。見出しはしばしばサンセリフフォントを使用します。サンセリフは、低解像度で読みやすく、電子書籍の作成に最適であるため、画面テキストに最適です。
等幅フォントまたはタイプライターフォントは、同じ幅の文字を作成します。現在、それらは印刷エディタとテキストエディタの両方でコンピュータプログラムのソースコードを書くためのものです。上記の例のように、タイプライターフォントは、Webアドレスとコードを標準のテキストと区別するために使用されます。
例III:フォントの切り替え
\documentclass{article}
\begin{document}
\section{\sffamily\FOSS\ resources in the internet}
The best place to learn Free and open source software is FOSSLinux.com.
Its address is \ttfamily https://fosslinux.com/.
\end{document
上記の例では、コマンド\ sffamilyを使用して、フォントをサンセリフフォントに切り替えました。変更は引数内にあるため、変更はそこでのみ有効であることに注意してください。
コマンド\rmfamilyを使用して、この時点以降で使用されるローマ字フォントに切り替えました。 \ ttfamilyを使用して、タイプライターフォントに戻ることができます。宣言コマンドは出力を生成しませんが、次のテキストに影響します。
フォントコマンドと宣言の要約
| \ textrm {...} | \ rmfamily |
| \ textsf {...} | \ sffamily |
| \ texttt {...} | \ ttfamily |
| \ textbf {...} | \ bfseries |
| \ textmd {...} | \ mdseries |
| \ textit {...} | \ itshape |
| \ textsl {...} | \ slshape |
| \ textsc {...} | \ scshape |
| \ textup {...} | \ upshape |
| \ textrm {...} | \ normalfont |
特殊文字
ハイフンとダッシュ
ハイフンは複合語を接続し、–文字で印刷されます。無料のオープンソースLinuxは、無料のオープンソースLinuxを提供します。
ダッシュには、emとenダッシュの2種類があります。
enダッシュは–-。
ppで印刷されます。 140 – -158 pp。126–128
Am em dashは– –-で印刷されます。
待ってください—これを持っていってください!待ってください—これを持っていってください!
引用符
キーボードの引用符はLaTeXでは理想的ではなく、期待どおりに植字されません。
「スマートクォート」の見栄えが悪い「スマートクォート」の見栄えが悪い
引用する適切な方法は、左のマークに「」、右のマークに「」を使用することです。
「「元気な」犬」「「元気な」犬」
コメント
テキストの前に%を使用して、LaTeXがテキストを植字できないようにします。
マスター組版%ここにマスター組版があります。
省略記号
省略記号は、3つの期間が連続する技術用語です。省略記号を印刷するには、\dotsを使用します。
これは醜いです。 。 。これは醜いです…
はるかに良い\dotsはるかに良い。 。 。
その他の文字
LaTeXは、独自の目的のためにいくつかの特殊文字を予約しています。これらの文字のほとんどは、その前に\を配置することでタイプセットできます。 \ {\} \%\ $ \&\ _ \#出力:{}%$&_#。
例外には\が含まれます。 \を印刷するには、コマンド\textbackslashを使用します。
2。ページのデザイン
本や記事のように複数のページにまたがる大きなドキュメントには、常にセクション、サブセクション、さらにはサブサブセクションが含まれている必要があります。見栄えのするドキュメントでは、ページの余白を変更したり、目次、ヘッダー、フッター、行間隔、サブセクションなどを作成したりして、全体的なレイアウトを設計する必要があります。
このセクションでは、複数のドキュメントにまたがるサンプルドキュメントを作成します。ページ。
デフォルトのLaTeXページレイアウト
ページ余白は、指定した用紙の種類(a4、レターなど)と、ドキュメントクラス(記事、本、レポートなど)によって定義されます。ページ余白を変更するには、フルページパッケージまたはジオメトリパッケージを使用して、私たちの仕事ははるかに簡単です。
以下は、デフォルトのLaTeXページのサイズです。
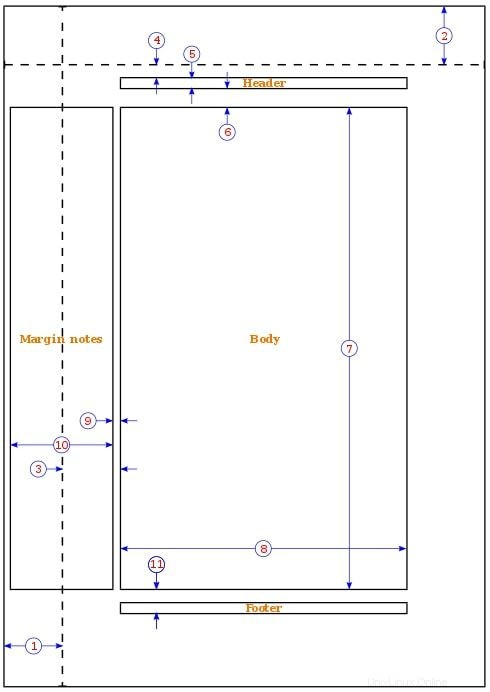
one inch + \hoffset
one inch + \voffset
\oddsidemargin = 31pt
\topmargin = 20pt
\headheight = 12pt
\headsep = 25pt
\textheight = 592pt
\textwidth = 390pt
\marginparsep = 35pt
\marginparwidth = 35pt
\footskip = 30pt
例IV:章のある本を書く
\documentclass[a4paper,12pt]{book}
\usepackage{blindtext}
\usepackage[english]{babel}
\
begin{document}
\chapter{\textsf{Document typesetting with LaTeX and TeXstudio}}
In this chapter we will study the document formatting, page layout, lists, and tables.
\section{Some filler text}
\blindtext
\section{A lot more filler text}
More dummy text will follow.
\subsection{Plenty of filler text}
\blindtext[10]
\end{document}
イラスト
ドキュメントクラスの本は、本のようなドキュメントに適しています。書籍は両面で、章、タイトルページ、参考文献、索引などで構成されています。
A4用紙、フォントサイズ12 ptを使用し、LaTeXにページ余白を定義させました。
babelパッケージは、ハイフン、英語以外の言語の言語固有の文字を植字するためのものです。 babelパッケージは、ブラインドテキストをロードしてフィラーテキストを生成します。この場合、言語を英語(アメリカ英語)で指定する必要があります。
\ chapterコマンドは、常に新しいページから始まる大きな見出しを生成します。
\ sectionコマンドは、2番目のセクションレベルを生成し、\chapterよりも小さい見出しを生成します。セクションは章ごとに自動的に番号が付けられます。
\ Blindtextコマンドは、スペースをテキストで埋めるためのダミーテキストを生成します。
\ subsectionコマンドは、本のセクションを絞り込みます。章の見出しがあるため、上部の余白は非常に高く見えます。下余白にはページ番号が含まれています。
ジオメトリパッケージを使用したマージンの定義
次の例を使用して、上記の本の例のマージンサイズを変更します。
\usepackage[a4paper, inner=1.3cm, outer=3cm, top=2cm,
bottom=3cm, bindingoffset=1cm]{geometry}
変更には、A4用紙サイズ、外側の余白3 cm、内側の余白1.5 cm、上余白2cm、下余白3cmを使用し、製本補正に1cmの値を指定しました。
ジオメトリパッケージ
ジオメトリパッケージの引数は、「key =value」の形式で、カンマで区切るか、\ geometry{argumentlist}を呼び出すことで渡すことができます。
ジオメトリパッケージを使用して用紙サイズと向きを設定するには、次のオプションを使用できます。
- paper =nameは、紙の名前を示します(paper =a4paper)。その他の用紙サイズには、レターペーパー、エグゼクティブペーパー、リーガルペーパー、a0paper、a6paper、b0paper、b6paperなどがあります。
- paperwidth、paperheightを使用すると、paperwidth =7.5in、paperheight=11inなどの用紙サイズを選択できます。
- papersize ={width、height}は、用紙の幅と高さを定義します。つまり、papersize ={7.5in、11in}。
- Landscapeは、用紙の向きを横向きモードとして定義します。
- Portraitは、用紙を縦向きモードに設定します。これは、LaTeXのデフォルトのレイアウトです。
テキストエリアを変更するには、次のオプションを使用できます。
- textwidth、textheieghtは、textwidth =130mm、textheight =160mmのように、テキスト領域の幅と高さを設定します。
- 行は、lines =21のように、行数を指定してテキストの高さを指定することもできます。
- includeheadを使用すると、ヘッダーがボディ領域に含まれます。
includefootを使用すると、フッターがボディ領域に組み込まれます。
2列の横向きドキュメントを作成する
オプションlandscapeとtwocolumnを\documentclassステートメントに追加して2列のドキュメントを作成できます。本の例の前文に次のコードを追加します。
\documentclass[a4paper,12pt,landscape,twocolumn]{book} ジオメトリパッケージは、その広範なマニュアルを通じて学ぶことができる多くの機能を提供します。
目次の作成
本の例を拡張して目次を含めましょう。 \begin{document}の直後に\tableofcontentsを追加します。これで、本のサンプルドキュメントは次のようになります。
例V:目次
\documentclass[a4paper,12pt]{book}
\usepackage[english]{babel}
\usepackage{blindtext}
\usepackage[a4paper, inner=1.3cm, outer=3cm, top=2cm,
bottom=3.5cm, bindingoffset=1cm]{geometry}
\begin{document}
\tableofcontents
\chapter{\textsf{Document typesetting with LaTeX and TeXstudio}}
In this chapter we will study the document formatting, page layout, lists, and tables.
\section{Some filler text}
\blindtext
\section{A lot more filler text}
More dummy text will follow.
\subsection{Plenty of filler text}
\blindtext[10]
\end{document}
ヘッダーとフッターのデザイン
デフォルトでは、LaTeXのページにはページ番号があります。ただし、fancyhdrパッケージを使用してヘッダーとフッターをカスタマイズし、要件を満たすことができます。
本の例を読み込み、次の行を追加して太字を使用し、すべてのヘッダーではなく章のタイトルに大文字のみを使用しますテキスト。
例VI:ヘッダーとフッター
\documentclass[a4paper,12pt]{book}
\usepackage{blindtext}
\usepackage[english]{babel}
\usepackage{fancyhdr}
\fancyhf{}
\fancyhead[LE]{\leftmark}
\fancyhead[RO]{\nouppercase{\rightmark}}
\fancyfoot[LE,RO]{\thepage}
\pagestyle{fancy}
\begin{document}
\chapter{\textsf{Document typesetting with LaTeX and TeXstudio}}
In this chapter we will study the document formatting, page layout, lists, and tables.
\section{Some filler text}
\documentclass[a4paper,12pt]{book}
\usepackage[english]{babel}
\usepackage{fancyhdr}
\usepackage{blindtext}
\fancyhf{}
\fancyhead[LE]{\leftmark}
\fancyhead[RO]{\nouppercase{\rightmark}}
\fancyfoot[LE,RO]{\thepage}
\pagestyle{fancy}
\begin{document}
\chapter{Explore the page layout}
In this article, we will study the layout of pages.
\section{Some filler text}
fancyhhdrパッケージを次のオプションとともに使用しました。
\leftmarkを使用して、章のタイトルと章の番号を保存します。デフォルトとして大文字が使用されます。
\ rightmarkは、セクションのタイトルとその番号を格納します。
\ fancyheadと引数LEを使用して、章のタイトルをヘッダーに配置しました。 LEは左です-偶数に設定されている場合、偶数ページのヘッダーの左側に章のタイトルが配置されます。
また、ROとともに\ fancyheadを使用して、セクションのタイトルをヘッダーに配置しました。 ROはright-oddの略で、設定されている場合、奇数ページのヘッダーの右側にセクションヘッダーを表示します。
LEおよびROとともに\fancyfootを使用して、偶数およびのフッターにページ番号を表示しました。奇数ページの場合。
\pagestyle {fancy}コマンドは、fancyhdrパッケージによって提供されるファンシースタイルでページスタイルを変更します。
ページスタイルを理解する
デフォルトでは、LaTeXは4つのページスタイルを提供します。
- plain:ページスタイルにはヘッダーがなく、ページ番号が印刷され、フッターの中央に配置されます。
- 空:フッターもヘッダーも表示されません。
- 見出し:ヘッダーセクションには、クラスとページ番号に応じて、章、セクション、サブセクションのタイトルが含まれますが、フッターは空です。
- myheadings:ヘッダーセクションには、フッターが空の場合のユーザー定義のテキストとページ番号が含まれます。
次のコマンドを使用して、ページスタイルを選択できます。
\ pagestyle {name}:この時点以降、ドキュメントはページスタイル「name」に切り替わります。
\thispagestyle{name}はページスタイルを定義します現在のページにのみ「名前」が表示されます。
ページ分割の挿入
LaTeXはページ分割を処理しますが、ドキュメントの特定のポイントにページ分割を挿入することをお勧めします。コマンド\pagebreakはページを分割し、テキストはページの一番下まで引き伸ばされます。
コマンド\newpageはページを分割しますが、テキストは拡大しません。残りのスペースは空のままになります。
テキストと見出しでの脚注の使用
脚注を挿入するには、\footnoteコマンドを使用して本の例を拡張します。脚注の前に\protectオプションを使用することもできます。
例VII:脚注
\documentclass[a4paper,12pt]{book}
\usepackage{blindtext}
\usepackage[english]{babel}
\begin{document}
\chapter{\textsf{Document typesetting with LaTeX and TeXstudio}}
In this chapter we will study the document formatting, page layout, lists, and tables.
\section{Some filler text \protect\footnote{serving as a placeholder}}
\blindtext
\section{A lot more filler text}
More dum dum text\footnote{serving as a placeholder} will follow.
\subsection{Plenty of filler text}
\blindtext[10]
\end{document}
\ footnote [number] {text}は、整数であるオプションの数値でマークされた脚注を生成します。脚注の処理時にエラーが発生しないように、引数内で\protect\footnoteのオプションを使用します。
3。リストの作成
リストは読みやすいテキストを作成し、それらを使用していくつかのアイデアを明確な構造で提示できます。 LaTeXの標準リストには、項目別(順序なしまたは箇条書き)、列挙(番号付きまたは順序付きリスト)、および説明(定義リスト)が含まれます。
リストを定義するには、各リストアイテムの前にコマンド\itemを付けます。 \begin{
LaTeXで利用可能なさまざまなタイプのリストのセクションを使用して、本の例を拡張します。
項目別リストの作成
次のコードを例に追加して、Linuxオペレーティングシステムの項目別リストを作成します。
\begin{itemize}
\item Fedora
\item Debian
\item Ubuntu
\item Zorin
\end{itemize}
列挙リストの作成
次のコードを例に追加して、Linuxオペレーティングシステムの列挙リストを作成します。
\begin{enumerate}
\item Fedora
\item Debian
\item Ubuntu
\item Zorin
\end{enumerate}
説明リストの作成
次のコードを例に追加して、Linuxオペレーティングシステムの説明リストを作成します。
\begin{description}
\item[Fedora] Freedom Friends
\item[Ubuntu] Ubuntu 21 is now available
\end{description}
間隔リストアイテム
enumitemパッケージを使用して、デフォルトのリスト間隔をカスタマイズできます。 enumitemパッケージは、\itemsepコマンドと\noitemsepコマンドを有効にします。前文に\usepackage{enumitem}を追加します。 noitemsepオプションを使用して、LaTeXのデフォルトの間隔を削除します。 noitemsepオプションを角かっこで囲み、\beginコマンドに配置します。
\begin{itemize}[noitemsep]
\item Fedora
\item Debian
\item Ubuntu
\item Zorin
\end{itemize}
\ itemsepを使用して、リストアイテム間に必要なスペースを指定します。
\begin{enumerate} \itemsep1.50pt
\item Fedora
\item Debian
\item Ubuntu
\item Zorin
\end{enumerate}
ネストされたリストの作成
LaTeXは、最大4レベルの深さのネストされたリストの作成をサポートします。
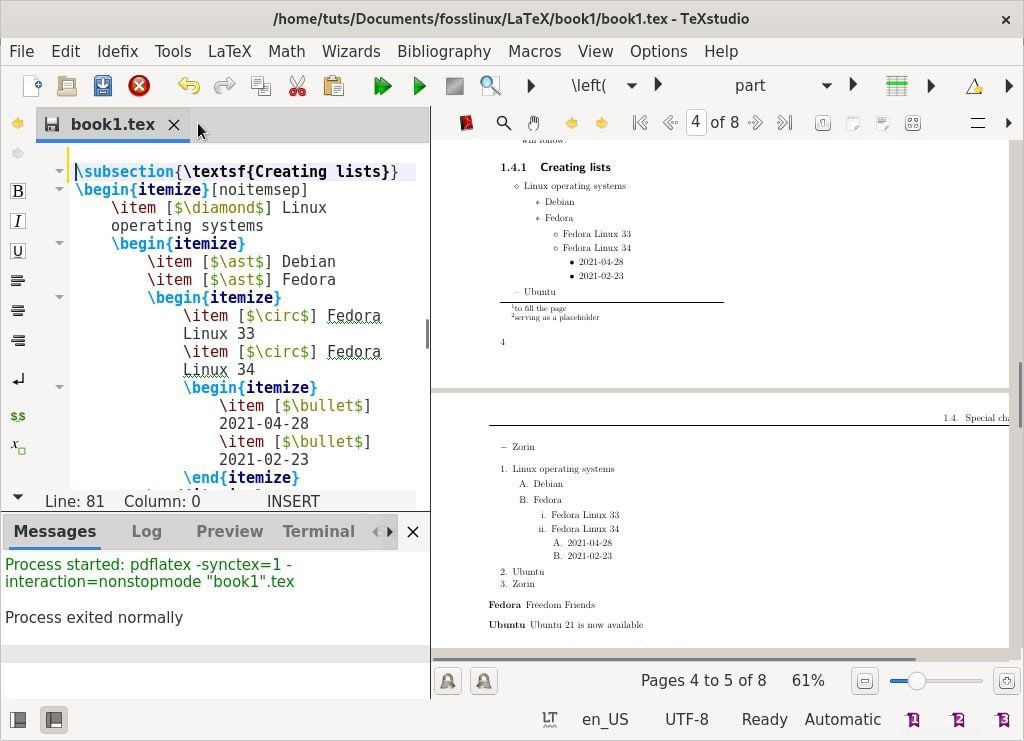
ネストされた項目別リスト
\begin{itemize}[noitemsep]
\item Linux operating systems
\begin{itemize}
\item Debian
\item Fedora
\begin{itemize}
\item Fedora Linux 33
\item Fedora Linux 34
\begin{itemize}
\item 2021-04-28
\item 2021-02-23
\end{itemize}
\end{itemize}
\end{itemize}
\item Ubuntu
\item Zorin
\end{itemize}
ネストされた列挙リスト
\begin{enumerate}[noitemsep]
\item Linux operating systems
\begin{enumerate}
\item Debian
\item Fedora
\begin{enumerate}
\item Fedora Linux 33
\item Fedora Linux 34
\begin{enumerate}
\item 2021-04-28
\item 2021-02-23
\end{enumerate}
\end{enumerate}
\end{enumerate}
\item Ubuntu
\item Zorin
\end{enumerate}
リストスタイルの設定
LaTeXには、深さに応じて次のデフォルトのリストスタイルがあります。作成したネストされたリストの例から、デフォルトのスタイルを確認できます。
| 1 |
| 2 |
| 3 |
| 4 |
カスタムリストスタイルを定義します。
カスタムリストスタイルを作成して、列挙リストと項目リストの次のオプションを含めることができます。
| \ alph * | $ \ bullet $ |
| \ Alph * | $ \ cdot $ |
| \ arabic * | $ \ diamond $ |
| \ roman * | $ \ ast $ |
| \ Roman * | $ \ circ $ |
| $-$ |
次の3つのオプションのいずれかを使用して、カスタムリストスタイルを設定できます。
オプション1-アイテムごとにスタイルを一覧表示する
目的のスタイルの名前を角かっこで囲み、\itemコマンドに配置します
\begin{itemize}[noitemsep]
\item [$\diamond$] Linux operating systems
\begin{itemize}
\item [$\ast$] Debian
\item [$\ast$] Fedora
\begin{itemize}
\item [$\circ$] Fedora Linux 33
\item [$\circ$] Fedora Linux 34
\begin{itemize}
\item [$\bullet$] 2021-04-28
\item [$\bullet$] 2021-02-23
\end{itemize}
\end{itemize}
\end{itemize}
\item [–] Ubuntu
\item [$-$] Zorin
\end{itemize}
オプション2–リストのリストスタイル
目的のリストスタイルの名前の前にlabel=を付けます。 \ beginコマンドでは、label=プレフィックスを含むパラメータを角かっこで囲んで配置します。
\begin{enumerate}[noitemsep]
\item Linux operating systems
\begin{enumerate} [label=\Alph*.]
\item Debian
\item Fedora
\begin{enumerate}
\item Fedora Linux 33
\item Fedora Linux 34
\begin{enumerate}
\item 2021-04-28
\item 2021-02-23
\end{enumerate}
\end{enumerate}
\end{enumerate}
\item Ubuntu
\item Zorin
\end{enumerate}
オプション3–ドキュメントのリストスタイル
このオプションは、ドキュメント全体のデフォルトのリストスタイルを変更します。 \ renewコマンドを使用して、labelitemsの値を設定します。以下の例では、4つのラベルの深さごとに異なるlabelitemを設定しています。
\renewcommand{\labelitemii}{$\diamond$}
\renewcommand{\labelitemi}{$\ast$}
\renewcommand{\labelitemiii}{$\bullet$}
\renewcommand{\labelitemiv}{$-$}
LaTeXリストの詳細については、LaTeXリストの構造をご覧ください。
おもしろ情報:
LaTeXは、/ ˈlɑːtɛx /LAH-tekhまたは/ˈleɪtɛx/LAY-tekhの2つの方法で発音されます。
4。テーブルのデザイン
情報やデータを表に表示し、図や図面を使用してそれらを視覚化する場合、ドキュメントは常に魅力的で理解しやすいものです。 LaTeXは、テーブルを構築およびカスタマイズするための表形式および表形式の環境を提供します。
テーブルを作成する
テーブルを作成するには、環境\ begin{tabular}{columns}を指定します。本の例を拡張して、次の表を含めましょう。
例VIII:表形式の表
\begin{tabular}{c|c}
Linux operating systems & Release date \\ \hline
Fedora Workstation 34 &2021-04-28 \\
Ubuntu 21.04 & 2021-03-28 \\
Fedora Workstation 33 &2021-10-11 \\
Ubuntu 20 & 2020-04-28 \\
\end{tabular}
イラスト
- &–アンパサンドは各セルを定義し、2番目の列からのみ使用されます。
- \ –行を終了し、新しい行を開始します。
- | –テーブルの垂直線を指定します(オプション)。
- \ hline –水平線を指定します(オプション)。
- * {num} {form} –多くの列をフォーマットし、繰り返しを制限する効率的な方法を提供します。
- || –二重の垂直線を指定します。
- 中括弧内の「{c|c}」オプションは、各列のテキストの位置を示します。テーブルの他の位置引数には、次のものがあります。
| c |
| l |
| r |
| p {width} |
| m {width} |
| b {width} |
テーブルのカスタマイズ
上記の表の例を次のコードで変更します。
\begin{tabular}{*{3}{|l|}}
\hline
\textbf {Linux operating systems} & \textbf {Release date} \\ \hline
Fedora Workstation 34 &2021-04-28 \\ \hline
Ubuntu 21.04 & 2021-03-28 \\ \hline
Fedora Workstation 33 &2021-10-11 \\ \hline
Ubuntu 20 & 2020-04-28 \\ \hline
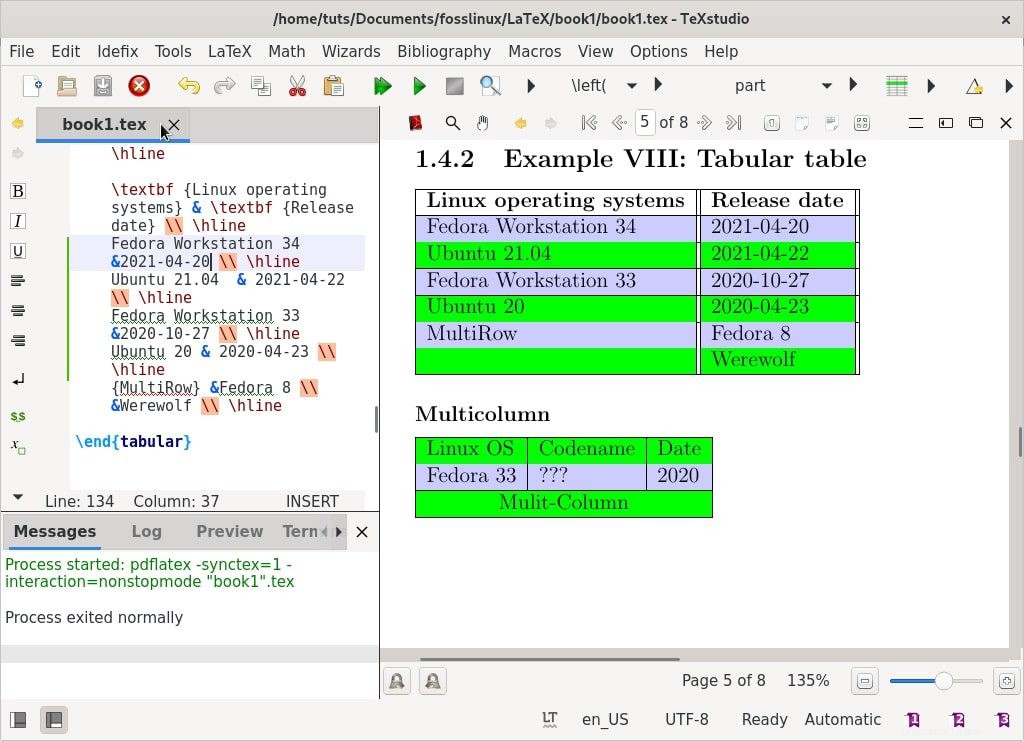
\end{tabular} 複数行および複数列のテーブルの設計
行と列をマージする必要がある場合は、プリアンブルに複数行を追加します。
複数行
本の例に次の複数行の引数を追加します。引数は次の形式を取ります、\ multirow {number_of_rows} {width} {text}
\begin{tabular}{*{3}{|l|}}
\hline \textbf {Linux operating systems} & \textbf {Release date} \\ \hline
Fedora Workstation 34 &2021-04-20 \\ \hline
Ubuntu 21.04 & 2021-04-22 \\ \hline
Fedora Workstation 33 &2021-10-27 \\ \hline
Ubuntu 20 & 2020-04-23 \\ \hline
{MultiRow} &Fedora 8 \\ &Werewolf \\ \hline
\end{tabular}
Multicolumn
Add the following command to create multicolumn table, \multicolumn{number_of_columns}{cell_position}{text}
\begin{tabular}{|l|l|l|}\hline
Release &Codename &Date \\ \hline
Fedora Core 4 &Stentz &2005 \\ \hline
\multicolumn{3}{|c|}{Mulit-Column} \\ \hline
\end{tabular}
Working with long text in tables
If you are working with lengthy text, you need to format your table so that the text will not exceed the page width. You can specify the column width or utilize the tabularx environment.
Using column width to manage long text
\begin{tabular}{|l|m{14cm}|} \hline
Summary &Description \\ \hline
Test &\blindtext \\ \hline
\end{tabular}\vspace{3mm}
Using tabularx to manage long text
Add the following table to your book example.
\begin{tabularx}{\textwidth}{|l|l|} \hline
Summary & Debian Description\\ \hline
Text &\blindtext \\ \hline
\end{tabularx}
Working with colors in tables
You can color to text, an individual cell, an entire row, or create alternating colors. Add the \usepackage[table “” not found /]
{xcolor} package into the preamble. Alternate colors take the following argument.
\rowcolors{start row colour}{even row colour}{odd row colour}.
Add the following arguments to your book example
\rowcolors{2}{green}{blue!20}
\begin{tabular}{*{3}{|l|}}
\hline
\textbf {Linux operating systems} & \textbf {Release date} \\ \hline
Fedora Workstation 34 &2021-04-28 \\ \hline
Ubuntu 21.04 & 2021-03-28 \\ \hline
Fedora Workstation 33 &2021-10-11 \\ \hline
Ubuntu 20 & 2020-04-28 \\ \hline
{MultiRow} &Fedora 8 \\ &Werewolf \\ \hline
\end{tabular}
Specify color for each row
Add the following arguments to the book example under “Long Text” to change the color of a specific row. The argument, \rowcolor{yellow}\textsc{\color{black, will specify the row color and text color.
\begin{tabular}{|l|m{9cm}|} \hline
\rowcolor{yellow}\textsc{\color{black}Summary} &Description \\ \hline
Test &\blindtext \\ \hline
\end{tabular}\vspace{3mm}
Working with lists in tables
You can use either tabularx or tabular to specify the column with the list.
List in tabularx, tabular
\begin{tabular}{|l|m{9cm}|} \hline
\rowcolor{yellow}\textsc{\color{black}Summary} &Description \\ \hline
\rowcolor{yellow}\textsc{\color{blue}Test} &\blindtext \\ \hline
&\begin{itemize}[noitemsep]
\item CentOS
\item Debian
\item Arch
\end{itemize}
\end{tabular}\vspace{3mm}
There are plenty of ways to customize tables with LATeX, and you can find more examples at LaTeX Wiki.
5。 Inserting graphics, pictures, and figures
LaTeX provides a simple way to include pictures, graphics, or drawings to your document with the graphicx package. Add the graphicx package to the preamble and move your images to the same directory as your .tex file.
The includegraphics command takes one argument, the path to the image file. You can also add a caption for your image with the figure environment. Add the following example to your book example.
Example IX:Inserting graphics
\usepackage{graphicx} %add graphicx package
\begin{figure}[h]
\center
\includegraphics{grisbi-logo_t.png}
\caption{Grisbi logo}
\label{fig:grisbi_logo}
\end{figure}
The figure environment takes an optional command which controls where the image is placed on the page. You can specify image position as [h] here on the page, [b] bottom of the page, or [t] top of the page. Use, \begin{figure}[!b], argument to let the figure float.
Book Example
Find attached the complete book.tex example.
\documentclass[a4paper,12pt,landscape,twocolumn]{book}
%packages
\usepackage[english]{babel}
\usepackage[inner=1.5cm, outer=3cm, top=2cm,bottom=3cm, bindingoffset=1cm]{geometry}
\usepackage{blindtext}
\usepackage{fancyhdr}
\usepackage{rotating}
\usepackage{enumitem}
\usepackage{graphicx}
\fancyhf{}
\fancyhead[LE]{\leftmark}
\fancyhead[RO]{\nouppercase{\rightmark}}
\fancyfoot[LE,RO]{\thepage}
\pagestyle{fancy}
\usepackage[table “” not found /]

{xcolor}
\begin{document}
\tableofcontents
\chapter{\textsf{Document typesetting with LaTeX and TeXstudio}}
In this chapter we will study the document formatting, page layout, lists, and tables.
\section{First LaTeX document}
LaTeX creates beautiful, high-quality documents with outstanding typography that are well suited for scientific and technical projects.
\section{Formatting}
The best way to learn about open source software,
is through FossLinux.

The best Linux operating system is Fedora.

\section{\textsf{Example III: Switching fonts}}
The best place to learn Free and open source software is FOSSLinux.
Its address is \texttt{https://fosslinux.com}.
\section{Special characters
\protect\footnote{to fill the page}}
Hyphens and dashes
pp. 140 -- 158
Wait --- take this!

"Smart quotes" look bad
‘‘A ‘feisty’ dog’’

Master typesetting % Here

This is ugly...
Much better\dots
\{ \} \% $ \& \_ \#

\footnote{serving as a placeholder} will follow.
\subsection{\textsf{Creating lists}}
\begin{itemize}[noitemsep]
\item [$\diamond$] Linux operating systems
\begin{itemize}
\item [$\ast$] Debian
\item [$\ast$] Fedora
\begin{itemize}
\item [$\circ$] Fedora Linux 33
\item [$\circ$] Fedora Linux 34
\begin{itemize}
\item [$\bullet$] 2021-04-28
\item [$\bullet$] 2021-02-23
\end{itemize}
\end{itemize}
\end{itemize}
\item [–] Ubuntu
\item [$-$] Zorin
\end{itemize}
\begin{enumerate}[noitemsep]
\item Linux operating systems
\begin{enumerate}[label=\Alph*.]
\item Debian
\item Fedora
\begin{enumerate}
\item Fedora Linux 33
\item Fedora Linux 34
\begin{enumerate}
\item 2021-04-28
\item 2021-02-23
\end{enumerate}
\end{enumerate}
\end{enumerate}
\item Ubuntu
\item Zorin
\end{enumerate}
\begin{description} \itemsep5.75pt
\item[Fedora] Freedom Friends
\item[Ubuntu] Ubuntu 21 is now available
\end{description}
\subsection{Example VIII: Tabular table}
\rowcolors{2}{green}{blue!20}
\begin{tabular}{*{3}{|l|}}
\hline
\textbf {Linux operating systems} & \textbf {Release date} \\ \hline
Fedora Workstation 34 &2021-04-20 \\ \hline
Ubuntu 21.04 & 2021-04-22 \\ \hline
Fedora Workstation 33 &2020-10-27 \\ \hline
Ubuntu 20 & 2020-04-23 \\ \hline
{MultiRow} &Fedora 8 \\ &Werewolf \\ \hline
\end{tabular}
\subsubsection{Multicolumn}
\begin{tabular}{|l|l|l|}\hline
Linux OS &Codename &Date \\ \hline
Fedora 33 & ??? &2020 \\ \hline
\multicolumn{3}{|c|}{Mulit-Column} \\ \hline
\end{tabular}
\subsection{Long Text}
\begin{tabular}{|l|m{9cm}|} \hline
\rowcolor{yellow}\textsc{\color{black}Summary} &Description \\ \hline
\rowcolor{yellow}\textsc{\color{blue}Test} &\blindtext \\ \hline
&\begin{itemize}[noitemsep]
\item CentOS
\item Debian
\item Arch
\end{itemize}
\end{tabular}\vspace{3mm}
\blindtext[2]
\subsection{Example IX: Inserting graphics}
\begin{figure}[ht]
\center
\includegraphics{grisbi-logo_t.png}
\caption{Grisbi logo}
\label{fig:grisbi_logo}
\end{figure}
\end{document}
Additional online resources
If you would like to learn more, the following resources are available for learning and mastering LaTeX.
- The LaTeX Wikibooks include basic and advanced information about LaTeX.
- TeX Stack Exchange is a question-and-answer site about TEX, LaTeX, and friends. The users are pros and can answer any question you have.
- The Comprehensive TEX Archive Network (CTAN) houses over 4500 packages and their documentation.
まとめ
That brings us to the end of document typesetting with LaTeX and TeXstudio on Fedora – Part 1. The article covers an introduction to the LaTeX typesetting system, formatting, fonts, creating lists, tables, designing pages, and inserting graphics into documents. I have used plenty of examples (book.tex) that are simple to follow.
The second part of the article, document typesetting with LaTeX and TeXstudio on Fedora – Part 2 has plenty of awesome typesetting tricks to learn. It will cover Math formulas, listing content and references, cross-referencing, troubleshooting errors, and how to enhance your document with hyperlinks and bookmarks.
Get typesetting, will you!