
以前の記事では、Nagios 3.0 ジャンプスタート ガイドと、リモート Linux ホストを監視する方法について説明しました。ナギオス3.0。この記事では、nagios監視サーバーを使用して、リモートのWindowsマシンとWindowsサーバーで実行されているさまざまなサービスを監視する方法について説明します.この記事では、次の 3 つのセクションについて説明します。
I.概要
Ⅱ.リモートWindowsホストにnagiosをインストールする4つのステップ
III. nagios監視サーバーでの6つの設定手順
<オール>
I.概要
.
(nagios サーバーにインストールされた) Nagios がリモート Windows ホスト上のサービス (ディスク容量の使用状況など) を監視する場合、以下の 3 つのステップが非常に高いレベルで行われます。
次のフローは、上記の説明をまとめたものです:
Nagios サーバー (check_nt) —–> リモート ホスト (NSClient++) —–> USEDDISKSPACE
Nagios サーバー (check_nt) <—– リモート ホスト (NSClient++) <—– USEDDISKSPACE (ディスク使用量を返します)
II.リモート Windows ホストで Nagios をセットアップするための 4 つのステップ
.
1.リモート Windows サーバーに NSClient++ をインストールします
NSClient++ プロジェクトから NSCP 0.3.1 (NSClient++-Win32-0.3.1.msi) をダウンロードします。 NSClient++ は、Nagios による Windows サービスのパフォーマンス メトリックの収集を可能にするオープン ソースの Windows サービスです。インストールを完了するには、次の 5 つの NSClient++ インストール手順を実行します。
(1) NSClient++ ようこそ画面
(2) 使用許諾画面
(3) インストールのオプションと場所を選択 .デフォルトのオプションを使用して、[次へ] をクリックします。
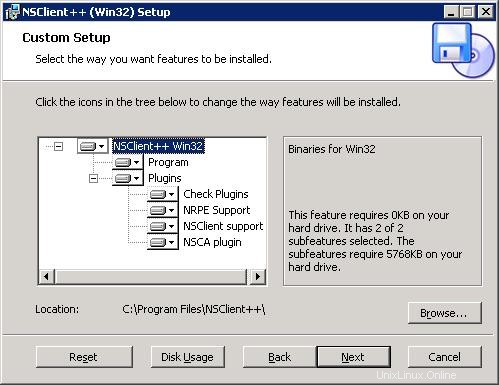
(4) インストール準備完了画面 . [インストール] をクリックして開始します。
(5)インストール完了画面 .
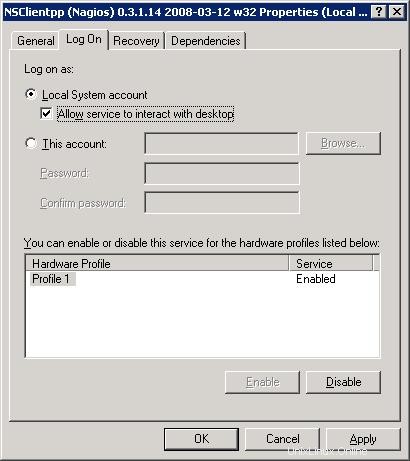
2. NSClient++ サービスを変更する
[コントロール パネル] -> [管理ツール] -> [サービス] に移動します。以下に示すように、「NSClientpp (Nagios) 0.3.1.14 2008-03-12 w32」サービスをダブルクリックし、「デスクトップとの対話をサービスに許可する」というチェックボックスを選択します。
3. NSC.ini を変更
(1) NSC.ini を変更し、*.dll のコメントを外します: C:\Program Files\NSClient++\NSC.ini ファイルを編集し、RemoteConfiguration.dll と CheckWMI.dll を除く [modules] の下のすべてのコメントを外します
[modules]
;# NSCLIENT++ MODULES
;# A list with DLLs to load at startup.
;  You will need to enable some of these for NSClient++ to work.
; ! ! ! ! ! ! ! ! ! ! ! ! ! ! ! ! ! ! ! ! ! ! ! ! ! ! ! ! ! ! ! ! !
; *                                                               *
; * N O T I C E ! ! ! - Y O U   H A V E   T O   E D I T   T H I S *
; *                                                               *
; ! ! ! ! ! ! ! ! ! ! ! ! ! ! ! ! ! ! ! ! ! ! ! ! ! ! ! ! ! ! ! ! !
FileLogger.dll
CheckSystem.dll
CheckDisk.dll
NSClientListener.dll
NRPEListener.dll
SysTray.dll
CheckEventLog.dll
CheckHelpers.dll
;CheckWMI.dll
;
; RemoteConfiguration IS AN EXTREM EARLY IDEA SO DONT USE FOR PRODUCTION ENVIROMNEMTS!
;RemoteConfiguration.dll
; NSCA Agent is a new beta module use with care!
NSCAAgent.dll
; LUA script module used to write your own "check deamon" (sort of) early beta.
LUAScript.dll
; Script to check external scripts and/or internal aliases, early beta.
CheckExternalScripts.dll
; Check other hosts through NRPE extreme beta and probably a bit dangerous! :)
NRPEClient.dll
(2) NSC.ini を変更し、allowed_hosts のコメントを外します。 C:\Program Files\NSClient++\NSC.ini ファイルを編集し、設定の下にある allowed_host のコメントを外して、nagios サーバーの IP アドレスを追加します。
;# ALLOWED HOST ADDRESSES
;  This is a comma-delimited list of IP address of hosts that are allowed to talk to the all daemons.
;  If leave this blank anyone can access the deamon remotly (NSClient still requires a valid password).
;  The syntax is host or ip/mask so 192.168.0.0/24 will allow anyone on that subnet access
allowed_hosts=192.168.1.2/255.255.255.0
注: allowed_host は [Settings]、[NSClient]、および [NRPE] セクションにあります。この目的のために、[Settings] の下にある allowed_host を必ず変更してください。
(3) NSC.ini を修正し、ポートのコメントを外します。 C:\Program Files\NSClient++\NSC.ini ファイルを編集し、[NSClient] セクションのポート番号のコメントを外します
;# NSCLIENT PORT NUMBER
;  This is the port the NSClientListener.dll will listen to.
port=12489
(4) NSC.ini を修正し、パスワードを指定します。 また、nagios サーバーが NSClient++ エージェントにリモート アクセスするために使用する必要があるパスワードを指定することもできます。
[Settings]
;# OBFUSCATED PASSWORD
;  This is the same as the password option but here you can store the password in an obfuscated manner.
;  *NOTICE* obfuscation is *NOT* the same as encryption, someone with access to this file can still figure out the
;  password. Its just a bit harder to do it at first glance.
;obfuscated_password=Jw0KAUUdXlAAUwASDAAB
;
;# PASSWORD
;  This is the password (-s) that is required to access NSClient remotely. If you leave this blank everyone will be able to access the daemon remotly.
password=My2Secure$Password
4. NSClient++ サービスを開始
[コントロール パネル] -> [管理ツール] -> [サービス] -> [NSClientpp (Nagios) 0.3.1.14 2008-03-12 w32] を選択し、[開始] をクリックします (または) [開始] -> [すべてのプログラム] をクリックします。> NSClient++ -> NSClient++ (Win32) を起動します。これにより、NSClient++ が Windows サービスとして開始されることに注意してください。
後で NSC.ini ファイルを変更した場合は、Windows サービスから「NSClientpp (Nagios) 0.3.1.14 2008-03-12 w32」を再起動する必要があります。
III. nagios監視サーバーでの6つの設定手順
.
1. check_nt コマンドと windows-server テンプレートを確認
/usr/local/nagios/etc/objects/commands.cfg で check_nt が有効になっていることを確認します
# 'check_nt' command definition
define command{
command_name    check_nt
command_line    $USER1$/check_nt -H $HOSTADDRESS$ -p 12489 -v $ARG1$ $ARG2$
}
windows-server テンプレートが /usr/local/nagios/etc/objects/templates.cfg で有効になっていることを確認します
# Windows host definition template - This is NOT a real host, just a template!
define host{
name                    windows-server  ; The name of this host template
use                     generic-host    ; Inherit default values from the generic-host template
check_period            24x7            ; By default, Windows servers are monitored round the clock
check_interval          5               ; Actively check the server every 5 minutes
retry_interval          1               ; Schedule host check retries at 1 minute intervals
max_check_attempts      10              ; Check each server 10 times (max)
check_command           check-host-alive        ; Default command to check if servers are "alive"
notification_period     24x7            ; Send notification out at any time - day or night
notification_interval   30              ; Resend notifications every 30 minutes
notification_options    d,r             ; Only send notifications for specific host states
contact_groups          admins          ; Notifications get sent to the admins by default
hostgroups              windows-servers ; Host groups that Windows servers should be a member of
register                0               ; DONT REGISTER THIS - ITS JUST A TEMPLATE
}
2. /usr/local/nagios/etc/nagios.cfg の windows.cfg のコメントを外します
# Definitions for monitoring a Windows machine
cfg_file=/usr/local/nagios/etc/objects/windows.cfg
3. /usr/local/nagios/etc/objects/windows.cfg を変更
デフォルトでは、windows.cfg の下に Windows サーバーのサンプル ホスト定義が提供されます。これを変更して、nagios で監視する必要がある適切な Windows サーバーを反映させます。
# Define a host for the Windows machine we'll be monitoring
# Change the host_name, alias, and address to fit your situation

define host{
use             windows-server              ; Inherit default values from a template
host_name   remote-windows-host      ; The name we're giving to this host
alias            Remote Windows Host     ; A longer name associated with the host
address       192.168.1.4                   ; IP address of the remote windows host
}
4.監視する必要がある Windows サービスを定義します。
以下は、サンプルの windows.cfg で既に有効になっているデフォルトの Windows サービスです。上記の手順で定義した host_name を反映するように、これらのサービスの host_name を更新してください。
define service{
use                     generic-service
host_name               remote-windows-host
service_description     NSClient++ Version
check_command           check_nt!CLIENTVERSION
}
define service{
use                     generic-service
host_name               remote-windows-host
service_description     Uptime
check_command           check_nt!UPTIME
}
define service{
use                     generic-service
host_name               remote-windows-host
service_description     CPU Load
check_command           check_nt!CPULOAD!-l 5,80,90
}
define service{
use                     generic-service
host_name               remote-windows-host
service_description     Memory Usage
check_command           check_nt!MEMUSE!-w 80 -c 90
}
define service{
use                     generic-service
host_name               remote-windows-host
service_description     C:\ Drive Space
check_command           check_nt!USEDDISKSPACE!-l c -w 80 -c 90
}
define service{
use                     generic-service
host_name               remote-windows-host
service_description     W3SVC
check_command           check_nt!SERVICESTATE!-d SHOWALL -l W3SVC
}
define service{
use                     generic-service
host_name               remote-windows-host
service_description     Explorer
check_command           check_nt!PROCSTATE!-d SHOWALL -l Explorer.exe
}
5.パスワード保護を有効にする
Windows マシンの NSClient++ 構成ファイルの NSC.ini ファイルでパスワードを指定した場合は、check_nt コマンド定義を変更してパスワードを含める必要があります。 /usr/local/nagios/etc/commands.cfg ファイルを変更し、以下に示すようにパスワードを追加します。
define command{
command_name	check_nt
command_line	$USER1$/check_nt -H $HOSTADDRESS$ -p 12489 -s My2Secure$Password -v $ARG1$ $ARG2$
}
6.構成を確認し、Nagios を再起動します。
以下に示すように、nagios 構成ファイルを確認します。
[nagios-server]# /usr/local/nagios/bin/nagios -v /usr/local/nagios/etc/nagios.cfg

Total Warnings: 0
Total Errors:   0

Things look okay - No serious problems were detected during the pre-flight check
以下に示すように、nagios を再起動します。
[nagios-server]# /etc/rc.d/init.d/nagios stop
Stopping nagios: .done.

[nagios-server]# /etc/rc.d/init.d/nagios start
Starting nagios: done.
以下に示すように、リモート Windows ホストで実行されているさまざまなサービスのステータスを Nagios Web UI (http://nagios-server/nagios) から確認します。

ベスト Nagios ブック
 Nagios Core 3 eBook – Nagios を数年間使用しており、夜は安らかに眠ることができます。 Nagios がすべてのシステムを監視しており、重大な問題が発生する前に潜在的な問題について警告します。 Nagios について詳しく理解するには、Nagios Core 3 電子ブックを読むことを強くお勧めします。 Nagios はフリー ソフトウェアであるため、この本に数ドルを費やすことが、あなたができる最高の投資になる可能性があります。
すばらしい Nagios の記事
以下は素晴らしい Nagios の記事です。
- Nagios 3 を使用してリモート Linux ホストを監視する方法
- Nagios を使用してネットワーク スイッチとポートを監視する方法
- Linux 用 Nagios 3 ジャンプスタート ガイド – 概要、インストール、構成