ファイルの検索に行き詰まり、どこに保存したか、ましてやファイル名自体を思い出せなかった経験はありませんか? Linux では、Bash find コマンドは、システムを精査してそのファイルを見つけるのに役立ちます。
バッシュ find コマンドは、ファイルとディレクトリを検索する多くの方法を提供します。このチュートリアルでは、Bash find を使用して、ファイルの最終アクセス、パーミッションなどを使用してファイルやディレクトリを検索する方法を学習します。 指図。始めましょう!
前提条件
このチュートリアルのさまざまなデモを実行する場合は、次のものを用意してください:
- Linux PC – このチュートリアルでは Ubuntu 20.04 を使用していますが、どの Linux ディストリビューションでも動作するはずです。
findutility – Bash find ユーティリティは、すべての Linux ディストリビューションに既に存在している必要があります。このチュートリアルでは v4.7.0 を使用しています。
Bash find コマンド 101
ファイルを見つけるには、いくつかの基準が必要です。ファイル名の一部、ファイルの種類、ファイルのパーミッションなど。 find コマンドを使用すると、これらの基準を定義して、検索したいファイルを正確に絞り込むことができます。 find コマンドは、シンボリック リンク (symlink) も検索または検索します。シンボリック リンクは、コンピューター上の別のファイルまたはフォルダーを指す Linux ショートカット ファイルです。最初に、Bash find を使用する最も基本的な方法について説明しましょう。 コマンド。
ホーム ディレクトリで、snap という名前のディレクトリを探している可能性があります。 およびその下のすべてのファイルとサブディレクトリ。その場合、 find を実行します コマンド、その後にディレクトリ名 ("snap" )、それだけです!
以下に他のコマンド ライン引数がないため、snap 内で再帰的に見つかったファイルとディレクトリのリストを確認できます。 ディレクトリ。
find "snap"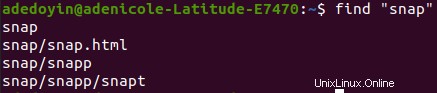
nameを指定しない場合 パラメータ、find最初の引数がname用であると仮定します パラメータ、例:find "snap"find -name "snapと同じです .」
テスト (別名フィルター) によるファイルの検索
find の最も基本的な形式を見てきました コマンドとその仕組み。しかし、より具体的な基準を定義するために、検索を少し絞り込みたいと思うかもしれません。その場合は、テストを適用する必要があります。テストは、find に提供する基準です。 コマンド。
テストは find を伝えます コマンドを使用して、さまざまな基準に基づいて出力をフィルタリングします。
ファイルまたはディレクトリ名によるファイルの検索
おそらく、大文字と小文字を区別しない方法で、ファイルの名前がどのように始まるかを覚えているだけでしょう。その場合、ワイルドカードを使用して結果を絞り込むことができます。
# Find files and directories with names starting with 'snap'
find -name "snap*"

# Find files and directories with names starting with 'snap'
# in case insensitive manner (For example:'Snap', 'snap', 'SNaP', etc.)
find -iname "snap*"
ファイル タイプによるファイルとディレクトリの検索
-name のように テスト、-type test は、ファイルとディレクトリを見つけるもう 1 つの効率的な方法です。 -type テストでは、find の結果をフィルタリングできます ファイルまたはディレクトリによるコマンド。
# Find a file named 'snap'
find "snap" -type f
# Find a directory named 'snap'
find "snap" -type d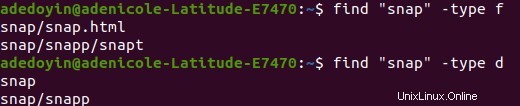
ファイル検索をさらに絞り込むには、 -name を組み合わせます と -type 以下のコマンドを実行してテストします。
find 以下のコマンドは、ディレクトリのみを検索します (-type d ) 名前付き (-name ) snap で始まる .
find -name "snap*" -type d
テストと演算子によるファイルとディレクトリの検索
find の基本を学んだので、 コマンドをテストと組み合わせて、ファイル検索をワンランク上に引き上げる時が来ました。名前やファイルの種類など、複数の条件に一致するファイルまたはディレクトリを検索する必要がある場合があります。その場合、条件を組み合わせる必要があります。
ファイルを検索するために複数の条件を追加する必要がある場合は、条件と演算子を組み合わせることができます。演算子は、条件を組み合わせてより複雑なテスト/フィルターを形成できるようにする要素です。
2 つの条件を -and で組み合わせる オペレーター
おそらく、特定の名前に一致するファイルまたはディレクトリを検索する必要がある場合がありますおよび タイプ。これを行うには、 -and を使用できます オペレーター。 -and 演算子を使用すると、2 つ以上の式を組み合わせて、find コマンドが true 値を返す場合にのみ結果を出力できます。式は、ファイルを名前 (-name "snap" ).
-and 演算子は 2 つの条件を組み合わせ、次の各コマンドを実行します。
# Find files only (-type f) and (-and) ensure the names (-name) start with snap
# in the current directory and subdirectories.
find -name "snap*" -and -type f

# Find directories only (-type d) and (-and) ensure the names (-name) start with snap
# in the current directory and subdirectories.
find -name "snap*" -and -type d

# Find files only (-type f) and (-and) ensure the names (-name) start with snap
find -name "snap" -and -type f

# Find directories only (-type d) and (-and) ensure the names (-name) start with snap
find -name "snap" -and -type d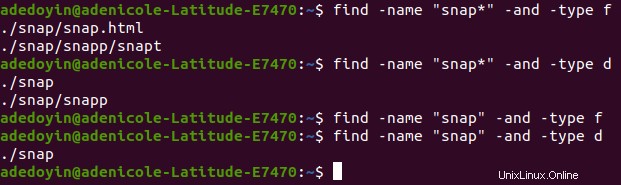
2 つの条件を -or で組み合わせる オペレーター
-and のように 演算子、-or 演算子 (-o ) も 2 つの別々の式を結合します。違いは、find コマンドは、1 つの式だけが true の場合でも結果を出力します。
以下は、2 つの条件を -or で組み合わせる方法の基本的な構文です。 オペレーター。 find コマンドは、expr1 または expr2 のいずれか一方のみが真の値を返す場合でも結果を出力します。
find -or
おそらく、-name を使用してファイル名を検索したいと思うでしょう。 -type を使用した特定の型のパラメータ パラメータ。その場合は、find を実行します 以下のコマンドでファイルを探します (-type f ) 名前付き (-name ) snap で始まる -or chart .
find -name "snap*" -type f -or -name "chart*"
-not でファイルを除外する オペレーター
探しているコンテンツをフィルタリングする最初の 2 つの演算子とは異なり、-not 演算子 (! )逆です。 -not 演算子は、検索結果に表示したくないファイルとディレクトリを除外します。
そうでない名前のファイルだけを見つけたいと思うかもしれません。 特定の名前で開始します。その場合は、次のコマンドを実行します。 find に注意してください 以下のコマンドはファイルのみを検索します (-type f )、名前付き (-name ) しない snap で始まる .
find -not -name "snap*" -type f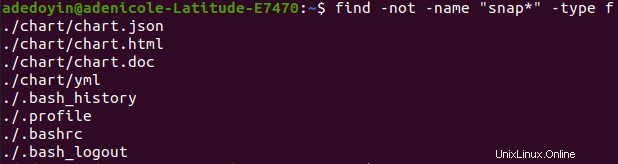
式のグループ化によるファイルの検索
ここまでで、テストと演算子を使用して find をフィルタリングする方法を学びました。 コマンドの結果。しかし、ターゲットの結果が少し複雑な場合はどうでしょうか?もしそうなら、グループ化式を調べる必要があります。バッシュ find コマンドを使用すると、2 つ以上の条件「セット」を定義することを意味する式をグループ化できます。
括弧による式のグループ化
異なる名前のファイルまたはディレクトリを検索する必要があるとします。 find を使用すると、すぐにそのタスクが不可能であることに気付くでしょう。 前述のコマンドの基本。解決策として、括弧を使用して式を結合し、1 つの複雑な式を形成する必要があります。
以下の例では、find コマンドはファイルを検索します (-type f ) .html で 拡張子またはディレクトリ (-type d ) chart で始まる名前 .
左括弧と右括弧の両方がバックスラッシュでエスケープされます (
\) 端末が括弧を文字どおりに読み取れるようにします。エスケープ文字はfindを伝えます 文字を文字どおりに扱うコマンド
find \( -name "*.html" -type f \) -or \( -name "chart*" -type d \)
括弧を使用する代わりに、カンマを使用して
find -name "snap*" -type d -delete, -name "chart*" -printのように式をグループ化することもできます .式をコンマでグループ化することは、基本的に、一連のタスクを 1 つのコマンドで実行することです。
親ディレクトリからのファイルの検索
前のすべての例で、Bash find コマンドは、現在の作業ディレクトリとすべてのサブディレクトリからのみファイルを見つけました。しかし、代わりに親ディレクトリから検索を開始する必要があるかもしれません。もしそうなら、-depth を与える オプションショット。 -depth 以下に示すように、パラメータはファイルとディレクトリを深さ優先順にリストします。
find 以下のコマンドは、最初に親ディレクトリから作業ディレクトリまでの内容を一覧表示します (snap ).
find "snap" -depth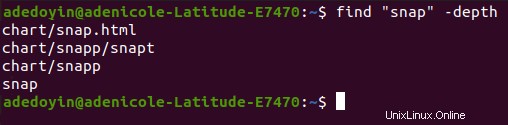
許可によるファイルとディレクトリの検索
名前と種類でフィルター処理されたファイルを検索する代わりに、find コマンドを使用すると、アクセス許可でフィルター処理されたファイルとディレクトリを検索することもできます。 Linux では、すべてのファイルとフォルダーに、所有者、グループ所有者、およびその他のユーザーのアクセス許可が指定されています。 find コマンドを使用すると、これらのアクセス許可を利用して、ファイルとディレクトリの検索結果を -perm でフィルタリングできます。 オプション。
-permでファイルやディレクトリを探す前に オプションを使用するには、読み取り権限について理解する必要があります。アクセス許可は、特定のファイルやディレクトリにアクセスして変更できるユーザーを示します。
シンボリック モードによるファイルの検索
ファイル許可の概念を理解したので、シンボリック モードでファイルを検索してみます。シンボリック モードでは、文字と記号の組み合わせを使用してファイルのアクセス許可を表します。
シンボリック モードでファイルを検索する方法を示すには、次の各コマンドを実行します。
# Find only files (-type f) in the working directory (.)
# with read, write and execute permissions for user, group and others in the current
find . -perm u=rwx,g=rwx,o=rwx -type f

# Find files (-type f) in the working directory (.)
# with any of the read, write and execute permissions (not the exact)
# for user, group and others in the current
find . -perm -u=rwx,g=rwx,o=rwx -type f

# Find files (including hidden files) where either of the user, group or others
# have read, write and execute access to files in the working directory (.)
find . -perm /u=rwx,g=rwx,o=rwx -type f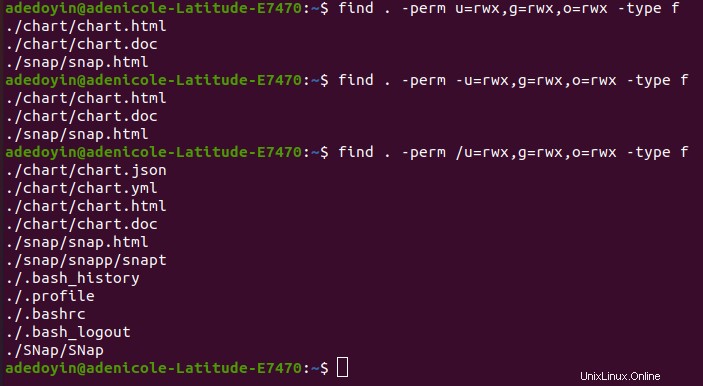
絶対モードによるファイルとディレクトリの検索
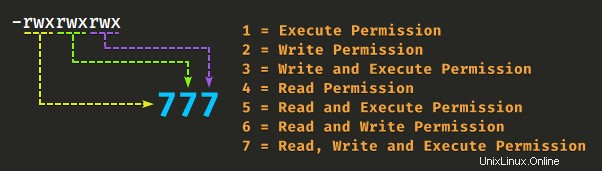
シンボリック モードでファイルを検索したくない場合は、絶対モードに興味をそそられるかもしれません。絶対モードでは、文字を使用するのではなく、8 進数表現で権限を定義します。
以下では、シンボリック モード -rwxrwxrwx を確認できます。 絶対モード 777 と同等 .
ユーザー、グループ、その他に対して読み取り専用のアクセス許可を持つファイルとディレクトリのみを検索したいとします。その場合は、以下の各コマンドを実行して、絶対モードでファイルとディレクトリを検索したときに得られる結果を確認してください。
# Find files and directories only with read-only permission
# for user, group and others in the working directory (.)
find . -perm 444

# Find files and directories only that have least the read-only permission
# for user, group and others in the working directory (.)
find . -perm -444

# Find files and directories only (including hidden files and directories)
# that have least the read-only permission
# for user, group and others in the working directory (.)
find . -perm /444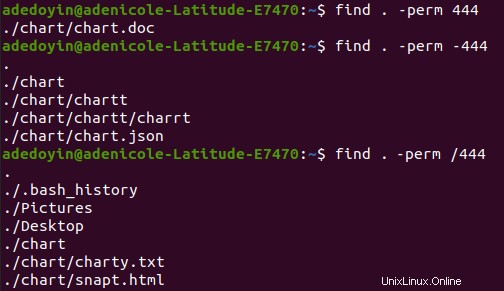
検索結果の出力を -print で変更する パラメータ
検索結果にファイル パスを表示するだけでなく、それらのプロパティも表示したい場合があります。 -print の使用 アクション、出力を find に変更できます コマンドが生成します。
-print パラメータは、find を実行したときのデフォルトの動作です。 ファイルの検索結果をそれぞれ新しい行に出力するコマンド。以下のいずれかのコマンドを find に対して実行します。 snap という名前のファイルとディレクトリ 、同じ結果が得られます。
find -name "snap" -print
find -name "snap"
空白のないファイル名の検索と出力
デフォルトの -print とは異なり パラメータ、-print0 find によって返された検索結果の空白または改行文字を消去できます。 指図。特に grep のような別のコマンドに結果を渡す場合 パターンを検索します。
次のコマンドを使用すると、空白や改行文字を含まないディレクトリを検索して出力できます。
# Find a file or directory named 'snap', print the result
# removing white spaces and newline characters
find -name "snap" -print0
印刷フォーマットによるプロパティ付きファイルの検索と印刷
出力のフォーマットを変更するには、 find コマンドには -printf もあります パラメータ。このパラメーターを使用すると、検索結果がどのように表示されるかを定義するディレクティブまたは「フォーマッター」を作成できます。
おそらく、最後にアクセスされたときのように、ファイルとそのプロパティを見つける必要があります。その場合は、次のコマンドを実行してください。
# Find files only with names starting with 'snap', then print each file
# along with their last-time access properties, full path and filename
# each on a new line
find -name "snap*" -printf "%a %p \n"

# Find files with .html or .json extension
# then print each file owner's username, group name, full path and filename
# each on a new line
find \( -name "*.html" -type f \) -or -name "*.json" -printf "%u %g %p \n"
以下は、-printf と並行して動作するディレクティブのリストです。 アクション:
%a– ファイルが最後にアクセスされた時刻を返します。%b– ファイルに使用されているディスク容量を 512 バイトのブロック単位で返します。%d– ディレクトリ ツリー内のファイルの深さを返します。%g– グループに名前がない場合は、ファイルのグループ名または数値グループ ID を返します。%k– ファイルに使用されているディスク容量を 1K ブロック単位で返します。%m– ファイルの許可ビットを返します (8 進数)。%p– ファイルの正確なファイル名を返します。%s– ファイルのサイズをバイト単位で返します。%t–-ctimeによって返される形式でファイルの最終変更時刻を返します オプション%u– ユーザーに名前がない場合は、ファイル所有者のユーザー名または数値のユーザー ID を返します。
ファイル検索の深さを制限する
おそらく、さらに絞り込み、ディレクトリ内の検索を制限したいでしょう。 -maxdepth を使用する必要があります find のオプション
-maxdepth パラメータは find を伝えます コマンドを使用して、ディレクトリ ツリーの下にある特定の数のサブディレクトリのみに検索範囲を制限します。
# Find files and directories one step down from the working directory
find . -maxdepth 1 -name "chart*"

# Find files and directories two steps down from the ~/chart directory
find ~/chart -maxdepth 2 -name "chart"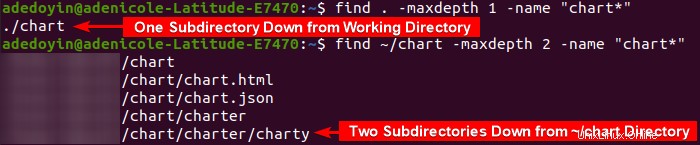
-prune で作業ディレクトリに限定されたファイルを検索する オプション
検索を現在の作業ディレクトリのみに制限し、サブディレクトリには再帰しない必要がある場合は、-prune を確認してください。 パラメータ。
以下のコマンドでは、find します。 という名前のファイルとディレクトリ (-name ) snap で始まらないでください 制限されています (-prune ) 作業ディレクトリ (.) へ ).
snapで始まる名前のファイルとフォルダの検索結果を取得するには 代わりに、-orを削除してください 演算子と-print action、次のように:find . -name "snap*" -prune
find . -name "snap*" -prune -or -print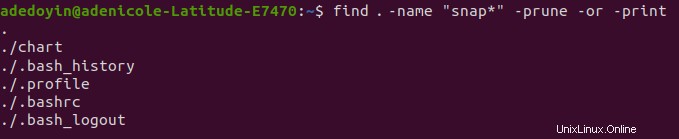
最終アクセスによるファイルとディレクトリの検索
特定のファイルをプルーニングすると、確実に検索結果が絞り込まれます。しかし、探しているファイルについて、最後にそのファイルにアクセスしたときのことしか覚えていない場合はどうでしょうか?幸いなことに、find コマンドを使用すると、前回アクセスしたファイルやディレクトリを検索できます。飛び込みましょう!
ファイルの最終日アクセスによるファイルの検索
ファイルまたはディレクトリに最後にアクセスした日のことをまだ覚えているとしましょう。それから -atime find と組み合わせたオプション 以下に示すように、必要なのはコマンドだけです。ファイルの最終アクセスが指定した値を下回らない場合、find コマンドは偽の値を返し、そのファイルをスキップします。
# Find files and directories you last accessed between 2-3 days ago
find -atime 2
# Find files and directories you last accessed within the past 2 days
find -atime -2
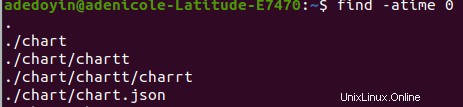
# Find files and directories you last accessed within the past day
find -atime 0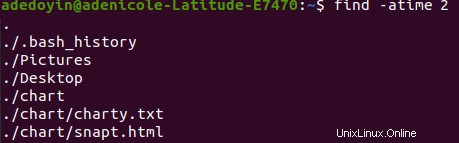

おそらく、ファイルまたはディレクトリの最終アクセス時間も確認したい場合は、
-printfを追加します ディレクティブによるアクション。以下のコマンド ラインでは、findを実行できます。 過去 1 日以内にアクセスされたファイル (-atime 0)。次に-printfアクションは最終アクセス時刻を出力します (%a) ファイルまたはディレクトリとファイル名 (%p)、それぞれ改行 (\n)、以下に示すとおりです。
find -atime 2 -printf "%a %p \n"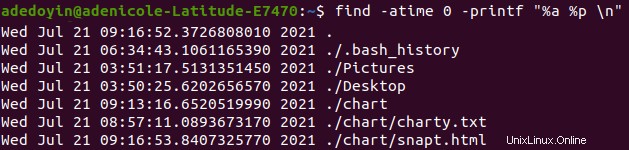
ファイルの直前アクセスによるファイルの検索
分単位でファイルを検索する必要があるとします。 -atimeのように オプション、-amin 機能は同じです。ただし、以下に示すように、指定した値に基づいて最終アクセス時間でフィルター処理されたファイルの検索結果が表示されます。
# Find files and directories accessed within the past 40 minutes
# Not ideal most of the time as you will get result of tons of files and directories
find -amin 40

# Find directories accessed within the past 40 minutes
find -name "snap*" -type d -amin -40

# Find files accessed within the past 40 minutes
find -name "snap*" -type f -amin -40
Last Time Change によるファイルとディレクトリの検索
前回のアクセスでファイルまたはディレクトリを検索すると、大量の結果が出力される可能性があり、ファイル名が似ていると混乱する可能性があります。検索結果をさらに絞り込むには、 -ctime を使用します 代わりにオプション。 -ctime オプションは、指定された値に基づいてファイルまたはディレクトリに最後に変更を加えた日時 (過去数日以内) で検索結果をフィルタリングします。
おそらく、2 日前に変更したファイルを見つけたいと思うでしょう。その場合は、以下のサンプル コマンドを実行してください。
# Find files and directories you modifed in the past two days
find -ctime -2

# Find files and directories with names starting with 'snap'
# which you modifed in the past two days
find -name "snap*" -ctime -2
ファイルまたはディレクトリを検索した後のコマンドの実行
find コマンドは、ファイルやディレクトリを見つけるだけではありません。 -exec を使用して検索結果を表示した直後にコマンドを実行することもできます パラメータ。この機能は、たとえば、ファイルをテキスト エディターで開いたり、見つかったファイルやディレクトリを削除したりする場合に最適です。
必ずセミコロンをエスケープしてください (
;) バックスラッシュ付き (\) 解釈されないようにします。
# Find a file named 'snap.doc' then open the file in vi editor
find -name "snap.doc" -exec vi {} \;

# Find a file named 'snap.doc' then remove the file
find -name "snap.doc" -exec rm {} \;
-delete によるファイルとディレクトリの削除 アクション
find コマンドは、これまでに学んだようにファイルを見つけるだけではありません。 find コマンドには、ファイルが見つかったら自動的に削除するオプションもあります。おそらく、特定の名前または特定のパターンに一致する空のファイルまたはディレクトリを削除する必要があります。次に find -delete のコマンド アクションは間違いなく役に立ちます。
-delete でファイルとディレクトリを削除するデモを行うには アクション、最初にディレクトリとファイルを作成します。以下のコマンド ラインでは、(mkdir を作成できます) ) (thanos という名前のディレクトリ )、次に snap という名前のファイル thanos の中 ディレクトリ。
mkdir thanos
touch thanos/snap
-delete アクションは空のディレクトリのみを削除します。 thanos を削除しようとすると 以下のコマンド ラインでディレクトリを検索すると、find:cannot delete 'thanos':Directory not empty. というメッセージが表示されます。
単一のファイルを削除するには (
snap)、-typeを指定します。 次のように、find コマンドを実行したときにテストします:find "snap" -type f -delete
# Find a directory named 'thanos', then delete the directory
# This command fails since the 'thanos' directory is not empty
find "thanos" -type d -delete

# Find a file named 'thanos.snap', then delete the file
find "thanos.snap" -type f -delete
~/thanos を削除するには ディレクトリ、-depth を適用 以下に示すように、オプション。 find コマンドは thanos を検索します ディレクトリを削除し、再帰的に削除します (-delete ) ~/thanos の内容 ディレクトリを削除し、ディレクトリ自体を削除してください。
find "thanos" -depth -delete結論
この記事の目的は、Bash の find コマンドを使用してファイルを検索したり、ファイルのプロパティを取得したり、特定の形式の出力を変更したりする方法について、さまざまな方法を説明することです。以前は、失われたファイルを見つけるのは、途中で障害に満ちていました。しかし今では、障害物を飛び越えてフィニッシュ ラインに直行できます。これは不正行為と見なされますか?
どのような方法でファイルを見つけようとしたとしても、その経験はきっと満足のいくものです!では、どのテスト、アクション、またはオプションが最も興味深いと思いましたか?