
検証およびテスト済み2021年2月27日
はじめに
このハウツー記事では、Postfixを使用してUbuntu20.04で完全なメールサーバーを構築する方法について説明します。 Linuxメールサーバーをゼロから構築することは、毎日それを行わない限り、骨の折れるプロセスになる可能性がありますが、できる限り苦痛を伴わずにそれを行う方法を紹介します。
メールサーバーは通常、SMTP、POP3 / IMAP、メールの保存、およびスパム関連のタスクを処理するさまざまなパッケージで構成されており、それらはすべて相互に通信する必要があります。このハウツー記事のパッケージと目標の概要は次のとおりです。
パッケージと構成手順の概要
1 –基本的なサーバーの準備
2 –LAMPWebサーバーを構築する
3–PHPを構成する
4 –Apache2を構成する
5 –Memcachedをインストールして構成する
6 –インストールするメールサーバーパッケージ
7–メールサーバー用のMySQLデータベースの作成
8.1 –Postfix管理者のインストール
8.2 –Postfix管理者の設定
9 – Postfixへのユーザーアカウント(メールボックス)の追加管理者
10–仮想メールディレクトリを処理するシステムユーザーを作成します
11 –Dovecotの構成
12 –スパムおよびアンチウイルスフィルターの構成
13 –Postfixの構成
14 –リバースDNSルックアップ
15 –RoundCubeWebmailをインストールする
前提条件
–Atlantic.netのLinuxVPSホスティングのようなサーバーでUbuntuサーバーを実行していない場合は、完全に更新されたUbuntu20.04サーバー。
–メールを設定するドメイン名へのアクセス(「 email.linuxbuz.com 」を使用します) この記事の例の」。
。
1 –基本的なサーバーの準備
Ubuntuの基本インストールには限られたパッケージのセットが付属しているため、最初に実行したいのは、すべてのタスクを完了するために使用するツールをインストールすることです。
まず、rootユーザーアカウントとしてログインしていることを確認してください。
sudo su -
それでは、基本的なツールをインストールして、ファイルをダウンロードしたり、構成ファイルを簡単に編集したりできるようにしましょう。
apt-get install wget nano ssl-cert
- wget :最も広く使用されているインターネットプロトコルであるHTTP、HTTPS、FTPを使用してファイルを取得するためのパッケージ。
- ナノ :使いやすいコントロールを備えたコマンドラインテキストエディタ。
- ssl-cert :SSL証明書を作成する機能を有効にするパッケージ。
次に、サーバーのホスト名とドメイン名を更新して、メールを送信するときに、ホスティングプロバイダーで設定したリバースポインターDNSレコードと一致するようにします。 /etc/hostnameも更新します ファイル。例を実際のホスト名とドメイン名に置き換えてください。
hostnamectl set-hostname email.linuxbuz.com
次に、/etc/hostsを手動で編集します。 入力した名前と一致するように構成ファイルを作成します。
nano /etc/hosts
最初の行を編集し、127.0.0.1 IPアドレスの直後にFQDN(完全修飾ドメイン名)を追加します。
127.0.0.1 email.linuxbuz.com localhost
次に、サーバーのデフォルトのSSL証明書を更新して、新しいホスト名と一致するようにします。メールサーバー用のSSL証明書を購入した場合は、この手順をスキップできます。
make-ssl-cert generate-default-snakeoil --force-overwrite
このコマンドは、デフォルトのシステムSSL証明書を再生成し、元のCRTファイルとKEYファイルを強制的に上書きするようにサーバーに指示します。
これで基本的なサーバーの準備が完了し、Webサーバーサービスのインストールに進むことができます。
[トップに戻る]
2 –LAMPWebサーバーを構築する
このステップでは、「LAMP」パッケージをインストールします。 LAMPは、Linux、Apache、MySQL、およびPHPの略です。これらのパッケージを組み合わせると、サーバーはMySQL接続を備えた動的なWebサービスを提供できるようになります。
まず、パッケージをインストールしましょう。これは、タスクパッケージのインストールと呼ばれます。
apt-get install lamp-server^
このグループインストールに含まれるパッケージのリストを表示するには、次のコマンドを実行できます。
tasksel --task-packages lamp-server
すべてのパッケージがインストールされたら、いくつかの追加のPHPモジュールをインストールする準備が整います。これらの追加モジュールにより、サーバーはPHP 5、memcached、cURL、XMLパーサー、およびGD画像処理用のAPCユーザーキャッシュをサポートできるようになります。
apt-get install php-apcu php-memcache php-curl php-mbstring php-gd php-xml php-imap php-xmlrpc libdbi-perl libdbd-mysql-perl -y
次に、MySQLルートパスワードを設定し、MySQLインストールを保護する必要があります。次のコマンドで実行できます:
mysql_secure_installation
以下に示すように、すべての質問に答えてください。
New password:
Re-enter new password:
Do you wish to continue with the password provided?(Press y|Y for Yes, any other key for No) : Y
Remove anonymous users? (Press y|Y for Yes, any other key for No) : Y
Disallow root login remotely? (Press y|Y for Yes, any other key for No) : Y
Reload privilege tables now? (Press y|Y for Yes, any other key for No) : Y
次に、MySQLにログインし、パスワードポリシーを低に変更します。
mysql -u root -p
SET GLOBAL validate_password.policy = 0;
FLUSH PRIVILEGES;
EXIT;
[トップに戻る]
3 –PHPの構成
PHPの構成を更新します。ほとんどのシステムでは、通常、デフォルト構成で十分です。ただし、PHPが潜在的な攻撃者に情報を公開しないようにする必要があります。ファイル/etc/php/7.4/apache2/php.iniを編集します 。
nano /etc/php/7.4/apache2/php.ini
変数expose_phpを見つけます Onから値を更新します Off 。 nanoでは、CTRL-Wを押して検索できます 次に検索語を入力します。
367  ;;;;;;;;;;;;;;;;;
368  ; Miscellaneous ;
369  ;;;;;;;;;;;;;;;;;
370
371  ; Decides whether PHP may expose the fact that it is installed on the server
372  ; (e.g. by adding its signature to the Web server header).  It is no security
373  ; threat in any way, but it makes it possible to determine whether you use PHP
374  ; on your server or not.
375  ; http://php.net/expose-php
376  expose_php = Off
377
[トップに戻る]
4 –Apache2を構成する
これで、ApacheWebサービスの構成のカスタマイズに進む準備ができました。 Apacheの最終結果は、Webメール(RoundCube)とPostfixAdminという2つの実行中のWebアプリケーションを備えた単一のWebサイトにサービスを提供することです。すべてのトラフィックはHTTPS(セキュリティで保護された)Webサービスに転送されます。
まず、Apacheが公開する情報を最小限に抑えます。 nanoを使用して、構成ファイル/etc/apache2/conf-available/security.confを編集します。 。
nano /etc/apache2/conf-available/security.conf
構成変数ServerTokensを検索します OSから値を設定します Prodへ 。
# ServerTokens
# This directive configures what you return as the Server HTTP response
# Header. The default is 'Full' which sends information about the OS-Type
# and compiled in modules.
# Set to one of:  Full | OS | Minimal | Minor | Major | Prod
# where Full conveys the most information, and Prod the least.
#ServerTokens Minimal
ServerTokens Prod
#ServerTokens Full
次に、構成変数ServerSignatureを検索します Onから値を設定します Off 。
# Optionally add a line containing the server version and virtual host
# name to server-generated pages (internal error documents, FTP directory
# listings, mod_status and mod_info output etc., but not CGI generated
# documents or custom error documents).
# Set to "EMail" to also include a mailto: link to the ServerAdmin.
# Set to one of:  On | Off | EMail
ServerSignature Off
#ServerSignature On
これで、この構成ファイルを保存して終了できます。
次に、追加のモジュールrewriteを有効にします。 およびssl Apacheで、デフォルトのHTTPトラフィックをHTTPSポートにリダイレクトし、Apache内でSSL証明書をサポートできるようにします。
a2enmod rewrite ssl
a2ensite default-ssl
現在、Webサイトの構成をカスタマイズしています。これらのファイルは、ディレクトリ/etc/apache2/sites-availableにあります。 。 SSLサービスをサポートするために既存のデフォルト構成ファイルを更新します。
まず、構成ファイル000-default.confを編集します 。 ServerNameを置き換えるだけで、既存の構成を以下に置き換えることができます ホスト名の変数。
nano /etc/apache2/sites-available/000-default.conf
<VirtualHost *:80>
        # The ServerName directive sets the request scheme, hostname and port that
        # the server uses to identify itself. This is used when creating
        # redirection URLs. In the context of virtual hosts, the ServerName
        # specifies what hostname must appear in the request's Host: header to
        # match this virtual host. For the default virtual host (this file) this
        # value is not decisive as it is used as a last resort host regardless.
        # However, you must set it for any further virtual host explicitly.
        ServerName email.linuxbuz.com

        DocumentRoot /var/www/html

        <Directory "/var/www/html">
           Options FollowSymLinks
           AllowOverride All
        </Directory>

        # Available loglevels: trace8, ..., trace1, debug, info, notice, warn,
        # error, crit, alert, emerg.
        # It is also possible to configure the loglevel for particular
        # modules, e.g.
        LogLevel info ssl:warn

        ErrorLog ${APACHE_LOG_DIR}/error.log
        CustomLog ${APACHE_LOG_DIR}/access.log combined

        # For most configuration files from conf-available/, which are
        # enabled or disabled at a global level, it is possible to
        # include a line for only one particular virtual host. For example the
        # following line enables the CGI configuration for this host only
        # after it has been globally disabled with "a2disconf".
        #Include conf-available/serve-cgi-bin.conf
</VirtualHost>
これで、この構成ファイルを保存して終了できます。
独自のSSL証明書を購入していない場合は、システムのデフォルトのSSL構成ファイルdefault-ssl.conf 私たちのニーズに対応します。ただし、カスタムSSL証明書を購入した場合は、構成ファイルを編集し、変数SSLCertificateFileを更新する必要があります。 、SSLCertificateKeyFile およびSSLCertificateChainFile 証明書とキーファイルを保存した場所を指すようにします(追加の構成支援については、認証局またはベンダーに相談してください)。
次に、.htaccessを作成します。 Webサーバーへの訪問者にHTTPS(SSL)プロトコルの使用を強制する構成ファイル。
nano /var/www/html/.htaccess
次の変数をコピーして.htaccessに貼り付けます 構成。
RewriteEngine On
RewriteCond %{SERVER_PORT} 80
RewriteRule ^(.*) https://%{HTTP_HOST}/$1 [L]
これらの構成変数は、Apacheにmod_rewriteエンジンを有効にしてから、HTTP(ポート80)の訪問者をHTTPS(ポート443)URLにリダイレクトするように指示します。
[トップに戻る]
5 –Memcachedのインストールと構成
Memcachedは、高性能の分散メモリオブジェクトキャッシングシステムです。このパッケージは、RoundCubeやPostfixWebadminなどの動的Webアプリケーションを高速化するのに役立ちます。
まず、apt-getを使用してパッケージをインストールしましょう。
apt-get install memcached
小規模なシステムの場合、通常はデフォルト構成で十分です。ローカルホストへのアクセスをロックダウンし、十分なメモリ割り当て値を提供します。ただし、使用率が高くなる可能性のある大規模なサーバーを構築している場合は、メモリ割り当て値をデフォルトの64Mよりも高く変更することをお勧めします。
memcached構成ファイルは、/etc/memcached.confにあります。 。
[トップに戻る]
6 –メールサーバーパッケージをインストールする
これで、メールサーバーパッケージをインストールする準備が整いました。繰り返しますが、これらはtaskselにあります パッケージグループ。
apt-get install mail-server^
このグループインストールに含まれるパッケージのリストを表示するには、次のコマンドを実行できます。
tasksel --task-packages mail-server
パッケージのインストール中に、Postfixは一連の質問をします:
- インストール構成タイプ—
「インターネットサイト」を選択します 」を構成タイプとして使用します。 - メールサーバーのホスト名—
必ず手順1で使用したものと同じホスト名(FQDN)を入力してください - 自己署名SSL証明書を作成する—
[はい]オプションを選択します - SSL証明書の共通名を設定する—
手順1で使用したものと同じホスト名(FQDN)を入力します
次に、メールサーバーがMySQLベースのユーザーをサポートするために必要な残りのパッケージと、スパムおよびアンチウイルス検出パッケージをインストールします。 (注:これらのパッケージは、単一のapt-get installを介してインストールできます。 コマンド。各パッケージ名はスペースで区切られていますが、読みやすくするために、ここでは個別のコマンドとして示されています。)
apt-get install postfix-mysql dovecot-mysql dovecot-imapd postgrey
apt-get install amavis clamav clamav-daemon spamassassin
apt-get install php-imap
この次のオプションパッケージのセットは、メールサーバーに入ってくる添付ファイルの検査を強化することにより、スパム対策およびウイルス対策検出パッケージの機能を拡張します。
apt-get install libnet-dns-perl pyzor razor
apt-get install arj bzip2 cabextract cpio file gzip nomarch pax unzip zip
それでは、Apache2サービスを再起動して、提供した新しいモジュールが表示されるようにします。
systemctl restart apache2
[トップに戻る]
7 –電子メールサーバー用のMySQLデータベースの作成
これで、ユーザーアカウントやその他のメールサーバー機能用のデータベースを作成する準備が整いました。
まず、rootユーザーとしてMySQLデータベースサービスにログインする必要があります。手順2で最初に入力したパスワードが必要になります。
mysql -u root -p
別のコマンドラインプロンプトが表示されます(mysql> )。これは、MySQLサーバーのデータベースとテーブルを管理できるMySQLCLIコンソールです。
まず、「mail」という名前の新しいデータベースを作成し、次に、この新しいデータベースへの完全なアクセス許可を持つシステムユーザーアカウントを作成します。必ず<secure password>を置き換えてください このアカウントの別の*新しい*安全なパスワードを持つ変数。 rootユーザーアカウントに使用したものと同じパスワードを使用しないでください 。
CREATE DATABASE mail;
CREATE USER 'mail'@'localhost' IDENTIFIED BY 'mypassword';
GRANT ALL PRIVILEGES ON mail.* TO 'mail'@'localhost' WITH GRANT OPTION;
FLUSH PRIVILEGES;
EXIT;
これで、メールサーバーサービスで使用されるデータベースがセットアップされました。
[トップに戻る]
8.1 –PostfixAdminのインストール
Postfix Adminは、Postfix用に作成されたWebベースの管理ツールです。これは、MySQLまたはPostgreSQLに保存されているPostfixスタイルの仮想ドメインとユーザーを処理するPHPベースのアプリケーションです。
まず、アプリケーションの最新リリースをダウンロードする必要があります。この例では、バージョン2.92をダウンロードします– 常にプロバイダーのWebサイトでバージョンをチェックして、最新のリリースを取得していることを確認してください 。
wget https://excellmedia.dl.sourceforge.net/project/postfixadmin/postfixadmin-3.3.1/PostfixAdmin%203.3.1.tar.gz
次に、アプリケーションを抽出して、HTMLディレクトリ/var/www/html/postfixadminにコピーします。 サーバー上で。
tar -xvf PostfixAdmin%203.3.1.tar.gz
mv postfixadmin-postfixadmin-cc23eba /var/www/html/postfixadmin
次に、テンプレートディレクトリを作成し、この新しいフォルダの権限を更新して、www-data ユーザーアカウントからアクセスできます。
mkdir /var/www/html/postfixadmin/templates_c
chown -R www-data:www-data /var/www/html/postfixadmin
[トップに戻る]
8.2 –Postfix管理者の設定
これで、Postfix管理ファイルで更新するいくつかの設定があります。まず、config.inc.phpを変更します ステップ7で作成したデータベースとの通信方法を認識できるようにファイルを作成します。
nano /var/www/html/postfixadmin/config.inc.php
変数'configured'を検索します 値をfalseからリセットします trueに 。
$CONF['configured'] = true;
次に、変数'database_'を検索します MySQLサーバー構成の値を置き換えます。変数mypasswordを必ず置き換えてください 手順7で入力したデータベースユーザー「メール」のパスワードを使用します。
$CONF['database_type'] = 'mysqli';
$CONF['database_host'] = 'localhost';
$CONF['database_user'] = 'mail';
$CONF['database_password'] = 'mypassword';
$CONF['database_name'] = 'mail';
次に、変数'admin_email'を検索します 値を、管理者の電子メールアカウント用に設定する電子メールアドレスに置き換えます。
$CONF['admin_email'] = 'example@unixlinux.online';
次に、変数'domain_path'を検索します ‘YESの値を置き換えます ‘から‘ NO ‘。
$CONF['domain_path'] = 'NO';
次に、変数'domain_in_mailbox'を検索します ‘NOの値を置き換えます ‘から‘ YES ‘。
$CONF['domain_in_mailbox'] = 'YES';
これらの最後の構成変数は、実際のユーザーメールボックスデータがサーバーに保存される場所へのパスを定義しません。これらは、後でDovecotの構成手順で定義されます。
これで、構成ファイルを保存する準備が整いました。ただし、まだ終了しないでください!
次に、Webブラウザを開いて、メールサーバーのURLを入力し、setup.phpを直接ポイントします。 構成ページ。 必ず
https://email.linuxbuz.com/postfixadmin/public/setup.php
URLにアクセスすると、スクリプトは自動的にサーバーをチェックし、すべての前提条件モジュールがインストールされ、機能していることを確認します。
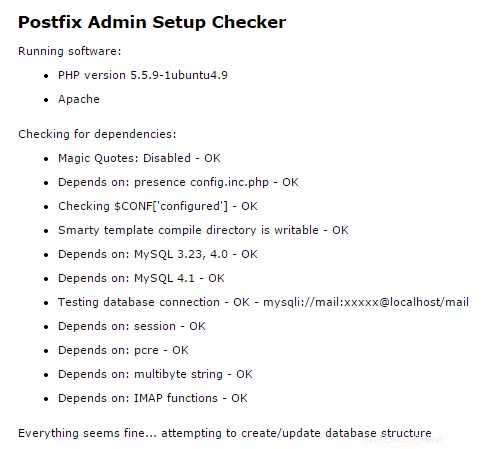
PostfixAdminセットアップチェッカー出力
チェックが完了すると、セットアップパスワードの入力を求められます。このパスワードは、PostfixAdminWebインターフェースのマスター管理者アカウントを作成するために使用されます。
安全なパスワードを入力し、[パスワードハッシュの生成]ボタンを押します。
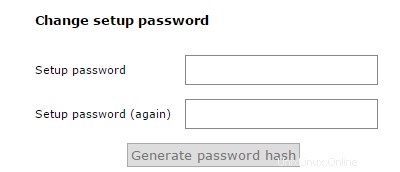
Postfix管理者はパスワードハッシュを生成します

Postfix管理者のパスワードハッシュの例
まだWebブラウザを閉じないでください!数分でここに戻ってきます。
パスワードハッシュを生成した後、config.inc.phpを更新する必要があります このパスワードで再度ファイルします。変数'setup_password'を検索します 値をスクリプトから生成された値に置き換えます。
// In order to setup Postfixadmin, you MUST specify a hashed password here.
// To create the hash, visit setup.php in a browser and type a password into the field,
// on submission it will be echoed out to you as a hashed value.
$CONF['setup_password'] = '<enter your hashed password here>';
これで、構成ファイルを保存して終了できます。
これで、Webブラウザに戻り、Postfix管理者ポータルの「スーパー管理者」アカウントを生成する準備が整いました。
[パスワードハッシュの生成]ボタンをクリックすると、フォームフィールドが次の例のように変更されました。これで、フォームに入力してスーパー管理者アカウントを生成できます。
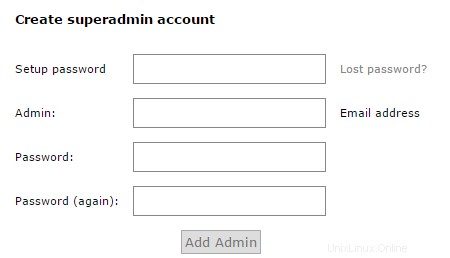
PostfixAdminでスーパー管理者アカウントを作成する
次のコマンドを使用して管理者ユーザーを作成することもできます。
bash /var/www/html/postfixadmin/scripts/postfixadmin-cli admin add example@unixlinux.online --superadmin 1 --active 1 --password example@unixlinux.online --password2 example@unixlinux.online
次の出力が得られるはずです:
Welcome to Postfixadmin-CLI v0.3
---------------------------------------------------------------

The admin example@unixlinux.online has been added!

---------------------------------------------------------------
[トップに戻る]
9 – Postfix Adminへのユーザーアカウント(メールボックス)の追加
これで、メールサーバーに仮想ユーザーアカウントを作成する準備が整いました。これを行うには、WebブラウザのPostfix管理者URLに戻り、メールサーバーのURLを入力します。 必ず
https://email.linuxbuz.com/postfixadmin/public
これで、仮想ドメインと仮想ユーザーアカウントを管理できるPostfix管理者ポータルにログインできるようになります。 Postfix Admin設定中に上記で作成したスーパー管理者のユーザー名とパスワードを入力し、「ログイン」ボタンを押します。

Postfix管理者の管理者ログイン
Postfix管理ポータルにログインすると、ページの上部にメニューが表示されます。
メニューオプションは、Postfixメールサーバーの仮想ドメインとユーザーを管理し、ログファイルを表示する機能を提供します。
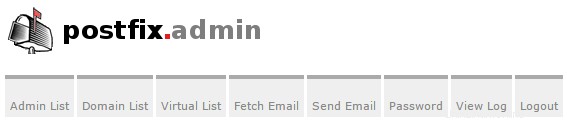
Postfix管理メニュー
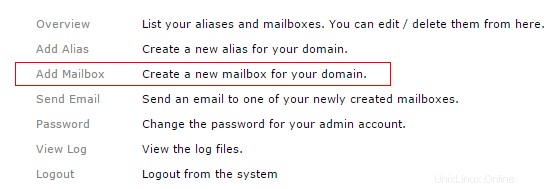
PostfixAdminメールボックスの追加オプション
ユーザーメールボックスを作成するには、クイックリンク「メールボックスの追加」をクリックします。 「メールボックスの追加ウィザード」画面が表示されます。フォームに詳細を入力し、完了したら[メールボックスの追加]ボタンを押します。ウィザードにより、最初の仮想ユーザー(メールボックス)アカウントが作成されます。
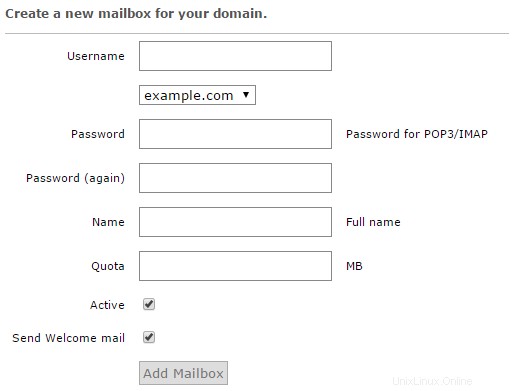
PostfixAdminで新しいメールボックスを作成する
[トップに戻る]
10 –仮想メールディレクトリを処理するシステムユーザーを作成する
仮想ユーザーとは、Linuxサーバーに技術的に存在しないユーザーであり、認証やメールの配信と保存に標準のLinuxメソッドを使用しません。メールサーバーの仮想ユーザーアカウントは、システムユーザーアカウントとして存在するのではなく、Postfix Adminによって作成されたデータベース内で定義されるため、メールストレージやDovecot認証などのサービスを処理する単一のシステムユーザーアカウントを作成する必要があります。
まず、vmailというシステムユーザーアカウントを作成しましょう。 必要なディレクトリへのアクセス許可を付与します。このシステムアカウントは、メールボックスのストレージとサービスのバックエンド操作を担当します。
useradd -r -u 150 -g mail -d /var/vmail -s /sbin/nologin -c "Virtual MailDir Handler" vmail
mkdir -p /var/vmail
chown vmail:mail /var/vmail
chmod 770 /var/vmail
上記のコマンドの説明:
- システムユーザーアカウント
vmailを作成しました 、ホームディレクトリを/var/vmailとして割り当てました 、およびこのアカウントがシェルまたはコンソールを介してログインする機能を制限しました。 - 次に、ホームディレクトリ
/var/vmailを手動で作成しました 新しいシステムユーザーアカウント用。 - 次に、
/var/vmailの所有者とグループを設定します ディレクトリ。 - 次に、システムユーザー
vmailに完全な権限を付与しました およびセキュリティグループのmailディレクトリ/var/vmailに割り当てられています 。
[トップに戻る]
11 –Dovecotの構成
Dovecotは、セキュリティを念頭に置いて作成されたオープンソースのIMAPおよびPOP3メールサーバーです。 Dovecotには多くの組み込み機能があり、公開Webサイトhttp://www.dovecot.orgで表示できます。
Dovecotは、IMAPおよびPOP3接続の管理、ローカルメールディレクトリの管理、およびPostfixSMTPメールサーバープロセスから渡された受信メールの受信を担当します。 Dovecotは、SMTP接続の認証も管理します。 /etc/dovecot内のさまざまなファイル ディレクトリハンドルDovecot構成。
まず、PostfixAdminによって設定されたデータベースを使用するようにDovecotを設定しましょう。まず、構成ファイル/etc/dovecot/conf.d/auth-sql.conf.extを編集します。
nano /etc/dovecot/conf.d/auth-sql.conf.ext
コンテンツを編集または更新して、次の構成にします。
# Look up user passwords from a SQL database as
# defined in /etc/dovecot/dovecot-sql.conf.ext
passdb {
  driver = sql
  args = /etc/dovecot/dovecot-sql.conf.ext
}
# Look up user information from a SQL database as
# defined in /etc/dovecot/dovecot-sql.conf.ext
userdb {
  driver = sql
  args = /etc/dovecot/dovecot-sql.conf.ext
}
で定義されているSQLデータベースからのユーザー情報 完了したら、構成ファイルを保存して終了します。
SQL構成ファイル
次に、元のSQL構成ファイル/etc/dovecot/dovecot-sql.conf.extをバックアップします。 Dovecotが使用する新しい構成ファイルを作成します。
mv /etc/dovecot/dovecot-sql.conf.ext /etc/dovecot/dovecot-sql.conf.ext.original
nano /etc/dovecot/dovecot-sql.conf.ext
次に、以下のコンテンツを構成ファイルにコピーし、手順7で設定したメールデータベースの値を更新します。
# Database driver: mysql, pgsql, sqlite
driver = mysql

# Database Connection:
#   connect = host=192.168.1.1 dbname=users
#   connect = host=sql.example.com dbname=virtual user=virtual password=blarg
#   connect = /etc/dovecot/authdb.sqlite
#
connect = host=localhost dbname=mail user=mail password=mypassword

# Default password scheme.
#
# List of supported schemes is in
# http://wiki2.dovecot.org/Authentication/PasswordSchemes
#
# Weak but common encryption scheme:
default_pass_scheme = MD5-CRYPT
#
# Comment the above out and uncomment below
# for stronger encryption:
#default_pass_scheme - SHA256-CRYPT


# Define the query to obtain a user password.
password_query = \
  SELECT username as user, password, '/var/vmail/%d/%n' as userdb_home, \
  'maildir:/var/vmail/%d/%n' as userdb_mail, 150 as userdb_uid, 8 as userdb_gid \
  FROM mailbox WHERE username = '%u' AND active = '1'

# Define the query to obtain user information.
user_query = \
  SELECT '/var/vmail/%d/%n' as home, 'maildir:/var/vmail/%d/%n' as mail, \
  150 AS uid, 8 AS gid, concat('dirsize:storage=', quota) AS quota \
  FROM mailbox WHERE username = '%u' AND active = '1'
完了したら、この構成ファイルを保存して終了します。
認証定義ファイル
次に、認証定義ファイル/etc/dovecot/conf.d/10-auth.confをバックアップします。 新しいものを作成します。
mv /etc/dovecot/conf.d/10-auth.conf /etc/dovecot/conf.d/10-auth.conf.original
nano /etc/dovecot/conf.d/10-auth.conf
次に、以下のコンテンツを定義ファイルにコピーします。
# Disable LOGIN command and all other plaintext authentications unless
# SSL/TLS is used (LOGINDISABLED capability). Note that if the remote IP
# matches the local IP (ie. you're connecting from the same computer), the
# connection is considered secure and plaintext authentication is allowed.
disable_plaintext_auth = yes

# Space separated list of wanted authentication mechanisms:
#   plain login digest-md5 cram-md5 ntlm rpa apop anonymous gssapi otp skey
#   gss-spnego
# NOTE: See also disable_plaintext_auth setting.
auth_mechanisms = plain login

##
## Password and user databases
##

#
# Password database is used to verify user's password (and nothing more).
# You can have multiple passdbs and userdbs. This is useful if you want to
# allow both system users (/etc/passwd) and virtual users to login without
# duplicating the system users into virtual database.
#
# <doc/wiki/PasswordDatabase.txt>
#
# User database specifies where mails are located and what user/group IDs
# own them. For single-UID configuration use "static" userdb.
#
# <doc/wiki/UserDatabase.txt>

# Use the SQL database configuration rather than any of the others.
!include auth-sql.conf.ext
完了したら、ファイルを保存して終了します。
メール定義ファイル
次に、仮想ユーザーのメールを保存する場所をDovecotに指示します。メール定義ファイル/etc/dovecot/conf.d/10-mail.confをバックアップします 新しいものを作成します。
mv /etc/dovecot/conf.d/10-mail.conf /etc/dovecot/conf.d/10-mail.conf.original
nano /etc/dovecot/conf.d/10-mail.conf
次に、以下のコンテンツを定義ファイルにコピーします。
# Location for users' mailboxes. The default is empty, which means that Dovecot
# tries to find the mailboxes automatically. This won't work if the user
# doesn't yet have any mail, so you should explicitly tell Dovecot the full
# location.
#
# If you're using mbox, giving a path to the INBOX file (eg. /var/mail/%u)
# isn't enough. You'll also need to tell Dovecot where the other mailboxes are
# kept. This is called the "root mail directory", and it must be the first
# path given in the mail_location setting.
#
# There are a few special variables you can use, eg.:
#
#   %u - username
#   %n - user part in example@unixlinux.online, same as %u if there's no domain
#   %d - domain part in example@unixlinux.online, empty if there's no domain
#   %h - home directory
#
# See doc/wiki/Variables.txt for full list. Some examples:
#
#   mail_location = maildir:~/Maildir
#   mail_location = mbox:~/mail:INBOX=/var/mail/%u
#   mail_location = mbox:/var/mail/%d/%1n/%n:INDEX=/var/indexes/%d/%1n/%n
#
# <doc/wiki/MailLocation.txt>
#
mail_location = maildir:/var/vmail/%d/%n

# System user and group used to access mails. If you use multiple, userdb
# can override these by returning uid or gid fields. You can use either numbers
# or names. <doc/wiki/UserIds.txt>
mail_uid = vmail
mail_gid = mail

# Valid UID range for users, defaults to 500 and above. This is mostly
# to make sure that users can't log in as daemons or other system users.
# Note that denying root logins is hardcoded to dovecot binary and can't
# be done even if first_valid_uid is set to 0.
#
# Use the vmail user uid here.
first_valid_uid = 150
last_valid_uid = 150

# If you need to set multiple mailbox locations or want to change default
# namespace settings, you can do it by defining namespace sections.
#
# You can have private, shared and public namespaces. Private namespaces
# are for user's personal mails. Shared namespaces are for accessing other
# users' mailboxes that have been shared. Public namespaces are for shared
# mailboxes that are managed by sysadmin. If you create any shared or public
# namespaces you'll typically want to enable ACL plugin also, otherwise all
# users can access all the shared mailboxes, assuming they have permissions
# on filesystem level to do so.
namespace inbox {
  # Namespace type: private, shared or public
  #type = private

  # Hierarchy separator to use. You should use the same separator for all
  # namespaces or some clients get confused. '/' is usually a good one.
  # The default however depends on the underlying mail storage format.
  #separator =

  # Prefix required to access this namespace. This needs to be different for
  # all namespaces. For example "Public/".
  #prefix =

  # Physical location of the mailbox. This is in same format as
  # mail_location, which is also the default for it.
  #location =

  # There can be only one INBOX, and this setting defines which namespace
  # has it.
  inbox = yes

  # If namespace is hidden, it's not advertised to clients via NAMESPACE
  # extension. You'll most likely also want to set list=no. This is mostly
  # useful when converting from another server with different namespaces which
  # you want to deprecate but still keep working. For example you can create
  # hidden namespaces with prefixes "~/mail/", "~%u/mail/" and "mail/".
  #hidden = no

  # Show the mailboxes under this namespace with LIST command. This makes the
  # namespace visible for clients that don't support NAMESPACE extension.
  # "children" value lists child mailboxes, but hides the namespace prefix.
  #list = yes

  # Namespace handles its own subscriptions. If set to "no", the parent
  # namespace handles them (empty prefix should always have this as "yes")
  #subscriptions = yes
}
Once done, save and exit the file.
SSL Definition File
If you have an SSL certificate that you would like to install, you will need to modify the Dovecot SSL definition file /etc/dovecot/conf.d/10-ssl.conf with your valid certificate. Remember, you will have to also include your CA certificate bundle if one has been provided by the certificate issuer.
Dovecot Master Definition File
We are now going to update the Dovecot master definition file /etc/dovecot/10-master.conf to include the system user account and the postfix settings.
nano /etc/dovecot/conf.d/10-master.conf
Search for the config definition service auth and replace the definition block with the following.
service auth {
  # auth_socket_path points to this userdb socket by default. It's typically
  # used by dovecot-lda, doveadm, possibly imap process, etc. Users that have
  # full permissions to this socket are able to get a list of all usernames and
  # get the results of everyone's userdb lookups.
  #
  # The default 0666 mode allows anyone to connect to the socket, but the
  # userdb lookups will succeed only if the userdb returns an "uid" field that
  # matches the caller process's UID. Also if caller's uid or gid matches the
  # socket's uid or gid the lookup succeeds. Anything else causes a failure.
  #
  # To give the caller full permissions to lookup all users, set the mode to
  # something else than 0666 and Dovecot lets the kernel enforce the
  # permissions (e.g. 0777 allows everyone full permissions).
  unix_listener auth-userdb {
    mode = 0600
    user = vmail
    group = mail
  }

  # Postfix smtp-auth
  unix_listener /var/spool/postfix/private/auth {
    mode = 0660
    # Assuming the default Postfix userid and groupid
    user = postfix
    group = postfix
  }

}
Once done, save and exit the file.
LDA Definition File
In some cases, you may have to explicitly define the postmaster email address for your server. To do this, you will need to edit the LDA definition file /etc/dovecot/conf.d/15-lda.conf 。 If you see error messages like Invalid settings: postmaster_address setting not given showing up in the mail server logs, then this configuration change is the likely fix for that error.
nano /etc/dovecot/conf.d/15-lda.conf
Search for the definition postmaster_address and update the value to include your domain’s postmaster account.
# Address to use when sending rejection mails.
# Default is example@unixlinux.online<your domain>. %d expands to recipient domain.
#postmaster_address =
postmaster_address = example@unixlinux.online
Once done, save and exit the file.
We now need to update the Dovecot configuration directory to be accessible to the Dovecot service account as well as the vmail system account.
chown -R vmail:dovecot /etc/dovecot
chmod -R o-rwx /etc/dovecot
You have now completed the configuration of the Dovecot service and we can now move on to the antivirus and anti-spam services.
[Back to top]
12 – Configuring Amavis, ClamAV, and SpamAssassin
What are these packages?
– Amavis is an interface between Postfix and content filtering packages such as SpamAssassin and ClamAV.
– ClamAV is a high-performance antivirus engine for detecting trojans, viruses, malware &other malicious threats.
– SpamAssassin is a high-performance anti-spam platform famous for its Bayesian spam filtering capabilities. It gives system administrators a filter to classify messages and block unsolicited bulk email.
We will now walk you through the process of installing some protection for your mail server. For the most part, the default configurations are sufficient for a good line of defense against spam and viruses getting through your mail server. If you have special requirements, you can, of course, spend a good amount of time crafting intricate processing rules.
Let’s first create the two system user accounts, amavis and clamav, and allow them to collaborate together.
adduser clamav amavis
adduser amavis clamav
We are now going to enable the Amavis daemon by editing the /etc/amavis/conf.d/15-content_filter_mode configuration file.
nano /etc/amavis/conf.d/15-content_filter_mode
use strict;

# You can modify this file to re-enable SPAM checking through spamassassin
# and to re-enable antivirus checking.

#
# Default antivirus checking mode
# Please note, that anti-virus checking is DISABLED by
# default.
# If You wish to enable it, please uncomment the following lines:

@bypass_virus_checks_maps = (
   %bypass_virus_checks, @bypass_virus_checks_acl, $bypass_virus_checks_re);

#
# Default SPAM checking mode
# Please note, that anti-spam checking is DISABLED by
# default.
# If You wish to enable it, please uncomment the following lines:

@bypass_spam_checks_maps = (
   %bypass_spam_checks, @bypass_spam_checks_acl, $bypass_spam_checks_re);

1;  # ensure a defined return
Once done, you can save and exit the file.
We are now going to enable the SpamAssassin software by editing the /etc/default/spamassassin configuration file.
nano /etc/default/spamassassin
Now search for the variable CRON=0 in the configuration file and change the value to 1.
# Cronjob
# Set to anything but 0 to enable the cron job to automatically update
# spamassassin's rules on a nightly basis
CRON=1
Next, enable the SpamAssassin software with the following command:
update-rc.d spamassassin enable
We are now going to set up Amavis to use the database from Postfix Admin to identify mail that is arriving for local delivery. By default, SpamAssassin and Amavis will only check mail that is determined to be arriving for local delivery. Because we are set up to use virtual user mailboxes, we have to tell the services where to locate the user accounts.
To do this, we need to update the configuration file /etc/amavis/conf.d/50-user 。
nano /etc/amavis/conf.d/50-user
Replace the contents of this configuration file with the below. Be sure to update the MySQL database password to use the password for the database user “mail” that you entered in Step #7.
use strict;

#
# Place your configuration directives here.  They will override those in
# earlier files.
#
# See /usr/share/doc/amavisd-new/ for documentation and examples of
# the directives you can use in this file
#

# Three concurrent processes. This should fit into the RAM available on an
# AWS micro instance. This has to match the number of processes specified
# for Amavis in /etc/postfix/master.cf.
$max_servers  = 3;

# Add spam info headers if at or above that level - this ensures they
# are always added.
$sa_tag_level_deflt  = -9999;

# Check the database to see if mail is for local delivery, and thus
# should be spam checked.
@lookup_sql_dsn = (
    ['DBI:mysql:database=mail;host=127.0.0.1;port=3306',
     'mail',
     'mypassword']);
$sql_select_policy = 'SELECT domain from domain WHERE CONCAT("@",domain) IN (%k)';

# Uncomment to bump up the log level when testing.
# $log_level = 2;

#------------ Do not modify anything below this line -------------
1;  # ensure a defined return
Once done, save and exit the configuration file.
We will now need to restart the Amavis and SpamAssassin services so that they see the new configuration settings.
service amavis restart
services spamassassin restart
[Back to top]
13 – Configuring Postfix
We are now ready to configure the Postfix mail server. Postfix handles all of the incoming and outgoing mail via the SMTP protocol, and we are going to configure it to integrate will all of the other software packages that we have just configured.
From a high level view, we are needing Postfix to hand off incoming mail to the SpamAssassin and ClamAV scanners for filtering, and then to pass unblocked mail messages on to the Dovecot services for final mailbox delivery. Postfix will also authenticate the virtual users who connect via SMTP in order to send email messages.
We are going to create a definition file for Postfix to identify users and mailboxes. Please note that the “hosts” directive in these configuration files must be exactly the same as the “bind-address” in the /etc/mysql/my.cnf configuration files.
First, let’s look up the value of the bind-address in the MySQL configuration files.
cat /etc/mysql/mysql.conf.d/mysqld.cnf | grep bind-address
<< output >>
bind-address            = 127.0.0.1
Now that we have the configuration value, we are going to create the required Postfix definition files.
Copy and paste the content for each file. Make sure to update the password value with the password for the database user “mail” that you entered in Step #7.
/etc/postfix/mysql_virtual_alias_domainaliases_maps.cf
nano /etc/postfix/mysql_virtual_alias_domainaliases_maps.cf
user = mail
password = mypassword
hosts = 127.0.0.1
dbname = mail
query = SELECT goto FROM alias,alias_domain WHERE alias_domain.alias_domain = '%d' AND alias.address=concat('%u', '@', alias_domain.target_domain) AND alias.active = 1
Once done, save and exit the configuration file.
/etc/postfix/mysql_virtual_alias_maps.cf
nano /etc/postfix/mysql_virtual_alias_maps.cf
user = mail
password = mypassword
hosts = 127.0.0.1
dbname = mail
table = alias
select_field = goto
where_field = address
additional_conditions = and active = '1'
Once done, save and exit the configuration file.
/etc/postfix/mysql_virtual_domains_maps.cf
nano /etc/postfix/mysql_virtual_domains_maps.cf
user = mail
password = mypassword
hosts = 127.0.0.1
dbname = mail
table = domain
select_field = domain
where_field = domain
additional_conditions = and backupmx = '0' and active = '1'
Once done, save and exit the configuration file.
/etc/postfix/mysql_virtual_mailbox_domainaliases_maps.cf
nano /etc/postfix/mysql_virtual_mailbox_domainaliases_maps.cf
user = mail
password = mypassword
hosts = 127.0.0.1
dbname = mail
query = SELECT maildir FROM mailbox, alias_domain
  WHERE alias_domain.alias_domain = '%d'
  AND mailbox.username=concat('%u', '@', alias_domain.target_domain )
  AND mailbox.active = 1
Once done, save and exit the configuration file.
/etc/postfix/mysql_virtual_mailbox_maps.cf
nano /etc/postfix/mysql_virtual_mailbox_maps.cf
user = mail
password = mypassword
hosts = 127.0.0.1
dbname = mail
table = mailbox
select_field = CONCAT(domain, '/', local_part)
where_field = username
additional_conditions = and active = '1'
Once done, save and exit the configuration file.
We are now going to create the Postfix header-checking directives. These directives remove certain headers when relaying mail through the system. This helps improve privacy for sending users by removing specific headers like origin IP Address and the mail software identifiers. Copy and paste the below content into the file.
nano /etc/postfix/header_checks
/^Received:/                 IGNORE
/^User-Agent:/               IGNORE
/^X-Mailer:/                 IGNORE
/^X-Originating-IP:/         IGNORE
/^x-cr-[a-z]*:/              IGNORE
/^Thread-Index:/             IGNORE
Once done, save and exit.
We are now ready to make some changes to the system default Postfix /etc/postfix/main.cf configuration file.
This file contains a large amount of complex choices and options for a Postfix server installation. It is far beyond the scope of this article to explain every option or best practice available, so we strongly suggest that you read through the Postfix configuration options
/usr/share/postfix/main.cf.distor the software vendor online manual. O’Reilly has also published a very good book named Postfix:The Definitive Guide 。
First, we are going to create a backup of the original main.cf configuration file and then create a new copy of the file.
mv /etc/postfix/main.cf /etc/postfix/main.cf.original
nano /etc/postfix/main.cf
Now, copy the below content into the /etc/postfix/main.cf configuration file.
# See /usr/share/postfix/main.cf.dist for a commented, more complete version

# The first text sent to a connecting process.
smtpd_banner = $myhostname ESMTP $mail_name
biff = no
# appending .domain is the MUA's job.
append_dot_mydomain = no
readme_directory = no

# SASL parameters
# ---------------------------------
# Use Dovecot to authenticate.
smtpd_sasl_type = dovecot
# Referring to /var/spool/postfix/private/auth
smtpd_sasl_path = private/auth
smtpd_sasl_auth_enable = yes
broken_sasl_auth_clients = yes
smtpd_sasl_security_options = noanonymous
smtpd_sasl_local_domain =
smtpd_sasl_authenticated_header = yes

# TLS parameters
# ---------------------------------

# Replace this with your SSL certificate path if you are using one.
smtpd_tls_cert_file=/etc/ssl/certs/ssl-cert-snakeoil.pem
smtpd_tls_key_file=/etc/ssl/private/ssl-cert-snakeoil.key
# The snakeoil self-signed certificate has no need for a CA file. But
# if you are using your own SSL certificate, then you probably have
# a CA certificate bundle from your provider. The path to that goes
# here.
#smtpd_tls_CAfile=/path/to/ca/file

smtp_tls_note_starttls_offer = yes
smtpd_tls_loglevel = 1
smtpd_tls_received_header = yes
smtpd_tls_session_cache_timeout = 3600s
tls_random_source = dev:/dev/urandom
#smtpd_tls_session_cache_database = btree:${data_directory}/smtpd_scache
#smtp_tls_session_cache_database = btree:${data_directory}/smtp_scache

# Note that forcing use of TLS is going to cause breakage - most mail servers
# don't offer it and so delivery will fail, both incoming and outgoing. This is
# unfortunate given what various governmental agencies are up to these days.

# These are Postfix 2.2 only.
#
# Enable (but don't force) use of TLS on incoming smtp connections.
smtpd_use_tls = yes
smtpd_enforce_tls = no
# Enable (but don't force) use of TLS on outgoing smtp connections.
smtp_use_tls = yes
smtp_enforce_tls = no

# These are Postfix 2.3 and later.
#
# Enable (but don't force) all incoming smtp connections to use TLS.
smtpd_tls_security_level = may
# Enable (but don't force) all outgoing smtp connections to use TLS.
smtp_tls_security_level = may

# See /usr/share/doc/postfix/TLS_README.gz in the postfix-doc package for
# information on enabling SSL in the smtp client.

# SMTPD parameters
# ---------------------------------

# Uncomment the next line to generate "delayed mail" warnings
#delay_warning_time = 4h
# will it be a permanent error or temporary
unknown_local_recipient_reject_code = 450
# how long to keep message on queue before return as failed.
# some have 3 days, I have 16 days as I am backup server for some people
# whom go on holiday with their server switched off.
maximal_queue_lifetime = 7d
# max and min time in seconds between retries if connection failed
minimal_backoff_time = 1000s
maximal_backoff_time = 8000s
# how long to wait when servers connect before receiving rest of data
smtp_helo_timeout = 60s
# how many address can be used in one message.
# effective stopper to mass spammers, accidental copy in whole address list
# but may restrict intentional mail shots.
smtpd_recipient_limit = 16
# how many error before back off.
smtpd_soft_error_limit = 3
# how many max errors before blocking it.
smtpd_hard_error_limit = 12

# This next set are important for determining who can send mail and relay mail
# to other servers. It is very important to get this right - accidentally producing
# an open relay that allows unauthenticated sending of mail is a Very Bad Thing.
#
# You are encouraged to read up on what exactly each of these options accomplish.

# Requirements for the HELO statement
smtpd_helo_restrictions = permit_mynetworks, warn_if_reject reject_non_fqdn_hostname, reject_invalid_hostname, permit

# Requirements for the sender details
smtpd_sender_restrictions = permit_sasl_authenticated, permit_mynetworks, warn_if_reject reject_non_fqdn_sender, reject_unknown_sender_domain, reject_unauth_pipelining, permit
# Requirements for the connecting server
# This is primarily the RBL (Realtime Blacklist) Filtering
smtpd_client_restrictions = reject_rbl_client b.barracudacentral.org, reject_rbl_client zen.spamhaus.org, reject_rbl_client spam.dnsbl.sorbs.net
# Requirement for the recipient address. Note that the entry for
# "check_policy_service inet:127.0.0.1:10023" enables Postgrey.
smtpd_recipient_restrictions = reject_unauth_pipelining, permit_mynetworks, permit_sasl_authenticated, reject_non_fqdn_recipient, reject_unknown_recipient_domain, reject_unauth_destination, check_policy_service inet:127.0.0.1:10023, permit
smtpd_data_restrictions = reject_unauth_pipelining

# This is a new option as of Postfix 2.10+, and is required in addition to
# smtpd_recipient_restrictions for things to work properly in this setup.
smtpd_relay_restrictions = reject_unauth_pipelining, permit_mynetworks, permit_sasl_authenticated, reject_non_fqdn_recipient, reject_unknown_recipient_domain, reject_unauth_destination, check_policy_service inet:127.0.0.1:10023, permit

# require proper helo at connections
smtpd_helo_required = yes
# waste spammers time before rejecting them
smtpd_delay_reject = yes
disable_vrfy_command = yes

# General host and delivery info
# ----------------------------------

myhostname = email.linuxbuz.com
myorigin = /etc/hostname
# Some people see issues when setting mydestination explicitly to the server
# subdomain, while leaving it empty generally doesn't hurt. So it is left empty here.
# mydestination = mail.example.com, localhost
mydestination =
# If you have a separate web server that sends outgoing mail through this
# mailserver, you may want to add its IP address to the space-delimited list in
# mynetworks, e.g. as 111.222.333.444/32.
mynetworks = 127.0.0.0/8 [::ffff:127.0.0.0]/104 [::1]/128
mailbox_size_limit = 0
recipient_delimiter = +
inet_interfaces = all
mynetworks_style = host

# This specifies where the virtual mailbox folders will be located.
virtual_mailbox_base = /var/vmail
# This is for the mailbox location for each user. The domainaliases
# map allows us to make use of Postfix Admin's domain alias feature.
virtual_mailbox_maps = mysql:/etc/postfix/mysql_virtual_mailbox_maps.cf, mysql:/etc/postfix/mysql_virtual_mailbox_domainaliases_maps.cf
# and their user id
virtual_uid_maps = static:150
# and group id
virtual_gid_maps = static:8
# This is for aliases. The domainaliases map allows us to make
# use of Postfix Admin's domain alias feature.
virtual_alias_maps = mysql:/etc/postfix/mysql_virtual_alias_maps.cf, mysql:/etc/postfix/mysql_virtual_alias_domainaliases_maps.cf
# This is for domain lookups.
virtual_mailbox_domains = mysql:/etc/postfix/mysql_virtual_domains_maps.cf

# Integration with other packages
# ---------------------------------------

# Tell postfix to hand off mail to the definition for dovecot in master.cf
virtual_transport = dovecot
dovecot_destination_recipient_limit = 1

# Use amavis for virus and spam scanning
content_filter = amavis:[127.0.0.1]:10024

# Header manipulation
# --------------------------------------

# Getting rid of unwanted headers. See: https://posluns.com/guides/header-removal/
header_checks = regexp:/etc/postfix/header_checks
# getting rid of x-original-to
enable_original_recipient = no
Once done, save and exit.
We are now ready to move on to the Postfix /etc/postfix/master.cf 構成ファイル。 This configuration file also contains a large number of complex choices and options for a Postfix server installation that is far beyond the scope of this article to explain.
We are going to create a backup of the original master.cf configuration file and then create a new file.
mv /etc/postfix/master.cf /etc/postfix/master.cf.original
nano /etc/postfix/master.cf
Now, copy the below content into the /etc/postfix/master.cf configuration file.
#
# Postfix master process configuration file.  For details on the format
# of the file, see the master(5) manual page (command: "man 5 master").
#
# Do not forget to execute "postfix reload" after editing this file.
#
# ==========================================================================
# service type  private unpriv  chroot  wakeup  maxproc command + args
#               (yes)   (yes)   (yes)   (never) (100)
# ==========================================================================

# SMTP on port 25, unencrypted.
smtp      inet  n       -       -       -       -       smtpd
#smtp      inet  n       -       -       -       1       postscreen
#smtpd     pass  -       -       -       -       -       smtpd
#dnsblog   unix  -       -       -       -       0       dnsblog
#tlsproxy  unix  -       -       -       -       0       tlsproxy

# SMTP with TLS on port 587.
submission inet n       -       -       -       -       smtpd
  -o syslog_name=postfix/submission
  -o smtpd_tls_security_level=encrypt
  -o smtpd_sasl_auth_enable=yes
  -o smtpd_enforce_tls=yes
  -o smtpd_client_restrictions=permit_sasl_authenticated,reject_unauth_destination,reject
  -o smtpd_sasl_tls_security_options=noanonymous

# SMTP over SSL on port 465.
smtps     inet  n       -       -       -       -       smtpd
  -o syslog_name=postfix/smtps
  -o smtpd_tls_wrappermode=yes
  -o smtpd_sasl_auth_enable=yes
  -o smtpd_tls_auth_only=yes
  -o smtpd_client_restrictions=permit_sasl_authenticated,reject_unauth_destination,reject
  -o smtpd_sasl_security_options=noanonymous,noplaintext
  -o smtpd_sasl_tls_security_options=noanonymous

#628       inet  n       -       -       -       -       qmqpd
pickup    fifo  n       -       -       60      1       pickup
  -o content_filter=
  -o receive_override_options=no_header_body_checks
cleanup   unix  n       -       -       -       0       cleanup
qmgr      fifo  n       -       n       300     1       qmgr
#qmgr     fifo  n       -       n       300     1       oqmgr
tlsmgr    unix  -       -       -       1000?   1       tlsmgr
rewrite   unix  -       -       -       -       -       trivial-rewrite
bounce    unix  -       -       -       -       0       bounce
defer     unix  -       -       -       -       0       bounce
trace     unix  -       -       -       -       0       bounce
verify    unix  -       -       -       -       1       verify
flush     unix  n       -       -       1000?   0       flush
proxymap  unix  -       -       n       -       -       proxymap
proxywrite unix -       -       n       -       1       proxymap
smtp      unix  -       -       -       -       -       smtp
relay     unix  -       -       -       -       -       smtp
#       -o smtp_helo_timeout=5 -o smtp_connect_timeout=5
showq     unix  n       -       -       -       -       showq
error     unix  -       -       -       -       -       error
retry     unix  -       -       -       -       -       error
discard   unix  -       -       -       -       -       discard
local     unix  -       n       n       -       -       local
virtual   unix  -       n       n       -       -       virtual
lmtp      unix  -       -       -       -       -       lmtp
anvil     unix  -       -       -       -       1       anvil
scache    unix  -       -       -       -       1       scache
#
# ====================================================================
# Interfaces to non-Postfix software. Be sure to examine the manual
# pages of the non-Postfix software to find out what options it wants.
#
# Many of the following services use the Postfix pipe(8) delivery
# agent.  See the pipe(8) man page for information about ${recipient}
# and other message envelope options.
# ====================================================================
#
# maildrop. See the Postfix MAILDROP_README file for details.
# Also specify in main.cf: maildrop_destination_recipient_limit=1
#
maildrop  unix  -       n       n       -       -       pipe
  flags=DRhu user=vmail argv=/usr/bin/maildrop -d ${recipient}
#
# ====================================================================
#
# Recent Cyrus versions can use the existing "lmtp" master.cf entry.
#
# Specify in cyrus.conf:
#   lmtp    cmd="lmtpd -a" listen="localhost:lmtp" proto=tcp4
#
# Specify in main.cf one or more of the following:
#  mailbox_transport = lmtp:inet:localhost
#  virtual_transport = lmtp:inet:localhost
#
# ====================================================================
#
# Cyrus 2.1.5 (Amos Gouaux)
# Also specify in main.cf: cyrus_destination_recipient_limit=1
#
#cyrus     unix  -       n       n       -       -       pipe
#  user=cyrus argv=/cyrus/bin/deliver -e -r ${sender} -m ${extension} ${user}
#
# ====================================================================
# Old example of delivery via Cyrus.
#
#old-cyrus unix  -       n       n       -       -       pipe
#  flags=R user=cyrus argv=/cyrus/bin/deliver -e -m ${extension} ${user}
#
# ====================================================================
#
# See the Postfix UUCP_README file for configuration details.
#
uucp      unix  -       n       n       -       -       pipe
  flags=Fqhu user=uucp argv=uux -r -n -z -a$sender - $nexthop!rmail ($recipient)
#
# Other external delivery methods.
#
ifmail    unix  -       n       n       -       -       pipe
  flags=F user=ftn argv=/usr/lib/ifmail/ifmail -r $nexthop ($recipient)
bsmtp     unix  -       n       n       -       -       pipe
  flags=Fq. user=bsmtp argv=/usr/lib/bsmtp/bsmtp -t$nexthop -f$sender $recipient
scalemail-backend unix  -       n       n       -       2       pipe
  flags=R user=scalemail argv=/usr/lib/scalemail/bin/scalemail-store ${nexthop} ${user} ${extension}
mailman   unix  -       n       n       -       -       pipe
  flags=FR user=list argv=/usr/lib/mailman/bin/postfix-to-mailman.py
  ${nexthop} ${user}

# The next two entries integrate with Amavis for anti-virus/spam checks.
amavis      unix    -       -       -       -       3       smtp
  -o smtp_data_done_timeout=1200
  -o smtp_send_xforward_command=yes
  -o disable_dns_lookups=yes
  -o max_use=20
127.0.0.1:10025 inet    n       -       -       -       -       smtpd
  -o content_filter=
  -o local_recipient_maps=
  -o relay_recipient_maps=
  -o smtpd_restriction_classes=
  -o smtpd_delay_reject=no
  -o smtpd_client_restrictions=permit_mynetworks,reject
  -o smtpd_helo_restrictions=
  -o smtpd_sender_restrictions=
  -o smtpd_recipient_restrictions=permit_mynetworks,reject
  -o smtpd_data_restrictions=reject_unauth_pipelining
  -o smtpd_end_of_data_restrictions=
  -o mynetworks=127.0.0.0/8
  -o smtpd_error_sleep_time=0
  -o smtpd_soft_error_limit=1001
  -o smtpd_hard_error_limit=1000
  -o smtpd_client_connection_count_limit=0
  -o smtpd_client_connection_rate_limit=0
  -o receive_override_options=no_header_body_checks,no_unknown_recipient_checks

# Integration with Dovecot - hand mail over to it for local delivery, and
# run the process under the vmail user and mail group.
dovecot      unix   -        n      n       -       -   pipe
  flags=DRhu user=vmail:mail argv=/usr/lib/dovecot/dovecot-lda -d $(recipient)
Once done, save and exit.
We are now ready to restart all of the mail services and test the server.
service postfix restart
service spamassassin restart
service clamav-daemon restart
service amavis restart
service dovecot restart
While testing your new mail server, make sure to watch the log files closely for any errors or unusual responses.
The mail server log files are located here:
- General Logging:
/var/log/mail.log - Error Logging:
/var/log/mail.err
[Back to top]
14 – Reverse DNS Lookup
You will now need to set up reverse DNS lookup for your mail server.
Reverse DNS is IP-address-to-domain-name mapping – the opposite of forward (normal) DNS which maps domain names to IP addresses. Reverse DNS is mostly used by people for such things as tracking where a website visitor came from or where an email message originated, for example. Reverse DNS is also important for mail server applications. Many email servers on the Internet are configured to reject incoming emails from any IP address which does not have reverse DNS record configured.
Unless you also administer your own DNS server, you can update reverse DNS with your ISP (Internet Service Provider) or via the hosting provider of your server.
[Back to top]
15 – Install RoundCube Webmail
Now we are going to install the RoundCube Webmail application. This application will allow your remote users to connect to their mailbox through a web browser.
apt-get install roundcube roundcube-mysql roundcube-plugins roundcube-plugins-extra
During the installation process, the system will ask you the prerequisite install questions. Note:you will need the password for the MySQL root user you set up in Step 2.
Configure database for roundcube with dbconfig-common?
  >> Select 'YES'

Database type to be used by roundcube:
 >> Select 'mysql'

Password of the database's administrative user:
 >> Enter the 'root' MySQL password that you created.

MySQL application password for roundcube:
 >> Enter a new secure password for the RoundCube application to use.
Once you are finished with the pre-installation questions, you should see the following output. Double check the output to make sure there are not errors posted during the installation process.
dbconfig-common: writing config to /etc/dbconfig-common/roundcube.conf

Creating config file /etc/dbconfig-common/roundcube.conf with new version

Creating config file /etc/roundcube/debian-db.php with new version
granting access to database roundcube for example@unixlinux.online: success.
verifying access for example@unixlinux.online: success.
creating database roundcube: success.
verifying database roundcube exists: success.
populating database via sql...  done.
dbconfig-common: flushing administrative password

Creating config file /etc/roundcube/config.inc.php with new version
apache2_invoke: Enable configuration roundcube.conf
 * Reloading web server apache2
 *
 * Reloading web server apache2
 *
Setting up roundcube (1.4.3) ...
Setting up roundcube-plugins (1.4.3) ...
Setting up roundcube-plugins-extra (0.9.2-20130819) ...
Processing triggers for dictionaries-common (1.20.5) ...
aspell-autobuildhash: processing: en [en-common]
aspell-autobuildhash: processing: en [en-variant_0]
aspell-autobuildhash: processing: en [en-variant_1]
aspell-autobuildhash: processing: en [en-variant_2]
aspell-autobuildhash: processing: en [en-w_accents-only]
aspell-autobuildhash: processing: en [en-wo_accents-only]
aspell-autobuildhash: processing: en [en_CA-variant_0]
aspell-autobuildhash: processing: en [en_CA-variant_1]
aspell-autobuildhash: processing: en [en_CA-w_accents-only]
aspell-autobuildhash: processing: en [en_CA-wo_accents-only]
aspell-autobuildhash: processing: en [en_GB-ise-w_accents-only]
aspell-autobuildhash: processing: en [en_GB-ise-wo_accents-only]
aspell-autobuildhash: processing: en [en_GB-ize-w_accents-only]
aspell-autobuildhash: processing: en [en_GB-ize-wo_accents-only]
aspell-autobuildhash: processing: en [en_GB-variant_0]
aspell-autobuildhash: processing: en [en_GB-variant_1]
aspell-autobuildhash: processing: en [en_US-w_accents-only]
aspell-autobuildhash: processing: en [en_US-wo_accents-only]
Setting up aspell (0.60.7~20110707-1ubuntu1) ...
Processing triggers for dictionaries-common (1.20.5) ...
Setting up aspell-en (7.1-0-1) ...
Processing triggers for libc-bin (2.19-0ubuntu6.6) ...
Processing triggers for dictionaries-common (1.20.5) ...
example@unixlinux.online#
Next, we need to customize some of the RoundCube configuration files. First, we are going to add the RoundCube application into our current Apache configuration files using path alias directives. The default configuration file is installed at /etc/apache2/conf-available/roundcube.conf
nano /etc/apache2/conf-available/roundcube.conf
We now need to remove the two comment flags in front of the alias directives. If you would like to use a different alias name, you can change that here as well. The default alias will use the URL http://<your-server-url>/roundcube/
    Alias /roundcube/program/js/tiny_mce/ /usr/share/tinymce/www/
    Alias /roundcube /var/lib/roundcube
Once done, save and exit the file.
Now we are going to modify the /etc/roundcube/config.inc.php 構成ファイル。 This file is where you can customize the RoundCube advanced settings.
nano /etc/roundcube/config.inc.php
Locate the following directives and update the values to match the following.
$config['default_host'] = '';
$config['smtp_server'] = 'localhost';
$config['smtp_port'] = 25;
$config['smtp_user'] = '%u';
$config['smtp_pass'] = '%p';
$config['support_url'] = '';
Once done, save and exit the configuration file.
Finally, restart the apache service to apply the changes:
systemctl restart apache2
You should now be able to use your new RoundCube webmail application for sending and receiving message.
[Back to top]
Congratulations!
You have now set up a fully functional and secure mail server on your VPS hosting account from Atlantic.Net.
VPSホスティングサービスと仮想プライベートサーバーの詳細をご覧ください。