はじめに
Secure Block Storage(SBS)ボリュームは、使いやすく、冗長性が高く、スケーラブルで、Atlantic.Netクラウドサーバーに接続できる安全なブロックストレージです。
ファイル、データベース、アプリケーション、およびバックアップストレージのニーズにSecureBlockStorageボリュームを使用できます。 99.999%の可用性を実現するように設計された、SBSボリュームは、コンポーネントの障害からデータを保護するために、複数回自動的に複製されます。ストレージをオンザフライで増やし、同じリージョン内のクラウドサーバー間でSBSボリュームを移動できます。
このガイドでは、Windows ServerでSBSボリュームを作成、構成、フォーマット、および管理する方法について説明し、リモートデスクトップ接続を介してサーバーに既に接続していることを前提としています。
このガイドで学習する内容:
ブロックストレージボリュームの作成
初期使用のためのブロックストレージボリュームの構成
ブロックストレージボリュームのデタッチ
以前に構成されたブロックストレージボリュームの接続
ブロックストレージボリュームのサイズ変更
ブロックストレージボリュームの削除
ボリュームの作成
ステップ1:Atlantic.Netクラウドコントロールパネルでボリュームを作成する
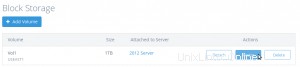
In the Atlantic.Net Control Panel, click on "Block Storage", then click the "Add Volume" button. Next select the volume size, name, location, and server you wish to attach the Volume to.
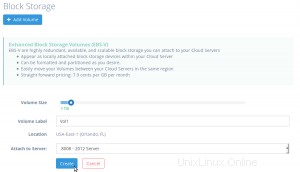
After the Volume is done creating, you should see that the Volume is attached to the server you chose.
初期使用のためのボリュームの構成
Atlantic.Netクラウドコントロールパネルでボリュームを作成した後、以下の手順に従って、WindowsServerで初めてボリュームを構成します。
ステップ1:オープンディスク管理
Windows 2008 Server:
Click on the Start Button, Administrative Tools, Computer Management, Disk Management.
Windows 2012 Server以降:
Right-click on the Windows Button and select "Disk Management"
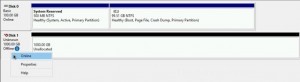
ステップ2:ボリュームをオンラインにする
In the lower pane, right-click all the way to the left under the disk name and select "Online".
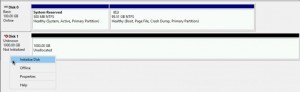
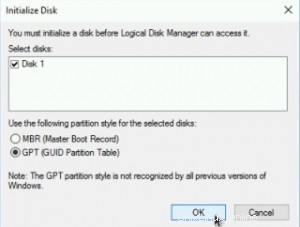
ステップ3:ボリュームを初期化する (警告:これにより、ボリューム上のすべてのデータが削除されます。保持するボリュームに関するデータが既にある場合は、この手順をスキップしてください)
In the lower pane, right-click all the way to the left under the disk name and select "Initialize Disk", partition style "GPT", then press "Ok"
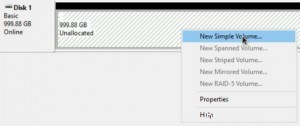
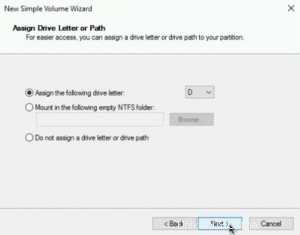
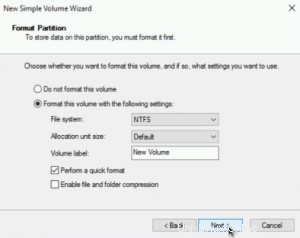
ステップ4:ボリュームを構成する (ボリュームを目的の設定に既に構成している場合は、この手順をスキップしてください)
In the lower pane, right-click in the right pane of the disk, select "New Simple Volume", Complete the wizard with your desired settings.
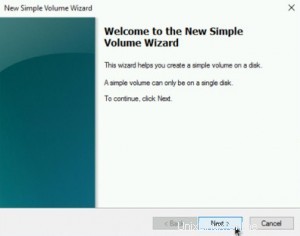
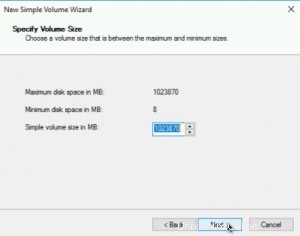
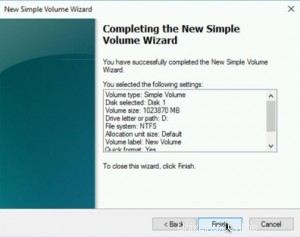
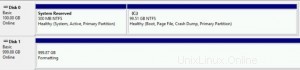
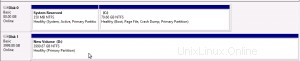
「ウィザード」を完了すると、ボリュームがフォーマットされ、最後に正常な状態になっていることがわかります。
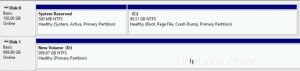
これで、ボリュームを使用する準備が整いました。
クラウドサーバーからのボリュームのデタッチ
Cloud Serverでボリュームを使用する必要がなくなった場合は、Atlantic.Netクラウドコントロールパネルでデタッチリクエストを発行する前に、必ずボリュームをオフラインにする必要があります。
ステップ1:オープンディスク管理
Windows 2008 Server:
Click on the Start Button, Administrative Tools, Computer Management, Disk Management.
Windows 2012 Server以降:
Right-click on the Windows Button and select "Disk Management"
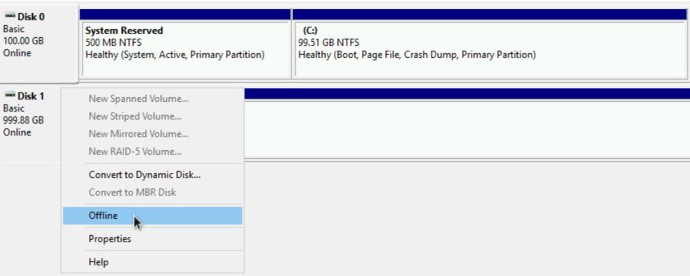
ステップ2:ボリュームをオフラインにする
In the lower pane, right-click all the way to the left under the disk name and select "Offline".

これで、Atlantic.Netコントロールパネルからデタッチコマンドを発行できます
ステップ3:クラウドサーバーからボリュームを切り離します
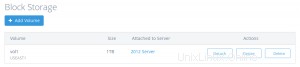
In the Atlantic.Net Control Panel, click on "Block Storage", then click the "Detach" button next to the Volume you wish to detach.
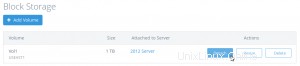
In the pop-up window, confirm you wish to detach the Volume from the Cloud Server by clicking the "Detach" button.

以前に構成したボリュームをクラウドサーバーに接続する
以前にクラウドサーバーでボリュームを構成し、それをクラウドサーバーから切り離して、同じまたは他のクラウドサーバーに接続する場合は、以下の手順に従ってください。
ステップ1:ボリュームを目的のクラウドサーバーに接続します
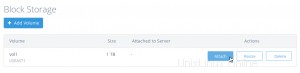
In the Atlantic.Net Control Panel, click on "Block Storage", then click the "Attach" button next to the Volume you wish to attach.
In the pop-up window, select the server you wish to attach the volume to.
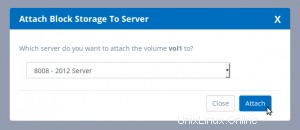
After the Volume is done attaching, you should see that the Volume is attached to the server you chose.
ステップ2:オープンディスク管理
Windows 2008 Server:
While logged into your Cloud Server, Click on the Start Button, Administrative Tools, Computer Management, Disk Management.
Windows 2012 Server以降:
While logged into your Cloud Server, Right-click on the Windows Button and select "Disk Management"
ステップ3:ボリュームをオンラインにする
In the lower pane, right-click all the way to the left under the disk name and select "Online".
これで、ボリュームが正常な状態で表示され、使用できるようになります
ボリュームのサイズ変更
スペースが不足していますか?ボリュームのストレージサイズを拡張する場合は、以下の手順に従ってください。
ステップ1:Atlantic.Netクラウドコントロールパネルでボリュームのサイズを変更します
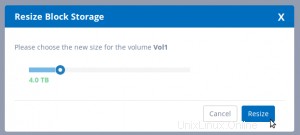
In the Atlantic.Net Control Panel, click on "Block Storage", then click the "Resize" button next to the Volume you wish to resize to a larger size.
In the pop-up window, select the size you wish to resize the Volume to and then press the "Resize" button.
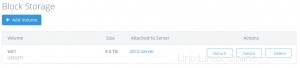
これで、コントロールパネルでボリュームのサイズが変更されたことがわかります
ステップ2:オープンディスク管理
Windows 2008 Server:
While logged into your Cloud Server, Click on the Start Button, Administrative Tools, Computer Management, Disk Management.
Windows 2012 Server以降:
While logged into your Cloud Server, Right-click on the Windows Button and select "Disk Management"
ステップ3:ディスクを再スキャンする
Windows Serverがボリュームに追加された追加のスペースを検出するには、次の手順を実行する必要があります。
Windows2008および2012Server:
From the Disk Management menu, select "Actions" and then "Rescan Disks"
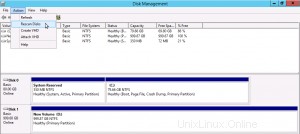
これで、追加のスペースが「未割り当て」として表示されるはずです

Windows Server 2016以降:
Windows 2016 Serverは、新しい追加スペースのオンラインディスク再スキャンをサポートしていないため、ボリュームをサーバーから切り離して再接続するか、CloudServerを再起動する必要があります。
一度これで、追加のスペースが「未割り当て」として表示されるはずです

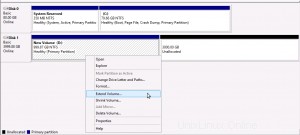
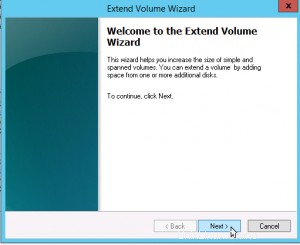
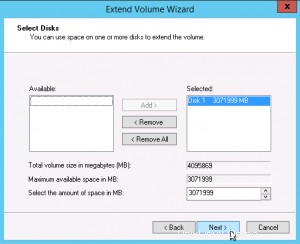
ステップ3:ボリュームを拡張して、追加のスペースを利用します
Right-click on the already configured "Healthy" portion of your Volume and select "Extend Volume"
Press "Next" to begin configuring your additional space.
Choose the amount of additional space to allocate to your volume (defaults to all available space) and press "Next"
Press "Finish" to complete setting up your additional space.
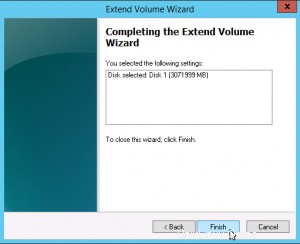
これで、ボリュームが目的の量にサイズ変更され、使用できるようになったことを確認できます。
ボリュームの削除
ボリュームが不要になったら、以下の手順に従ってください
ステップ1:オープンディスク管理
注:ボリュームが現在クラウドサーバーに接続されていない場合は、この手順をスキップできます
Windows 2008 Server:
Click on the Start Button, Administrative Tools, Computer Management, Disk Management.
Windows 2012 Server以降:
Right-click on the Windows Button and select "Disk Management"
ステップ2:ボリュームをオフラインにする
注:ボリュームが現在クラウドサーバーに接続されていない場合は、この手順をスキップできます
In the lower pane, right-click all the way to the left under the disk name and select "Offline".
ステップ3:Atlantic.Netコントロールパネルでボリュームを削除します
In the Atlantic.Net Control Panel, click on "Block Storage", then click the "Delete" button next to the Volume you wish to delete.

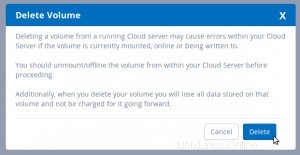
In the pop-up window, carefully read the entire message, and click the "Delete" button to remove the Volume.
ボリュームは削除され、今後は課金されなくなります。