この記事では、OpenSSLを使用して認証局を設定する方法を説明します。デジタル証明書は、公開鍵の所有権を証明するために使用されるドキュメントです。たとえば、デジタル証明書は、HTPSを介してアクセスされたWebサイトを認証するために使用されます。一般的な使用法のもう1つの例は、ドキュメントの署名です。
証明書には、キー、所有者のID、およびコンテンツを検証したエンティティのデジタル署名に関する情報が含まれています。認証局(CA)は、デジタル証明書を発行する組織です。
また、この記事では、発行された証明書を信頼するように他のホストに指示する方法についても説明します。
警告 :これは、テスト目的または概念実証のみを目的としています。実際に使用するには、実際の認証局から実際の証明書を取得する必要があります。たとえば、HTTPSだけが必要で、証明書が無料で必要な場合は、https://letsencrypt.org/にアクセスしてください。
OpenSSLのインストール
私のメインOSはFreeBSDで、portsツリーを使用してインストールするのが好きです。
# cd /usr/ports/security/openssl
# make install clean
そして、ポートのコンパイルとインストールの準備ができるまで待ちます。おそらくすでにopenssl実行可能ファイル(/ usr / binパスの下)があり、それをインストールすると、「ポート」バイナリは/ usr/ローカルにあることに注意してください。 /bin/openssl。
OpenSSLを初めて扱ったとき、提供されたバイナリは機能しませんでしたが、ポートは機能しました。
構成ファイル
私のメインOSはFreeBSDですが、これからは、OpenSSLをサポートするすべてのOSで同じ手順を実行する必要があります。いくつかのパスを調整する必要があるかもしれませんが、それだけです。
/usr/local/openssl/openssl.confに例とコメントエンド構成ファイルがあります(これもFreeBSDにあります)。これはクリーンアップ後の私のものです。最も重要な設定を強調しました:
#OpenSSL Home current directory
HOME                    = /var/openssl #choose any reasonable location
#RANDFILE                = $ENV::HOME/.rnd

# Extra OBJECT IDENTIFIER info:
oid_section             = new_oids

[ new_oids ]
tsa_policy1 = 1.2.3.4.1
tsa_policy2 = 1.2.3.4.5.6
tsa_policy3 = 1.2.3.4.5.7

[ ca ]
default_ca      = YourCA              # The default Certificate Authority section

[ YourCA ] #most important section of your file
dir             = /var/openssl/yourCA           # Where everything is kept
                                                              # choose any reasonable location
certs           = $dir/certs            # Where the issued certs are kept
crl_dir         = $dir/crl              # Where the issued crl are kept
database        = $dir/index.txt        # database index file.
new_certs_dir   = $dir/newcerts         # default place for new certs.
certificate     = $dir/CA/yourCA.crt  # The CA certificate
serial          = $dir/serial           # The current serial number
#crlnumber       = $dir/crlnumber        # the current crl number
                                        # must be commented out to leave a V1 CRL
crl             = $dir/CA/yourCA.crl  # The current CRL
private_key     = $dir/CA/yourCA.key  # The private key
RANDFILE        = $dir/private/.rand    # private random number file
x509_extensions = usr_cert              # The extentions to add to the cert

# Comment out the following two lines for the "traditional"
# (and highly broken) format.
name_opt        = ca_default            # Subject Name options
cert_opt        = ca_default            # Certificate field options

default_days    = 365                   # how long to certify for
default_crl_days= 30                    # how long before next CRL
default_md      = default               # use public key default MD
preserve        = no                    # keep passed DN ordering
policy          = policy_match

# For the CA policy
[ policy_match ]
countryName             = match
stateOrProvinceName     = supplied
organizationName        = match
organizationalUnitName  = optional
commonName              = supplied
emailAddress            = optional
localityName            = supplied

# For the 'anything' policy. At this point in time, you must list all
# acceptable 'object' types.
[ policy_anything ]
countryName             = optional
stateOrProvinceName     = optional
localityName            = optional
organizationName        = optional
organizationalUnitName  = optional
commonName              = supplied
emailAddress            = optional

############################################################
[ req ]
default_bits            = 2048
default_keyfile         = privkey.pem
distinguished_name      = req_distinguished_name
attributes              = req_attributes
x509_extensions = v3_ca # The extentions to add to the self signed cert
string_mask = utf8only

[ req_distinguished_name ]
countryName                     = Country Name (2 letter code)
countryName_default             = AR #I'm on ARgentina
countryName_min                 = 2
countryName_max                 = 2

stateOrProvinceName             = State or Province Name (full name)
stateOrProvinceName_default     = Salta # i.e. the province I live on

localityName                    = Locality Name (eg, city)

0.organizationName              = Organization Name (eg, company)
0.organizationName_default      = Your company name

organizationalUnitName          = Organizational Unit Name (eg, section)
organizationalUnitName_default  = Section Name. # eg. IT
commonName                      = Common Name (e.g. server FQDN or YOUR name)
commonName_max                  = 64

emailAddress                    = Email Address
emailAddress_max                = 64

[ req_attributes ]
challengePassword               = A challenge password
challengePassword_min           = 4
challengePassword_max           = 20
unstructuredName                = An optional company name

[ usr_cert ]
basicConstraints=CA:FALSE
nsComment                       = "OpenSSL Generated Certificate"
subjectKeyIdentifier=hash
authorityKeyIdentifier=keyid,issuer

[ v3_req ]
# Extensions to add to a certificate request
basicConstraints = CA:FALSE
keyUsage = nonRepudiation, digitalSignature, keyEncipherment

[ v3_ca ]
# Extensions for a typical CA
# PKIX recommendation.
subjectKeyIdentifier=hash
authorityKeyIdentifier=keyid:always,issuer
basicConstraints = CA:true

[ crl_ext ]
authorityKeyIdentifier=keyid:always

[ proxy_cert_ext ]
basicConstraints=CA:FALSE
nsComment                       = "OpenSSL Generated Certificate"
subjectKeyIdentifier=hash
authorityKeyIdentifier=keyid,issuer
# This really needs to be in place for it to be a proxy certificate.
proxyCertInfo=critical,language:id-ppl-anyLanguage,pathlen:3,policy:foo

[ tsa ]
default_tsa = tsa_config1       # the default TSA section

[ tsa_config1 ]
# These are used by the TSA reply generation only.
dir             = ./demoCA              # TSA root directory
serial          = $dir/tsaserial        # The current serial number (mandatory)
crypto_device   = builtin               # OpenSSL engine to use for signing
signer_cert     = $dir/tsacert.pem      # The TSA signing certificate
                                        # (optional)
certs           = $dir/cacert.pem       # Certificate chain to include in reply
                                        # (optional)
signer_key      = $dir/private/tsakey.pem # The TSA private key (optional)
default_policy  = tsa_policy1           # Policy if request did not specify it
                                        # (optional)
other_policies  = tsa_policy2, tsa_policy3      # acceptable policies (optional)
digests         = md5, sha1             # Acceptable message digests (mandatory)
accuracy        = secs:1, millisecs:500, microsecs:100  # (optional)
clock_precision_digits  = 0     # number of digits after dot. (optional)
ordering                = yes   # Is ordering defined for timestamps?
                                # (optional, default: no)
tsa_name                = yes   # Must the TSA name be included in the reply?
                                # (optional, default: no)
ess_cert_id_chain       = no    # Must the ESS cert id chain be included?
                                # (optional, default: no)
用語集
ファイルで使用されている頭字語の小さな用語集を続ける前に:
- CA:認証局の略
- CRL:証明書失効リストの略
- CSR:証明書署名要求の略
- MD:メッセージダイジェストの略
- TSA:TimeStampingAuthorityの略です
証明書リポジトリ
次に、キーと証明書を保存するためのディレクトリと(今のところ空の)ファイルを作成します。
# cd /var/openssl
# mkdir -p yourCA/CA
# mkdir -p yourCA/newcerts
# mkdir -p yourCA/certs/keys
# mkdir -p yourCA/certs/requests
# mkdir -p yourCA/certs/certificates
# cd yourCA
# touch index.txt
# echo 01 > serial
CA証明書
これで、認証局の証明書を作成して署名できます。ただし、最初に、次のコマンドを使用して秘密鍵を作成する必要があります。
# /usr/local/bin/openssl genrsa -out yourCA/CA/yourCA.key 2048次に、次のコマンドを実行してCSRを作成します。
# /usr/local/bin/openssl req -new -key ./yourCA/CA/yourCA.key -out yourCA/CA/yourCA.csr画面の指示に従い、正しい情報を入力するように注意してください。最後に、証明書に自己署名します:
# /usr/local/bin/openssl x509 -req -days 365 \
> -in yourCA/CA/yourCA.csr -out yourCA/CA/yourCA.crt \
> -signkey yourCA/CA/yourCA.key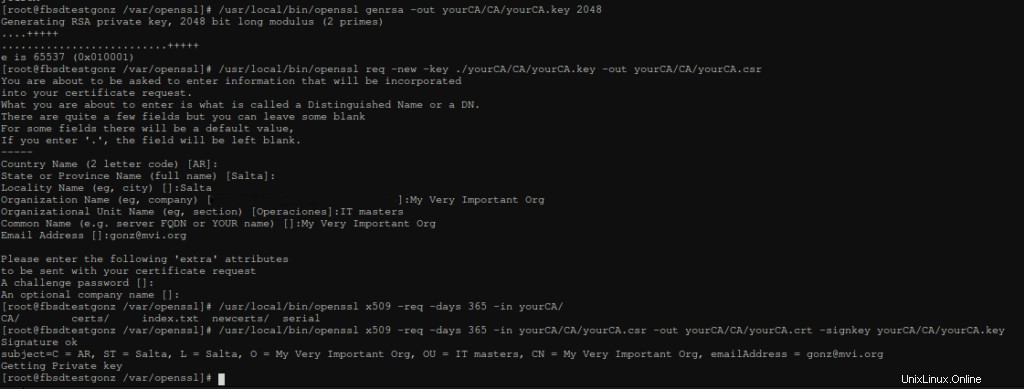
これで、クライアントやWeb証明書への署名を開始できます
クライアント証明書
プロセスは前のプロセスと非常に似ています。ただし、CA証明書を使用してクライアント証明書に署名しています。そして、理想的には、クライアントは自分の秘密鍵とCSRを生成します。
とにかく、私たちはただテストしているだけなので、私はすべてのステップを実行してから、生成された証明書をユーザーに配布しています。次のコマンドはどこでも実行できますが、順序を維持するために、以前に作成したフォルダ( / var / openssl / yourCA / certs の下)を使用しています。 )。ユーザーのJohnDoeは、最初に秘密鍵が必要です:
# cd /var/openssl/yourCA/certs
# /usr/local/bin/openssl genrsa -des3 -out keys/johndoe.key 2048
何度か尋ねられるので、パスフレーズを忘れないでください。次に、証明書署名要求を作成します:
# /usr/local/bin/openssl req -new -key keys/johndoe.key -out requests/johndoe.csr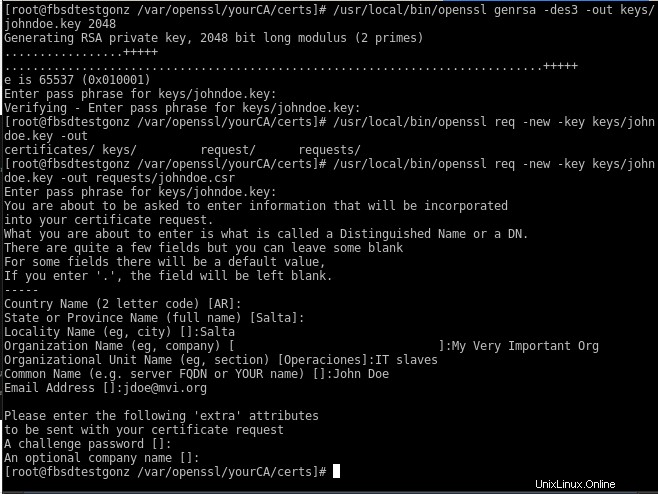
次に、次のコマンドで証明書に署名します:
# /usr/local/bin/openssl ca -in requests/johndoe.csr -cert ../CA/yourCA.crt -keyfile ../CA/yourCA.key -out certificates/johndoe.crt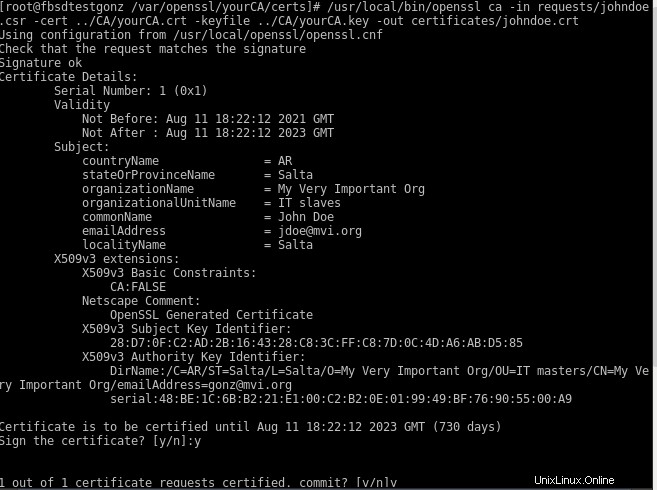
最後に、証明書をPKCS12形式にエクスポートすると、PKのパスフレーズの入力を求められます:
# /usr/local/bin/openssl pkcs12 -export -clcerts -in certificates/johndoe.crt -inkey keys/johndoe.key -out certificates/johndoe.p12証明書のインストール
これで、ユーザーが使用するためにインストールする必要のある独自の証明書を発行できます。 yourCA.crtと個人のjohndoe.p12の2つのファイルを配信する必要があります。
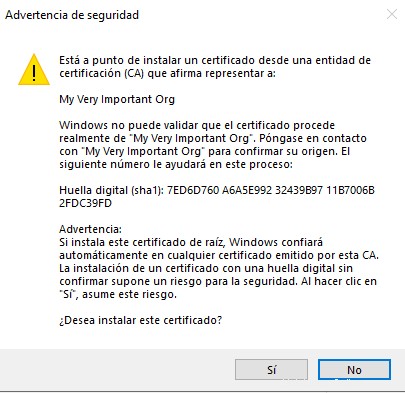
Windowsにインストールするには、証明書マネージャーツールを使用します。私のウィンドウはスペイン語であるため、あまり役に立たないと思うので、いくつかのスクリーンショットをアップロードしていません。スタートメニューをクリックして「certmgr.msc」を実行すると、次の画面がポップアップ表示されます。
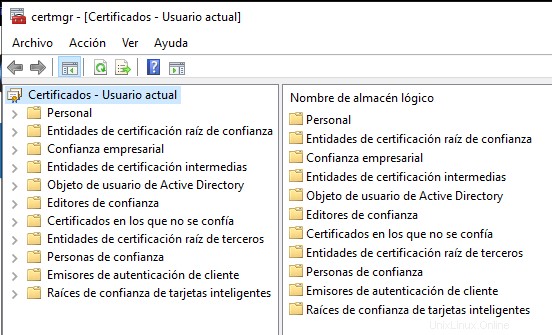
ルート証明機関フォルダを右クリックして、「インポート」を選択します。 yourCA.crtから始めて、ストアのルート証明機関を選択し、ウィザードに従います。
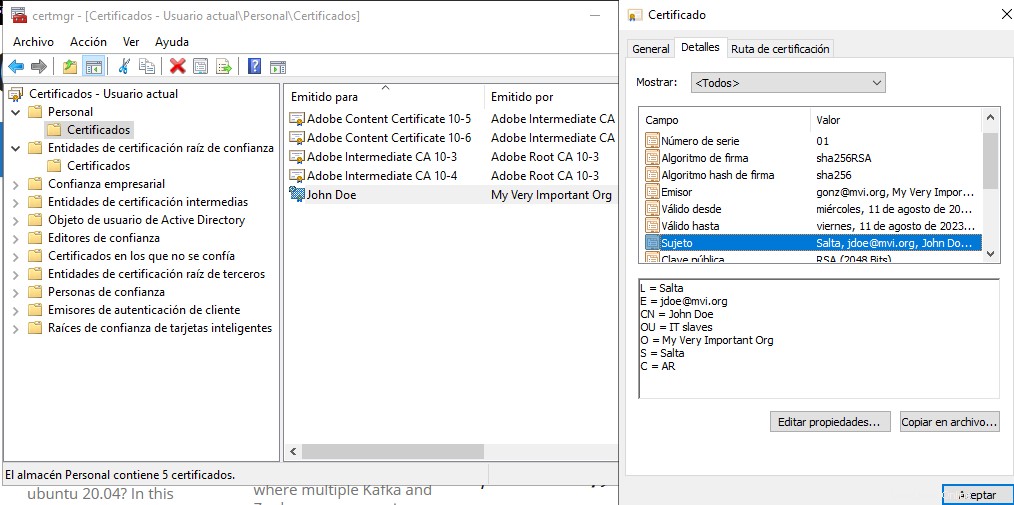
次に、Personalフォルダーを右クリックし、johndoe.p12ファイルを使用してウィザードを繰り返します。パスフレーズの入力を求められます。ウィザードが完了すると、インストールされている有効な証明書と詳細が表示されます。
これは学習目的のみであることを忘れないでください。しかし、これも信頼の問題です。組織が十分に小さく、信頼がある場合は、このDIY証明書を使用できるはずです。