Python プログラミング言語の頼りになる選択肢になりました。一般的なオブジェクト指向プログラミングだけでなく、さまざまな科学、数学、統計などのアプリケーションにも使用できます。
これはすべて、 Pythonであらゆる目的のためにライブラリとAPIを開発した強力な開発者コミュニティのおかげで可能になりました。 。機械学習から医学まで、あらゆる分野のライブラリがあります。
関連記事 :PHPでPythonスクリプトを実行する方法そのようなライブラリの1つが枕です。 、Pythonを使用した画像処理のメソッドが含まれています。今日は枕の使い方を見ていきます Pythonを使用して画像のサイズを変更するには Linux 。
前提条件
必ずPython3をインストールしてください およびPIP (Python用の便利なパッケージマネージャー)Linuxシステムで次のコマンドを使用します。
$ sudo apt install python3 python3-pip       [On Debian, Ubuntu & Mint]
$ sudo dnf install python3 python-pip        [On CentOS, RHEL & Fedora]
$ sudo pacman -S python3 python-pip          [On Arch and Manjaro]
$ sudo zypper install python3 python3-pip    [On openSUSE]
次に、枕をインストールします ピップを使用する 次のように:
$ pip3 install pillow
Or
$ pip install pillow
LinuxでPillowを使用して画像のサイズを変更する
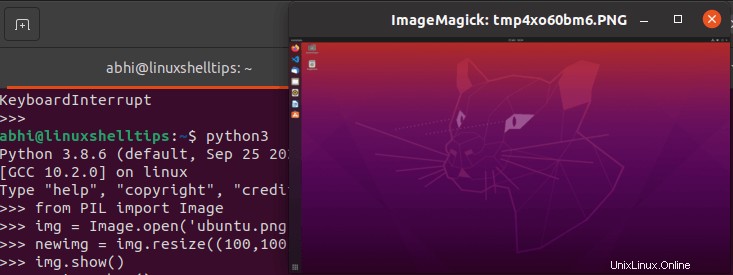
まず、ファイルを開いて Pythonを記述します コードを書くか、単に Python 3を起動します コマンドラインのインタプリタ。
$ python3
「画像」をインポートします ‘枕のクラス 。 枕に注意してください ライブラリはPILという名前で知られています Python 3 。
>>> from PIL import Image

「Image.open」で画像ファイルを開きます ‘。
>>> img = Image.open('filepath')

次に、メソッド「サイズ変更」を呼び出します ‘画像オブジェクト‘ img ‘。このメソッドは1つの引数を取ります。それは、画像の新しい幅と高さをピクセル単位で含むタプルです。
>>> newimg = img.resize((new_width, new_height))

実際、関数「 show」を呼び出すこともできます ‘元のファイルとサイズ変更されたファイルがどのように見えるかを確認します。
>>> img.show()
サイズ変更された画像を参照してください。
>>> newimg.show()

最後に、サイズ変更した画像を新しいファイルに保存します。
>>> newimg.save('resized_ubuntu.png')
これらすべての行をファイルにコーディングした場合は、ファイルを保存して終了できます。
from PIL import Image
img = Image.open('filepath')
newimg = img.resize((new_width, new_height))
newimg.save('resized_ubuntu.png')
次の手順を実行して、上記のすべての手順を次々に実行します。
$ python3 file.py
新しいファイルが実際に保存されているかどうかを確認します。
$ ls resized_ubuntu.png

結論
枕を使用して、Pythonを使用して画像のサイズをすばやく簡単に変更する方法を学びました。 図書館。 枕の学習に興味がある場合 詳細については、公式ドキュメントを必ずお読みください。
読んでいただきありがとうございます。以下にご意見をお聞かせください。