Linuxオペレーティングシステムでは、「rsync」は Rを表します エモートS ync。これは、ファイルとディレクトリをソース(SRC)から宛先(DEST)に同期(コピー)するために使用されるユーティリティです。
ファイルとディレクトリは、ローカルホスト上で、またはリモートホストとの間で同期できます。 SRCでは、ファイルとディレクトリが同期されます。一方、DESTでは、同期されたファイルとディレクトリが作成されます。
さらに、rsyncコマンドは、ファイルとディレクトリを再帰的にコピーし、シンボリックリンクをコピーし、ファイルID(権限、グループ、変更時間、所有権)を保持できます。
Rsyncは、ファイルまたはディレクトリを同期/コピーするために2つの異なる方法を使用できます。
- リモートシェルを使用する:sshまたはrsh
- TCPを介して直接rsyncデーモンを使用する
さらに、rsyncは、SRCとDESTの間で異なるデータのみをコピー/同期するデルタ転送アルゴリズムを使用します。
このチュートリアルでは、実践的な実践と例を通じて、rsyncコマンドを使用する多くの方法を説明します。また、rsyncコマンドの最も一般的なオプションの詳細についても説明します。
Rsyncコマンドの構文
rsyncコマンドの使用方法を深く掘り下げる前に、その構文を見てみましょう。
rsync [options] <SRC_PATH> <DEST_PATH>1。ローカルマシン上のファイルのコピー/同期
Rsyncコマンドを使用して、ローカルマシン上のファイルをコピー/同期できます。
ユーザー「linoxide」のホームディレクトリから「/home/linoxide」という名前のファイルをフォルダ「/opt/test」にコピーするとします。
$ sudo rsync -zvh /home/linoxide/computer-networking.pdf /opt/test/
computer-networking.pdf

sent 1.01K bytes  received 35 bytes  2.10K bytes/sec
total size is 3.03K  speedup is 2.89
場所:
-z :圧縮
-v :出力を冗長化する
-h :人間が読める形式
2。ローカルマシンのディレクトリをコピー/同期する
すべてのファイルをSRCローカルディレクトリからDESTディレクトリに転送するには、オプション-zavhを指定してrsyncコマンドを実行します。 。
「/home/linoxide」という名前のユーザー「linoxide」のホームディレクトリを「/opt/backup」フォルダにコピーするとします。
$ sudo rsync -zavh /home/linoxide/ /opt/backup/

sending incremental file list
./
.bash_history
.bash_logout
.bashrc
.lesshst
.profile
.sudo_as_admin_successful
.viminfo
computer-networking.pdf
.ssh/
.ssh/known_hosts

sent 4.85K bytes  received 198 bytes  10.10K bytes/sec
total size is 9.59K  speedup is 1.90
場所:
-a :コピー/同期プロセス中にデータをアーカイブする
rsyncコマンドが成功したかどうかを確認できますか?次のコマンドを実行します:
$ ls /opt/backup/ -la
total 40
drwxr-xr-x 3 linoxide linoxide 4096 Thg 6 15 16:02 .
drwxr-xr-x 4 root     root     4096 Thg 6 15 16:25 ..
-rw------- 1 linoxide linoxide  817 Thg 6 15 16:01 .bash_history
-rw-r--r-- 1 linoxide linoxide  220 Thg 6 11 15:58 .bash_logout
-rw-r--r-- 1 linoxide linoxide 3771 Thg 6 11 15:58 .bashrc
-rw-rw-r-- 1 linoxide linoxide 3028 Thg 2 25  2017 computer-networking.pdf
-rw------- 1 linoxide linoxide   40 Thg 6 15 15:51 .lesshst
-rw-r--r-- 1 linoxide linoxide  807 Thg 6 11 15:58 .profile
drwx------ 2 linoxide linoxide 4096 Thg 6 13 17:58 .ssh
-rw-r--r-- 1 linoxide linoxide    0 Thg 6 15 16:02 .sudo_as_admin_successful
-rw------- 1 linoxide linoxide  680 Thg 6 14 16:50 .viminfo
3。特定のポートを使用したssh経由のRsync
ssh(セキュアシェル)を使用してデータをコピー/同期できます。データは暗号化されたセキュア接続で転送されます。インターネット上で転送されている間、誰もあなたのデータを読むことができません。 rsyncコマンドを使用する場合、特定のタスクを実行するためにユーザー/rootパスワードを提供する必要があります。 SSHオプションを使用すると、パスワードが安全になるように暗号化された方法でログインが送信されます。
特定のsshポートを使用してリモートからローカルにファイルをコピーします。 rsyncコマンドでプロトコルを指定するには、-eを使用する必要があります 使用するプロトコル名のオプション。
たとえば、次のrsyncコマンドは、リモートシェルを介してファイル「deploy.yaml」をリモートマシンからユーザー「linoxide」のホームディレクトリにコピーします。
$ rsync -avz -e "ssh -p 22" cas@10.9.8.41:/home/cas/deploy.yaml /home/linoxide/
cas@10.9.8.41's password:
receiving incremental file list

sent 20 bytes  received 60 bytes  32.00 bytes/sec
total size is 239  speedup is 2.99
4。ローカルマシンからリモートマシンにファイルとディレクトリをコピー/同期する
ローカルホストのユーザー「linoxide」のホームディレクトリにあるフォルダ「test-data」をリモートマシン「cas@10.9.8.41」のホームディレクトリにコピー/同期する場合は、次のコマンドを実行します。
$ rsync -azrvh /home/linoxide/computer-networking.pdf cas@10.9.8.41:
cas@10.9.8.41's password:
sending incremental file list
computer-networking.pdf

sent 1.04K bytes  received 35 bytes  430.80 bytes/sec
total size is 3.03K  speedup is 2.81
場所:
-r :再帰コピー
5。リモートマシンからローカルマシンにファイルとディレクトリをコピー/同期する
rsyncコマンドは、ローカルホストにコピーするリモートディレクトリ「ドキュメント」を転送するのに役立ちます。
リモートホスト「cas@10.9.8.41」からユーザー「linoxide」のホームディレクトリにファイル/ディレクトリをコピー/同期したいとします。
例:
$ rsync -zavhr cas@10.9.8.41:document /home/linoxide
cas@10.9.8.41's password:
receiving incremental file list
document/
document/kubernetes.txt

sent 47 bytes  received 139 bytes  74.40 bytes/sec
total size is 0  speedup is 0.00
6。 Rsync-includeおよび-excludeオプション
これらの2つのオプションを使用すると、これらのオプションでパラメータを指定してファイルを含めたり除外したりできます。同期に含めるファイルやディレクトリを指定したり、転送したくないファイルやフォルダを除外したりできます。
>この例では、rsyncコマンドは、「k」で始まるファイルとディレクトリのみを含み、他のすべてのファイルとディレクトリを除外します。
$ rsync -avhz -e "ssh -p 22" --include 'k*' --exclude '*' cas@10.9.8.41: /home/linoxide

cas@10.9.8.41's password:
receiving incremental file list
./
k8s.yaml
kubernetes.yaml
kuber/

sent 88 bytes  received 280 bytes  147.20 bytes/sec
total size is 73  speedup is 0.20
7。ファイルの最大サイズを設定する
転送または同期する最大ファイルサイズを指定できます。 '--max-size'オプションでそれを行うことができます。
次の例では、最大ファイルサイズは200kであるため、このコマンドは200k以下のファイルのみを転送します。
$ rsync -zavhr --max-size='200k' cas@10.9.8.41: /home/linoxide
cas@10.9.8.41's password:
receiving incremental file list
.bash_history
.bash_logout
.bashrc
.profile
.sudo_as_admin_successful
.viminfo
computer-networking.pdf

sent 2.58K bytes  received 51.60K bytes  21.67K bytes/sec
total size is 113.24K  speedup is 2.09
8。転送が成功したらソースファイルを削除する
ここで、Webサーバーとデータバックアップサーバーがあり、毎日のバックアップを作成してバックアップサーバーと同期したとすると、バックアップのローカルコピーをWebサーバーに保持したくありません。では、転送が完了するのを待ってから、そのローカルバックアップファイルを手動で削除しますか?もちろんNO。この自動削除は、「-remove-source-files」オプションを使用して実行できます。
$ ls /home/directory
computer-networking.pdf  deploy.yaml  document  k8s.yaml  kuber  kubernetes.yaml

------
$ rsync -azvh --remove-source-files /home/linoxide/deploy.yaml cas@10.9.8.41:
cas@10.9.8.41's password:
sending incremental file list

sent 70 bytes  received 20 bytes  36.00 bytes/sec
total size is 239  speedup is 2.66
'ls'コマンドを再度実行すると、SRCでファイル'deploy.yaml'が削除されたことがわかります。
$ ls
computer-networking.pdf  document  k8s.yaml  kuber  kubernetes.yaml
9。 SRCとDESTのファイルとディレクトリの違いを見つける
SRCとDESTの間のディレクトリのファイルの違いを見つけるために、「-i」オプションを指定してrsyncコマンドを実行できます。
$ rsync -avzi /home/linoxide/cloud cas@10.9.8.41:
cas@10.9.8.41's password:
sending incremental file list
cd+++++++++ cloud/
<f+++++++++ cloud/computer-networking.pdf
<f+++++++++ cloud/k8s.yaml
<f+++++++++ cloud/kubernetes.yaml
cd+++++++++ cloud/document/
<f+++++++++ cloud/document/kubernetes.txt
cd+++++++++ cloud/kuber/
<f+++++++++ cloud/kuber/test.txt

sent 1,472 bytes  received 127 bytes  1,066.00 bytes/sec
total size is 3,101  speedup is 1.94
10。帯域幅を制限する
'--bwlimit =
データ転送速度を300KB/秒に制限する場合は、次のコマンドを実行します。
$ rsync -avzh --bwlimit=300 /home/linoxide/coursera.png cas@10.9.8.41:

cas@10.9.8.41's password:
sending incremental file list
coursera.png

sent 2.93M bytes  received 35 bytes  234.48K bytes/sec
total size is 3.00M  speedup is 1.02
11。 scpで失敗したときに転送を再開します
場合によっては、scpコマンドを使用して非常に大きなファイルを転送する必要がありますが、コピー中にエラーが発生し、ファイルサイズと時間が大きいため、scpコマンドを使用して転送を再開できませんでした。
この状況では、rsyncコマンドを使用して、エラーが発生した場所からファイルのコピーを開始できます。たとえば、ホームディレクトリにある大きなISOファイルをリモートホスト'cas@10.9.8.41'
にコピーします。$ scp /home/linoxide/ubuntu-18.04.4-live-server-amd64.iso cas@10.9.8.41:
cas@10.9.8.41's password:
ubuntu-18.04.4-live-server-amd64.iso 32% 278MB 86.7MB/s 00:06 ETAプロセスはユーザーによって強制終了されました。その時点で、ファイルの32%が転送されました。これで、rsyncを実行して現在の作業を続行できます:
$ rsync -P -avzh ubuntu-18.04.4-live-server-amd64.iso cas@10.9.8.41:

cas@10.9.8.41's password:
sending incremental file list
ubuntu-18.04.4-live-server-amd64.iso
        912.26M 100%   15.89MB/s    0:00:54 (xfr#1, to-chk=0/1)

sent 541.25M bytes  received 132.44K bytes  9.25M bytes/sec
total size is 912.26M  speedup is 1.69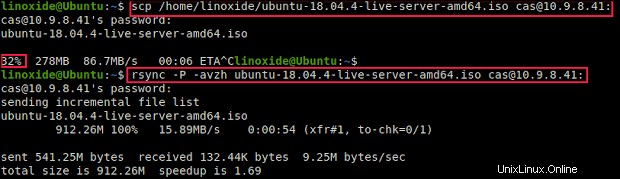
12。データ転送中の進行状況を表示する
rsyncコマンドの実行時に転送された進行状況を確認したい場合は、「-progress」オプションを使用できます。
ファイルとコピーを完了するための残り時間が表示されます。
例:
$ rsync -avh --progress /home/linoxide/cloud/ cas@10.9.8.41:
cas@10.9.8.41's password:
sending incremental file list
./
computer-networking.pdf
          3.03K 100%    0.00kB/s    0:00:00 (xfr#1, to-chk=8/10)
coursera.png
          3.00M 100%  114.38MB/s    0:00:00 (xfr#2, to-chk=7/10)
k8s.yaml
             39 100%    1.52kB/s    0:00:00 (xfr#3, to-chk=6/10)
kubernetes.yaml
             34 100%    1.33kB/s    0:00:00 (xfr#4, to-chk=5/10)
ubuntu-18.04.4-live-server-amd64.iso
        912.26M 100%   89.60MB/s    0:00:09 (xfr#5, to-chk=4/10)
document/
document/kubernetes.txt
              0 100%    0.00kB/s    0:00:00 (xfr#6, to-chk=1/10)
kuber/
kuber/test.txt
              0 100%    0.00kB/s    0:00:00 (xfr#7, to-chk=0/10)

sent 915.49M bytes  received 164 bytes  79.61M bytes/sec
total size is 915.26M  speedup is 1.00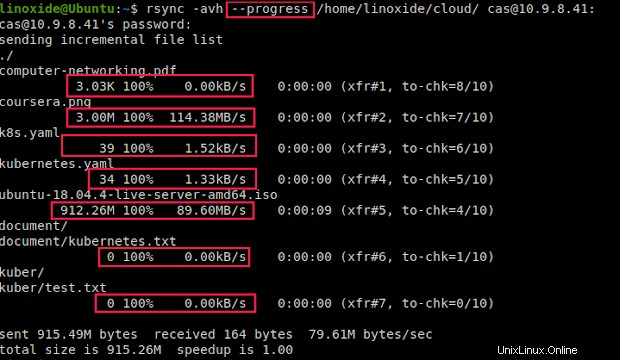
結論
このチュートリアルでは、ファイル/ディレクトリをコピーまたは同期するためのいくつかの例を使用して、rsyncコマンドを使用する方法を学習しました。
読んでいただきありがとうございます。以下のコメントセクションに提案を残してください。