Nginxは、オープンソース、軽量、高性能で、世界中で最も急速に成長しているWebサーバーです。 Nginxは、Linux、Windows、Mac OS、およびSolarisオペレーティングシステムで動作します。 NGINXの人気は高まり続けているため、ますます多くのNGINXデプロイメントを保護する必要があります。
このチュートリアルでは、いくつかの一般的なNginxサーバーのセキュリティのヒントとコツを説明します。
- Ubuntu18.04またはDebian9を実行しているサーバー。
- ルートパスワードがサーバーに設定されています。
Nginxをインストール
まず、システムにNginxをインストールする必要があります。次のコマンドを実行してインストールできます:
apt-get install nginx -y
Nginxをインストールしたら、次のコマンドでNginxのステータスを確認できます。
systemctl status nginx
次の出力が表示されます。
? nginx.service - A high performance web server and a reverse proxy server
   Loaded: loaded (/lib/systemd/system/nginx.service; enabled; vendor preset: enabled)
   Active: active (running) since Sun 2019-03-10 02:43:14 UTC; 4min 40s ago
     Docs: man:nginx(8)
  Process: 2271 ExecStop=/sbin/start-stop-daemon --quiet --stop --retry QUIT/5 --pidfile /run/nginx.pid (code=exited, status=0/SUCCESS)
  Process: 2281 ExecStart=/usr/sbin/nginx -g daemon on; master_process on; (code=exited, status=0/SUCCESS)
  Process: 2274 ExecStartPre=/usr/sbin/nginx -t -q -g daemon on; master_process on; (code=exited, status=0/SUCCESS)
 Main PID: 2285 (nginx)
    Tasks: 2 (limit: 1111)
   CGroup: /system.slice/nginx.service
           ??2285 nginx: master process /usr/sbin/nginx -g daemon on; master_process on;
           ??2290 nginx: worker process

Mar 10 02:43:14 ubuntu1804 systemd[1]: Starting A high performance web server and a reverse proxy server...
Mar 10 02:43:14 ubuntu1804 systemd[1]: nginx.service: Failed to parse PID from file /run/nginx.pid: Invalid argument
Mar 10 02:43:14 ubuntu1804 systemd[1]: Started A high performance web server and a reverse proxy server.
Nginxを更新
多くのパフォーマンスの強化、新機能、セキュリティ修正が追加されているため、NginxWebサーバーを更新する必要があります。最新のLinuxディストリビューションのほとんどは、デフォルトのパッケージリストに最新バージョンのnginxが含まれていません。そのため、パッケージマネージャーを介してnginxの最新バージョンをアップグレードする必要があります。次のコマンドを使用して、NginxWebサーバーを更新できます。
apt-get update -y
apt-get install nginx --reinstall -y
まず、Nginxがバージョン情報を開示しないようにする必要があります。
デフォルトでは、Nginxはその名前とバージョンをHTTPヘッダーに表示します。
次のコマンドで確認できます:
curl -I http://localhost
次の出力が表示されます。
HTTP/1.1 200 OK
Server: nginx/1.14.0 (Ubuntu)
Date: Sat, 09 Mar 2019 15:28:01 GMT
Content-Type: text/html
Content-Length: 10918
Last-Modified: Fri, 01 Feb 2019 16:05:17 GMT
Connection: keep-alive
ETag: "5c546e3d-2aa6"
Accept-Ranges: bytes
上記の出力では、Nginxとオペレーティングシステムのバージョンが表示されます。
/etc/nginx/nginx.confファイルを編集すると、この情報を非表示にできます:
nano /etc/nginx/nginx.conf
server_tokensをhttp構成部分内にオフラインで追加します:
http {

        ##
        # Basic Settings
        ##
        server_tokens off;
終了したら、ファイルを保存して閉じます。次に、Nginx Webサーバーを再起動して、変更を適用します。
systemctl restart nginx
ここで、curlコマンドを再度実行します:
curl -I http://localhost
次の出力が表示されます。
HTTP/1.1 200 OK
Server: nginx
Date: Sat, 09 Mar 2019 15:33:31 GMT
Content-Type: text/html
Content-Length: 10918
Last-Modified: Fri, 01 Feb 2019 16:05:17 GMT
Connection: keep-alive
ETag: "5c546e3d-2aa6"
Accept-Ranges: bytes
Nginxには、特定のIPアドレスを許可または拒否するためのngx_http_access_moduleという単純なモジュールが付属しています。
Nginxフォーム172.16.0.0/16を許可し、他のサブネットから拒否する場合。次に、/ etc / nginx / sites-enabled/defaultファイルを開きます。
nano /etc/nginx/sites-enabled/default
サーバーブロック内で次の変更を行います。
server {
        listen 80 default_server;
        listen [::]:80 default_server;

	allow 172.16.0.0/16;
    	deny  all;
終了したら、ファイルを保存して閉じます。次に、Nginxを再起動して、これらの変更を適用します。
systemctl restart nginx
次に、192.168.0.102などの他のIPアドレス範囲からNginxサーバーにアクセスしてみます。
次に、次のコマンドを使用してNginxログを確認します。
tail -f /var/log/nginx/error.log
次の出力でアクセスが禁止されているはずです:
2019/03/09 16:13:01 [error] 11589#11589: *1 access forbidden by rule, client: 192.168.0.102, server: _, request: "GET /test/ HTTP/1.1", host: "172.16.0.122"
TLSを使用したセキュアなNginx
TLS(Transport Layer Security)は、SSL(Secure Socket Layer)の後継です。より強力で効率的なHTTPSを提供し、Forward Secrecy、最新のOpenSSL暗号スイートとの互換性、HSTSなどの拡張機能が含まれています。このチュートリアルでは、Nginxで自己署名SSL証明書を有効にする方法を示します。代わりにLet'sEncrypt証明書を使用する場合は、https://www.howtoforge.com/tutorial/nginx-with-letsencrypt-ciphersuite/
をご覧ください。まず、次のコマンドを使用してSSL用のディレクトリを作成します。
mkdir /etc/nginx/ssl/
次に、次のコマンドを使用してキーと証明書を生成します。
cd /etc/nginx/ssl/
まず、次のコマンドでキーを生成します:
openssl genrsa -aes256 -out nginx.key 1024
次の出力が表示されます。
Generating RSA private key, 1024 bit long modulus
...++++++
.............................++++++
e is 65537 (0x010001)
Enter pass phrase for nginx.key:
Verifying - Enter pass phrase for nginx.key:
次に、次のコマンドを使用してcsrを生成します。
openssl req -new -key nginx.key -out nginx.csr
以下に示すようにすべての情報を提供します:
Generating RSA private key, 1024 bit long modulus
...++++++
.............................++++++
e is 65537 (0x010001)
Enter pass phrase for nginx.key:
Verifying - Enter pass phrase for nginx.key:
[email protected]:~# openssl req -new -key nginx.key -out nginx.csr
Enter pass phrase for nginx.key:
You are about to be asked to enter information that will be incorporated
into your certificate request.
What you are about to enter is what is called a Distinguished Name or a DN.
There are quite a few fields but you can leave some blank
For some fields there will be a default value,
If you enter '.', the field will be left blank.
-----
Country Name (2 letter code) [AU]:IN
State or Province Name (full name) [Some-State]:Gujarat
Locality Name (eg, city) []:Junagadh
Organization Name (eg, company) [Internet Widgits Pty Ltd]:IT
Organizational Unit Name (eg, section) []:IT
Common Name (e.g. server FQDN or YOUR name) []:HITESH
Email Address []:[email protected]

Please enter the following 'extra' attributes
to be sent with your certificate request
A challenge password []:admin
An optional company name []:IT
次に、次のコマンドを使用して証明書に署名します。
openssl x509 -req -days 365 -in nginx.csr -signkey nginx.key -out nginx.crt
次の出力が表示されます。
Signature ok
subject=C = IN, ST = Gujarat, L = Junagadh, O = IT, OU = IT, CN = HITESH, emailAddress = [email protected]
Getting Private key
Enter pass phrase for nginx.key:
次に、Nginxのデフォルトの仮想ホストファイルを開き、証明書を定義します。
nano /etc/nginx/sites-enabled/default
次の変更を行います:
server {
        listen 192.168.0.100:443 ssl;
        root /var/www/html;
        index index.html index.htm index.nginx-debian.html;
        server_name _;
        ssl_certificate /etc/nginx/ssl/nginx.crt;
        ssl_certificate_key /etc/nginx/ssl/nginx.key;
        ssl_protocols       TLSv1 TLSv1.1 TLSv1.2;
終了したら、ファイルを保存して閉じます。次に、Nginxサーバーを再起動して、これらの変更を適用します。
systemctl restart nginx
Nginx Webサーバーをセットアップするときに、特定のディレクトリをパスワードで保護することもできます。これは、.htpasswdファイルを使用して実行できます。
これを行うには、passwdファイルを作成し、次のコマンドを使用してそのファイルにユーザーを追加します。
mkdir /etc/nginx/.htpasswd
htpasswd -c /etc/nginx/.htpasswd/passwd admin
次の出力が表示されます。
New password:
Re-type new password:
Adding password for user admin
次に、次のコマンドを使用して、NginxWebルート内にテストディレクトリを作成します。
mkdir /var/www/html/test
次に、次のコマンドを使用してwww-dataユーザーに所有権を付与します。
chown -R www-data:www-data /var/www/html/test
次に、次のコマンドを使用してNginxのデフォルトの仮想ホストファイルを開きます。
nano /etc/nginx/sites-enabled/default
次に、以下に示すようにテストディレクトリを保護します。
        location /test {

	auth_basic  "Restricted";
	auth_basic_user_file   /etc/nginx/.htpasswd/passwd;
終了したら、ファイルを保存して閉じます。次に、Nginxサービスを再起動して、これらの変更を適用します。
systemctl restart nginx
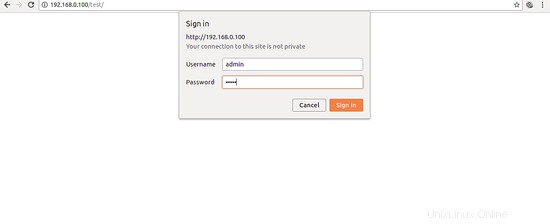
次に、Webブラウザーを開き、URL http:// your-server-ip/testを入力します。次のページに示すように、テストディレクトリにアクセスするためのユーザー名とパスワードの入力を求めるプロンプトが表示されます。

おめでとう! Ubuntu18.04サーバーでNginxサーバーを正常に保護しました。これが、NginxWebサーバーでホストされているアプリケーションの保護に役立つことを願っています。ご不明な点がございましたら、お気軽にお問い合わせください。詳細については、Nginxセキュリティドキュメントを参照してください。