Naemonは、ネットワークとアプリケーションの状態を明確に表示しながら、高速、安定、革新を目指す新しい監視スイートです。これは、nagiosサーバーの代わりであり、非常に安定しており、thrukと呼ばれるすばらしいダッシュボードを使用します。 naemonのセットアップは非常に簡単で、ライブステータスが組み込まれています。このチュートリアルでは、グラフ用のpnp4nagiosとともに、実稼働環境にnaemonをインストールして構成する方法を示します。 Naemonは非常に安定しています。大規模な環境で構成を維持する方法を紹介します。
このチュートリアルでは、4台のサーバーを使用します
- 192.168.1.170-Naemonサーバー-centos7
- 192.168.1.21-nrpeクライアント-centos6
- 192.168.1.182-nrpeクライアント-ubuntu
- 192.168.1.75-nscpクライアント-Windowsサーバー2012R2
Naemonサーバーのインストール
最小限のインストールで、SELinuxが無効になり、firewalldが有効になっているCentOS7ホストを使用しています。
[[email protected] ~]# sestatus
SELinux status:                 disabled
[[email protected] ~]#
リポジトリのインストール:
[[email protected] ~]# yum -y install https://labs.consol.de/repo/stable/rhel7/x86_64/labs-consol-stable.rhel7.noarch.rpm
epelリポジトリを有効にする:
yum -y install epel-release
Naemonパッケージのインストール:
[[email protected] ~]# yum install naemon*
Naemonは、同じNagiosプラグインとnrpeを使用してホストを監視します。次にそれらをインストールします:
[[email protected] ~]# yum install nagios-plugins nagios-plugins-all nagios-plugins-nrpe nrpe -y
ファイアウォールルールを追加します:
[[email protected] ~]# firewall-cmd --add-service=http --permanent
success
[[email protected] ~]# firewall-cmd --add-service=https --permanent
success
[[email protected] ~]# firewall-cmd --reload
success
[[email protected] ~]# firewall-cmd --list-all
public (active)
  target: default
  icmp-block-inversion: no
  interfaces: eno16777736
  sources:
  services: dhcpv6-client http https ssh
  ports:
  protocols:
  masquerade: no
  forward-ports:
  sourceports:
  icmp-blocks:
  rich rules:

[[email protected] ~]#
pnp4nagiosのインストール。
yum install gcc-c++ rrdtool perl-Time-HiRes perl-rrdtool php-gd php php-cli wget
pnp4nagiosをダウンロードしています。
[[email protected] ~]# wget https://svwh.dl.sourceforge.net/project/pnp4nagios/PNP-0.6/pnp4nagios-0.6.25.tar.gz
    [[email protected] ~]# tar -zxvf pnp4nagios-0.6.25.tar.gz
    [[email protected] ~]# cd pnp4nagios-0.6.25/
[[email protected] pnp4nagios-0.6.25]# ./configure --with-nagios-user=naemon --with-nagios-group=naemon
[[email protected] pnp4nagios-0.6.25]# make all
[[email protected] pnp4nagios-0.6.25]# make fullinstall
[[email protected] pnp4nagios-0.6.25]# make install-webconf
[[email protected] pnp4nagios-0.6.25]# make install-config
[[email protected] pnp4nagios-0.6.25]# make install-init
サービスを再起動して有効にします。
    [[email protected] ~]# systemctl enable httpd && systemctl restart httpd
[[email protected] ~]# systemctl enable naemon && systemctl restart naemon
[[email protected] ~]# systemctl enable thruk && systemctl restart thruk
[[email protected] ~]# systemctl enable npcd && systemctl restart npcd
http://192.168.1.170/thruk
からURLにアクセスできるはずです。
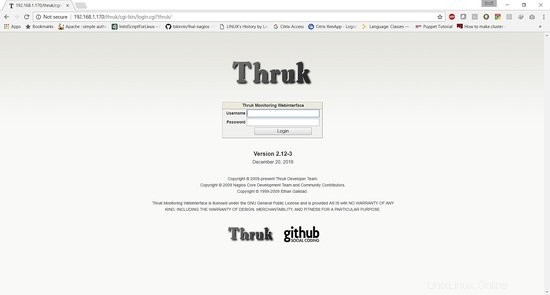
デフォルトのユーザー名はthrukadmin、パスワードはthrukadminです。
thrukadminパスワードを変更する場合は、次のコマンドを実行します。
[[email protected] ~]# htpasswd /etc/thruk/htpasswd thrukadmin
Linuxホストを監視するためのnrpeクライアントのインストール
192.168.1.21-nrpeクライアント-centos6
Nagiosプラグインとnrpeクライアントのインストール:
[[email protected] ~]# yum install nagios-plugins nagios-plugins-all nagios-plugins-nrpe nrpe -y
nrpe.cfgのバックアップを取ります:
[[email protected] ~]# cp /etc/nagios/nrpe.cfg /etc/nagios/nrpe.cfg.bkp
nrpe.confファイルの内容を以下の内容に置き換えます。
[[email protected] ~]# cat /etc/nagios/nrpe.cfg
log_facility=daemon
pid_file=/var/run/nrpe/nrpe.pid
nrpe_user=nrpe
nrpe_group=nrpe
allowed_hosts=127.0.0.1,192.168.1.170
dont_blame_nrpe=1
debug=0
command_timeout=60
connection_timeout=300
include_dir=/etc/nrpe.d/

[[email protected] ~]#
allowed_hostの下に、naemonサーバーのIPアドレスをここに追加します。これは192.168.1.170です。
次に、nrpeサービスを再起動する必要があります:
	[[email protected] ~]# service nrpe restart
	[[email protected] ~]# chkconfig nrpe on
192.168.1.182-nrpeクライアント-ubuntu
[email protected]:~# apt-get install nagios-nrpe-server nagios-plugins -y
nrpe.cfgのバックアップを取ります:
[[email protected] ~]# cp /etc/nagios/nrpe.cfg /etc/nagios/nrpe.cfg.bkp
nrpe.confファイルの内容を以下の内容に置き換えます。
[email protected]:~# cat /etc/nagios/nrpe.cfg
log_facility=daemon
pid_file=/var/run/nagios/nrpe.pid
nrpe_user=nagios
nrpe_group=nagios
allowed_hosts=127.0.0.1,192.168.1.170
dont_blame_nrpe=1
debug=0
command_timeout=60
connection_timeout=300
include_dir=/etc/nagios/nrpe.d/
[email protected]:~#
次に、nrpeサービスを再起動する必要があります:
	[email protected]:~# systemctl restart nagios-nrpe-server.service
	[email protected]:~# systemctl enable nagios-nrpe-server.service
WindowsへのNscpのインストール
192.168.1.75-nscpクライアント-Windowsサーバー2012R2
このWebサイトからnscpをダウンロードします:
https://www.nsclient.org/download/
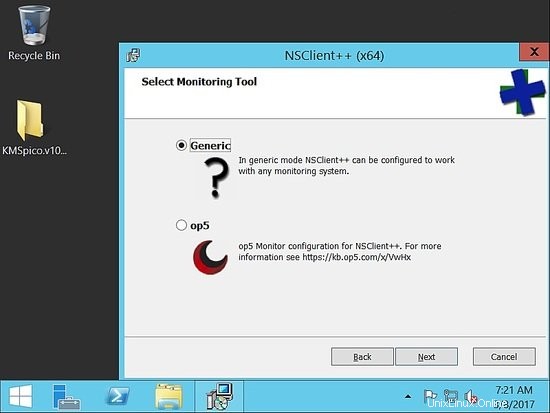
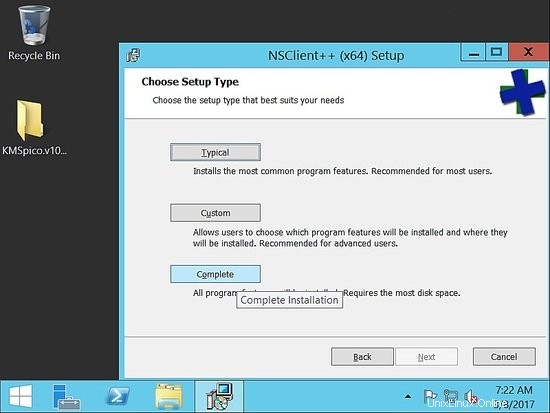
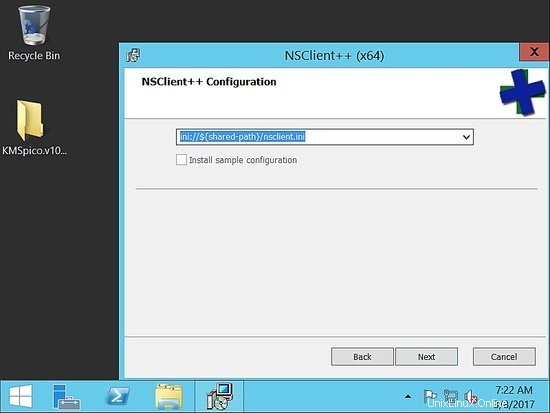
ダウンロードしたら、インストールのスクリーンショットに従ってください
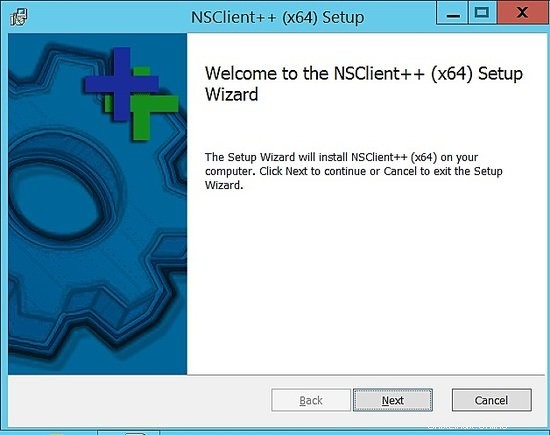
ジェネリックを選択してください。
完全を選択:
デフォルトのパスを選択します:
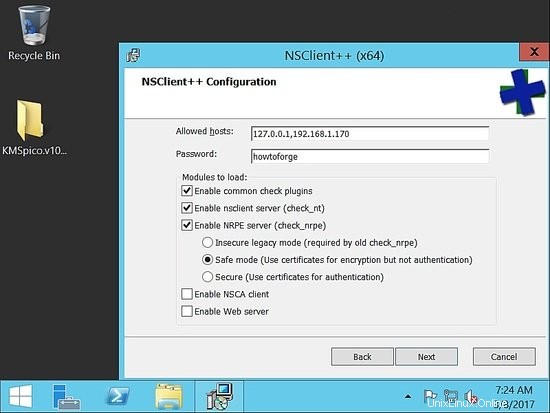
ここで、許可されたホストの下に、naemonホストを追加してください。ここでのセットアップでは、192.168.1.170です。
複雑なパスワードを指定してください。この例では、パスワードを「howtoforge」として使用しました。次に、nsclientとnrpeを有効にするをチェックします。
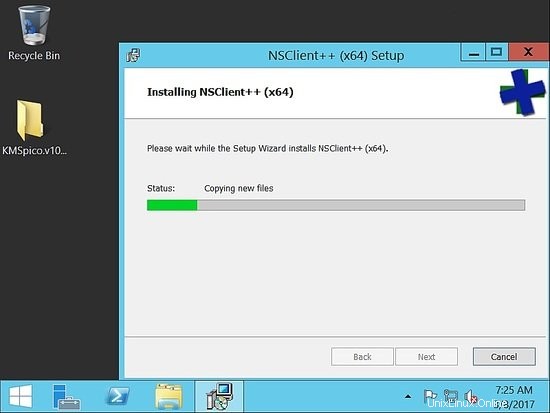
インストールが完了したら、サービスが稼働していることを確認してください。
次に、naemonホストから検証して、到達できることを確認します。
Naemonサーバーからnrpeとnscpを検証して接続を確認します
[[email protected] ~]# /usr/lib64/nagios/plugins/check_nrpe -H 192.168.1.182
NRPE v2.15
[[email protected] ~]# /usr/lib64/nagios/plugins/check_nrpe -H 192.168.1.21
NRPE v2.15
[[email protected] ~]#
[[email protected] ~]# /usr/lib64/nagios/plugins/check_nt -H 192.168.1.75 -p 12489 -v CLIENTVERSION -s 'howtoforge'
NSClient++ 0.5.0.62 2016-09-14
[[email protected] ~]#
このチュートリアルでは、サーバーのパフォーマンスを監視します。
実稼働環境では、CPU、メモリ、ハードディスクの使用率を監視し、ホストのアライブチェックを行う必要があります。
nrpeconf/etc/nrpe.d/base.cfgに次の行を追加します
192.168.1.21-nrpeクライアント-centos6
  [[email protected] ~]# cat /etc/nrpe.d/base.cfg
command[check_disks]=/usr/lib64/nagios/plugins/check_disk -w $ARG1$ -c $ARG2$ -p $ARG3$
command[check_disk]=/usr/lib64/nagios/plugins/check_disk -X nfs -X cifs -X none -X tmpfs -w $ARG1$ -c $ARG2$
command[memory]=/usr/lib64/nagios/plugins/check_memory -w $ARG1$ -c $ARG2$
command[load]=/usr/lib64/nagios/plugins/check_load -w $ARG1$ -c $ARG2$
command[check_total_procs]=/usr/lib64/nagios/plugins/check_procs -w $ARG1$ -c $ARG2$
command[check_procs_c]=/usr/lib64/nagios/plugins/check_procs -c $ARG1$ -C $ARG2$
command[check_procs_a]=/usr/lib64/nagios/plugins/check_procs -c $ARG1$ -a $ARG2$
ファイルを保存して再起動してから、nrpeを再起動します。
[[email protected] ~]# /etc/init.d/nrpe restart
Shutting down nrpe:                                        [FAILED]
Starting nrpe:                                             [  OK  ]
[[email protected] ~]#
メモリプラグインはデフォルトのプラグインとして使用できません。以下のプラグインを使用します。
 [[email protected] ~]# cd  /usr/lib64/nagios/plugins/
 [[email protected] plugins]# vim check_memory
以下のコンテンツを追加してください。
#! /usr/bin/perl -w
##Included Perf data
#The nagios plugins come with ABSOLUTELY NO WARRANTY. You may redistribute
#copies of the plugins under the terms of the GNU General Public License.
#
use strict;
use Getopt::Long;

my ($opt_f, $opt_h, $opt_c, $opt_w);
my ($result, $message, $ram_percent);

my $PROGNAME="check_memory";

$opt_f = "";

Getopt::Long::Configure('bundling');
GetOptions(
        "h"   => \$opt_h, "help"        => \$opt_h,
        "c=s" => \$opt_c, "Warning_Percentage"  => \$opt_c,
        "w=s" => \$opt_w, "Critical_Percentage" => \$opt_w,
);

if ($opt_h) {
        &print_help();
        exit 0;
}

$opt_w = shift unless ($opt_w);
$opt_c = shift unless ($opt_c);

if (! $opt_c && ! $opt_w) {
        print "Warning and Critical must be specified\n";
        exit 3;
}
if ($opt_c <= $opt_w){
        print "Critical must be greater than Warning CRITICAL: $opt_c WARNING: $opt_w\n";
        exit 3;
}


$result = 'OK';
open(FREE_M, "free -m|");
while (my $line = ){
        if ($line =~ /^Mem/){
                my ($junk,$total_mem,$used_mem,$free_mem,$shared_mem,$buffered_mem,$cached_mem)=split(/\s+/,$line);
                $ram_percent=int(($total_mem-($free_mem+$cached_mem+$buffered_mem))/$total_mem*100*100)/100;

        }
}
close(FREE_M);

if ($ram_percent > $opt_c){
print "Memory usage is: CRITICAL: ${ram_percent}% used | used=$ram_percent;$opt_w;$opt_c\n";
exit 2;
}elsif ($ram_percent > $opt_w) {
print "Memory usage is: WARNING: ${ram_percent}% used | used=$ram_percent;$opt_w;$opt_c\n";
exit 1;
}
else{
print "Memory usage is: $result: ${ram_percent}% used | used=$ram_percent;$opt_w;$opt_c\n";
exit 0;
}

sub print_usage () {
        print "Usage:\n";
        print "  $PROGNAME -f \n";
        print "  $PROGNAME -c \n";
        print "  $PROGNAME -w \n";
        print "  $PROGNAME [-h | --help]\n";
        print "  $PROGNAME [-V | --version]\n";
}

sub print_help () {
        print << EOF;
$PROGNAME v1.0.01
The nagios plugins come with ABSOLUTELY NO WARRANTY. You may redistribute
copies of the plugins under the terms of the GNU General Public License.
EOF
        &print_usage();
        print "\n";
        exit 3;
}
リンクcheck_memoryプラグインをダウンロード
ファイルに実行権限を付与する必要があります:
[[email protected] plugins]# chmod 755 check_memory
nrpeconf/etc/nagios/nrpe.d/base.cfgに次の行を追加します
192.168.1.182 --nrpe client --ubuntu
ここではファイルパスが異なります:
プラグインフォルダはlibであり、lib64ではありません。
  [email protected]:~# cat /etc/nagios/nrpe.d/base.cfg
command[check_disks]=/usr/lib/nagios/plugins/check_disk -w $ARG1$ -c $ARG2$ -p $ARG3$
command[check_disk]=/usr/lib/nagios/plugins/check_disk -X nfs -X cifs -X none -X tmpfs -w $ARG1$ -c $ARG2$
command[memory]=/usr/lib/nagios/plugins/check_memory -w $ARG1$ -c $ARG2$
command[load]=/usr/lib/nagios/plugins/check_load -w $ARG1$ -c $ARG2$
command[check_total_procs]=/usr/lib/nagios/plugins/check_procs -w $ARG1$ -c $ARG2$
command[check_procs_c]=/usr/lib/nagios/plugins/check_procs -c $ARG1$ -C $ARG2$
command[check_procs_a]=/usr/lib/nagios/plugins/check_procs -c $ARG1$ -a $ARG2$
同じcheck_memoryスクリプトを/usr/ lib / nagios/pluginsに追加します。
  [email protected]:~# vim /usr/lib/nagios/plugins/check_memory
[email protected]:~# chmod 755 /usr/lib/nagios/plugins/check_memory
[email protected]:~# systemctl restart nagios-nrpe-server.service
[email protected]:~#
Naemonサーバーでの構成
naemonユーザーとしてログイン:
[[email protected] ~]# su - naemon
Last login: Thu Mar  9 17:11:39 CET 2017 on pts/0
-sh-4.2$
/etc/naemon/naemon.cfg
の管理者メールを変更します........ ........ [email protected] [email protected] ........ ........
次に、/ etc / naemon / conf.d
でチェックを実行するようにカスタムコマンドを構成します。以下の内容でcustom_commands.cfgというカスタムコマンドを作成します。
$ vim /etc/naemon/conf.d/custom_commands.cfg
## Host Alive check ##
# command 'check_icmp Host Alive'
define command{
    command_name                   host_alive
    command_line                   $USER1$/check_icmp -H $HOSTADDRESS$ -n 1 -w 3000.00,80% -c 5000.00,100%
    }
### Service Command ##
# command 'check_nrpe_disks'
define command{
    command_name                   check_nrpe_disks
    command_line                   $USER1$/check_nrpe -t 55 -u -H $HOSTADDRESS$ -c check_disks -a $ARG1$ $ARG2$ $ARG3$
    }

# command 'nrpe'
define command{
    command_name                   nrpe
    command_line                   $USER1$/check_nrpe -t 55 -u -H $HOSTADDRESS$ -c $ARG1$
    }

# NRPE With Arguements
define command{
    command_name                   check_nrpe_a
    command_line                   $USER1$/check_nrpe -t 55 -u -H $HOSTADDRESS$ -c $ARG1$ -a $ARG2$ $ARG3$ $ARG4$
    }
#####################################
# Windows NSClient++ Checks
# command 'check_nt'
define command{
    command_name                   nt
    command_line                   $USER1$/check_nt -H $HOSTADDRESS$ -p 12489 -v $ARG1$ $ARG2$ -s $USER4$
    }
安全のため、nscpクライアントのパスワードを/etc/naemon/resource.cfg
に保存してください。........... ........... $USER4$=howtoforge ........... ............
次に、ホスト構成を定義する必要があります。
linux.cfgというファイルを作成します。
$ vim /etc/naemon/conf.d/linux.cfg
define host {
  host_name                      centos6.sunil.cc
  alias                          Centos
  address                        192.168.1.21
  use                            linux-server
  hostgroups                     linux-servers
}
define host {
  host_name                      ubuntu.sunil.cc
  alias                          Ubuntu
  address                        192.168.1.182
  use                            linux-server
  hostgroups                     linux-servers
}
Windowsホストについても同じことを行います。
$ vim /etc/naemon/conf.d/windows.cfg
define host {
  host_name                      ad.sunil.cc
  alias                          My Windows Server
  address                        192.168.1.75
  use                            windows-server
}

define hostgroup {
  hostgroup_name                 windows-servers
  alias                          Windows Servers
}
次に、サービス構成を定義する必要があります。
$ vim linux_services.cfg
define service {
  service_description            Disks Status
  hostgroup_name                  linux-servers
  use                            generic-service
  check_command                  check_nrpe_a!check_disk!15%!5%
}
define service{
    use                            generic-service
    hostgroup_name                 linux-servers
    service_description            Load Average
    check_command                  check_nrpe_a!load!30,25,20!45,40,35
    }
define service{
    use                            generic-service
    hostgroup_name                 linux-servers
    service_description            Memory Usage
    check_command                  check_nrpe_a!memory!80!90
    }
Windowsの場合、同様の構成を作成します。
$ vim window_services.cfg
define service{
    use                            generic-service
    hostgroup_name                 windows-servers
    service_description            Disk - C:
    check_command                  nt!USEDDISKSPACE!-l c -w 80 -c 90
     }
define service{
    use                            generic-service
    hostgroup_name                 windows-servers
    service_description            Load Average
    check_command                  nt!CPULOAD!-l 60,90,95
    }
define service{
    use                            generic-service
    hostgroup_name                 windows-servers
    service_description            Memory Usage
    check_command                  nt!MEMUSE!-w 90 -c 95
    }
次に、連絡先のメールアドレスを変更します。
$ vim contacts.cfg
define contact {
  contact_name                   naemonadmin                         ; Short name of user
  alias                          Naemon Admin                        ; Full name of user
  use                            generic-contact                     ; Inherit default values from generic-contact template (defined above)
  email                          [email protected]             ; <<***** CHANGE THIS TO YOUR EMAIL ADDRESS ******
}
ここで、不要な構成を削除します。
$ mv switch.cfg switch.cfg.bkp
$ mv printer.cfg printer.cfg.bkp
構成を検証します。
$ naemon -v /etc/naemon/naemon.cfg

Naemon Core 1.0.6-pkg
Copyright (c) 2013-present Naemon Core Development Team and Community Contributors
Copyright (c) 2009-2013 Nagios Core Development Team and Community Contributors
Copyright (c) 1999-2009 Ethan Galstad
License: GPL

Website: http://www.naemon.org
Reading configuration data...
   Read main config file okay...
   Read object config files okay...

Running pre-flight check on configuration data...

Checking objects...
        Checked 20 services.
        Checked 4 hosts.
        Checked 1 contacts.
        Checked 2 host groups.
        Checked 0 service groups.
        Checked 1 contact groups.
        Checked 29 commands.
        Checked 5 time periods.
        Checked 0 host escalations.
        Checked 0 service escalations.
Checking for circular paths...
        Checked 4 hosts
        Checked 0 service dependencies
        Checked 0 host dependencies
        Checked 5 timeperiods
Checking global event handlers...
Checking obsessive compulsive processor commands...
Checking misc settings...

Total Warnings: 0
Total Errors:   0

Things look okay - No serious problems were detected during the pre-flight check
-sh-4.2$
rootとしてログインし、naemonサービスを再起動します。
[[email protected] conf.d]# systemctl restart naemon
[[email protected] conf.d]# systemctl status naemon
? naemon.service - Naemon Monitoring Daemon
   Loaded: loaded (/usr/lib/systemd/system/naemon.service; enabled; vendor preset: disabled)
   Active: active (running) since Thu 2017-03-09 19:14:36 CET; 7s ago
     Docs: http://naemon.org/documentation
  Process: 5112 ExecStart=/usr/bin/naemon --daemon /etc/naemon/naemon.cfg (code=exited, status=0/SUCCESS)
  Process: 5110 ExecStartPre=/usr/bin/chown -R naemon:naemon /var/run/naemon/ (code=exited, status=0/SUCCESS)
  Process: 5108 ExecStartPre=/usr/bin/mkdir /var/run/naemon (code=exited, status=1/FAILURE)
 Main PID: 5114 (naemon)
   CGroup: /system.slice/naemon.service
           ??5114 /usr/bin/naemon --daemon /etc/naemon/naemon.cfg
           ??5115 /usr/bin/naemon --worker /var/lib/naemon/naemon.qh
           ??5116 /usr/bin/naemon --worker /var/lib/naemon/naemon.qh
           ??5117 /usr/bin/naemon --worker /var/lib/naemon/naemon.qh
           ??5118 /usr/bin/naemon --worker /var/lib/naemon/naemon.qh
           ??5119 /usr/bin/naemon --daemon /etc/naemon/naemon.cfg

Mar 09 19:14:36 naemon.sunil.cc systemd[1]: Starting Naemon Monitoring Daemon...
Mar 09 19:14:36 naemon.sunil.cc systemd[1]: Failed to read PID from file /var/run/naemon/naemon.pid: Invalid argument
Mar 09 19:14:36 naemon.sunil.cc systemd[1]: Started Naemon Monitoring Daemon.
[[email protected] conf.d]#
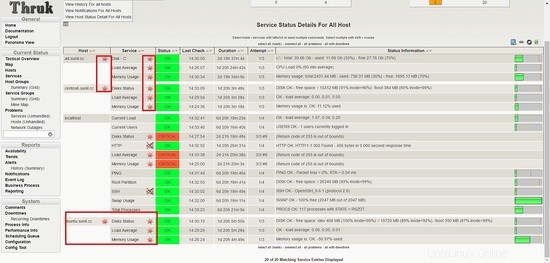
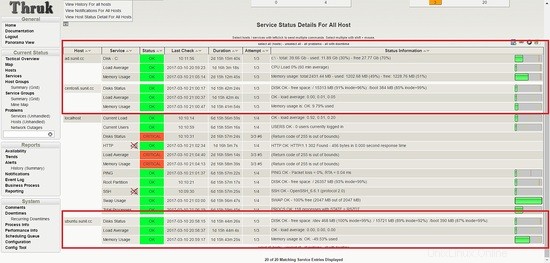
ダッシュボードにログインすると、サービスが稼働していることがわかります。
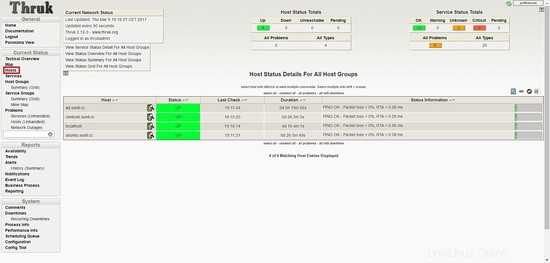
Ubuntuホストのサービスが失敗することがわかります。
It is seen that nrpe package compiled for ubuntu had enable arguments disabled for security vulnerabily and that is the reason it is failing
引数を有効にし、naemonからのチューニングを管理するには、パッケージを再コンパイルする必要があります。
以下のリンクは、再コンパイルする方法を示しています。このサイトには、enable引数を使用してコンパイル済みのパッケージもあります。このチュートリアルでは、このプリコンパイル済みパッケージを使用します。
https://www.claudiokuenzler.com/blog/626/nrpe-debian-jessie-command-ags-arguments-not-working-error
[email protected]:~# wget https://www.claudiokuenzler.com/downloads/nrpe/nagios-nrpe-server_2.15-1ubuntu2_amd64.xenial.deb
パッケージをインストールします。
[email protected]:~# dpkg -i nagios-nrpe-server_2.15-1ubuntu2_amd64.xenial.deb
(Reading database ... 79576 files and directories currently installed.)
Preparing to unpack nagios-nrpe-server_2.15-1ubuntu2_amd64.xenial.deb ...
Unpacking nagios-nrpe-server (2.15-1ubuntu2) over (2.15-1ubuntu1) ...
Setting up nagios-nrpe-server (2.15-1ubuntu2) ...
Processing triggers for systemd (229-4ubuntu16) ...
Processing triggers for ureadahead (0.100.0-19) ...
Processing triggers for man-db (2.7.5-1) ...
[email protected]:~#
NRPEを再起動します。
[email protected]:~# systemctl restart nagios-nrpe-server.service
現在、naemonを使用してすべてのホストを監視しています。
pnp4nagiosの構成
パフォーマンスグラフ用にpnp4nagiosを構成する必要があります。
次に、thrukダッシュボードと同じ認証方法を使用します。最初にファイルのバックアップを取り、次の行を変更します。
[[email protected] conf.d]# cd /etc/httpd/conf.d/
[[email protected] conf.d]# cp pnp4nagios.conf pnp4nagios.conf.bkp
[[email protected] share]# cat /etc/httpd/conf.d/pnp4nagios.conf
# SAMPLE CONFIG SNIPPETS FOR APACHE WEB SERVER

Alias /pnp4nagios "/usr/local/pnp4nagios/share"

<Directory "/usr/local/pnp4nagios/share">
        AllowOverride None
        Order allow,deny
        Allow from all
        #
        # Use the same value as defined in nagios.conf
        #
        AuthName "Thruk Access"
        AuthType Basic
        AuthUserFile /etc/thruk/htpasswd
        Require valid-user

                # Turn on URL rewriting
                RewriteEngine On
                Options symLinksIfOwnerMatch
                # Installation directory
                RewriteBase /pnp4nagios/
                # Protect application and system files from being viewed
                RewriteRule "^(?:application|modules|system)/" - [F]
                # Allow any files or directories that exist to be displayed directly
                RewriteCond "%{REQUEST_FILENAME}" !-f
                RewriteCond "%{REQUEST_FILENAME}" !-d
                # Rewrite all other URLs to index.php/URL
                RewriteRule "^.*$" "index.php/$0" [PT]


[[email protected] share]#
[[email protected] conf.d]# systemctl restart httpd.service
次に、構成ページを変更する必要があります。
[[email protected] share]# cd /usr/local/pnp4nagios/share/
[[email protected] share]# mv install.php install.php.txt
次に、pnp4nagiosの構成ファイルを変更する必要があります。
設定ファイルでnagiosをnaemonに変更します。
[[email protected] conf.d]# vi /usr/local/pnp4nagios/etc/config_local.php
............................
................................
$conf['nagios_base'] = "/naemon/cgi-bin";
..................................
............................
0から1までのパフォーマンスデータを有効にします。
[[email protected] conf.d]# vi /etc/naemon/naemon.cfg
.....................
.....................
process_performance_data=1
......................
......................
naemon.confの下部に以下の行を追加します。
[[email protected] conf.d]# vi /etc/naemon/naemon.cfg
#
# service performance data
#
service_perfdata_file=/usr/local/pnp4nagios/var/service-perfdata
service_perfdata_file_template=DATATYPE::SERVICEPERFDATA\tTIMET::$TIMET$\tHOSTNAME::$HOSTNAME$\tSERVICEDESC::$SERVICEDESC$\tSERVICEPERFDATA::$SERVICEPERFDATA$\tSERVICECHECKCOMMAND::$SERVICECHECKCOMMAND$\tHOSTSTATE::$HOSTSTATE$\tHOSTSTATETYPE::$HOSTSTATETYPE$\tSERVICESTATE::$SERVICESTATE$\tSERVICESTATETYPE::$SERVICESTATETYPE$
service_perfdata_file_mode=a
service_perfdata_file_processing_interval=15
service_perfdata_file_processing_command=process-service-perfdata-file

#
#
#
host_perfdata_file=/usr/local/pnp4nagios/var/host-perfdata
host_perfdata_file_template=DATATYPE::HOSTPERFDATA\tTIMET::$TIMET$\tHOSTNAME::$HOSTNAME$\tHOSTPERFDATA::$HOSTPERFDATA$\tHOSTCHECKCOMMAND::$HOSTCHECKCOMMAND$\tHOSTSTATE::$HOSTSTATE$\tHOSTSTATETYPE::$HOSTSTATETYPE$
host_perfdata_file_mode=a
host_perfdata_file_processing_interval=15
host_perfdata_file_processing_command=process-host-perfdata-file
次に、custom_commands.confに以下の行を追加する必要があります。
[[email protected] conf.d]# vim /etc/naemon/conf.d/custom_commands.cfg
define command{
       command_name    process-service-perfdata-file
       command_line    /bin/mv /usr/local/pnp4nagios/var/service-perfdata /usr/local/pnp4nagios/var/spool/service-perfdata.$TIMET$
}

define command{
       command_name    process-host-perfdata-file
       command_line    /bin/mv /usr/local/pnp4nagios/var/host-perfdata /usr/local/pnp4nagios/var/spool/host-perfdata.$TIMET$
}
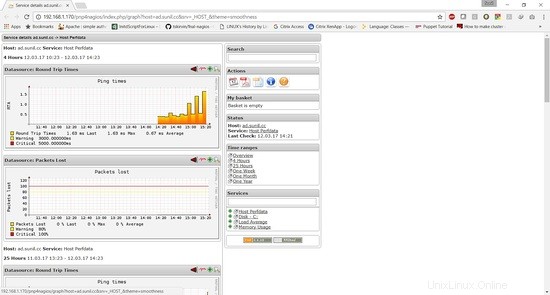
> 次に、ホストパフォーマンスとサービスパフォーマンスのグラフのテンプレートを作成します。
$ cd /etc/naemon/conf.d/templates/
$ cat pnp.cfg
define host {
   name host-pnp
   process_perf_data 1
   action_url /pnp4nagios/index.php/graph?host=$HOSTNAME$&srv=_HOST_' class='tips' rel='/pnp4nagios/index.php/popup?host=$HOSTNAME$&srv=_HOST_
   register 0
}

define service {
   name service-pnp
   process_perf_data 1
   action_url /pnp4nagios/index.php/graph?host=$HOSTNAME$&srv=$SERVICEDESC$' class='tips' rel='/pnp4nagios/index.php/popup?host=$HOSTNAME$&srv=$SERVICEDESC$
   register 0
}
次に、必要なサービスのパフォーマンスグラフにアクセスするには、service.cfgファイルを更新する必要があります。
$ cat linux_services.cfg
define service {
  service_description            Disks Status
  hostgroup_name                  linux-servers
  use                            generic-service,service-pnp                       ; Name of service template to use
  check_command                  check_nrpe_a!check_disk!15%!5%
}
define service{
    use                            generic-service,service-pnp
    hostgroup_name                 linux-servers
    service_description            Load Average
    check_command                  check_nrpe_a!load!30,25,20!45,40,35
    }
define service{
    use                            generic-service,service-pnp
    hostgroup_name                 linux-servers
    service_description            Memory Usage
    check_command                  check_nrpe_a!memory!80!90
    }
$ cat window_services.cfg
define service{
    use                            generic-service,service-pnp
    hostgroup_name                 windows-servers
    service_description            Disk - C:
    check_command                  nt!USEDDISKSPACE!-l c -w 80 -c 90
     }
define service{
    use                            generic-service,service-pnp
    hostgroup_name                 windows-servers
    service_description            Load Average
    check_command                  nt!CPULOAD!-l 60,90,95
    }
define service{
    use                            generic-service,service-pnp
    hostgroup_name                 windows-servers
    service_description            Memory Usage
    check_command                  nt!MEMUSE!-w 90 -c 95
    }
ホストグラフを確認するには、以下のファイルに含める必要があります。
$ cat linux.cfg
define host {
  host_name                      centos6.sunil.cc
  alias                          Centos
  address                        192.168.1.21
  use                            linux-server,host-pnp
  hostgroups                     linux-servers
}
define host {
  host_name                      ubuntu.sunil.cc
  alias                          Ubuntu
  address                        192.168.1.182
  use                            linux-server,host-pnp
  hostgroups                     linux-servers
}
$ cat windows.cfg
define host {
  host_name                      ad.sunil.cc
  alias                          My Windows Server
  address                        192.168.1.75
  use                            windows-server,host-pnp
}

define hostgroup {
  hostgroup_name                 windows-servers
  alias                          Windows Servers
}
構成を検証します。
$ naemon -v /etc/naemon/naemon.cfg

Naemon Core 1.0.6-pkg
Copyright (c) 2013-present Naemon Core Development Team and Community Contributors
Copyright (c) 2009-2013 Nagios Core Development Team and Community Contributors
Copyright (c) 1999-2009 Ethan Galstad
License: GPL

Website: http://www.naemon.org
Reading configuration data...
   Read main config file okay...
   Read object config files okay...

Running pre-flight check on configuration data...

Checking objects...
        Checked 20 services.
        Checked 4 hosts.
        Checked 1 contacts.
        Checked 2 host groups.
        Checked 0 service groups.
        Checked 1 contact groups.
        Checked 31 commands.
        Checked 5 time periods.
        Checked 0 host escalations.
        Checked 0 service escalations.
Checking for circular paths...
        Checked 4 hosts
        Checked 0 service dependencies
        Checked 0 host dependencies
        Checked 5 timeperiods
Checking global event handlers...
Checking obsessive compulsive processor commands...
Checking misc settings...

Total Warnings: 0
Total Errors:   0

Things look okay - No serious problems were detected during the pre-flight check
サービスを再開します。
[[email protected] ~]# systemctl enable npcd
npcd.service is not a native service, redirecting to /sbin/chkconfig.
Executing /sbin/chkconfig npcd on
[[email protected] ~]# systemctl restart npcd
[[email protected] ~]# systemctl restart naemon