Osqueryは、オープンソースのオペレーティングシステムのインストルメンテーション、監視、および分析です。 Facebookによって作成され、SQLベースのクエリを使用してクエリできる高性能のリレーショナルデータベースとしてオペレーティングシステムを公開します。
Osqueryはマルチプラットフォームソフトウェアであり、Linux、Windows、MacOS、およびFreeBSDにインストールできます。これにより、SQLベースのクエリを使用して、これらのオペレーティングシステムのプロファイル、パフォーマンス、セキュリティチェックなどをすべて調べることができます。
このチュートリアルでは、osqueryを使用してファイル整合性監視(FIM)を設定する方法を示します。 LinuxオペレーティングシステムUbuntu18.04とCentOS7を使用します。
前提条件
- Linux(UbuntuまたはCentOS)
- root権限
- 最初のosqueryガイドを完了
- Linuxサーバーにosqueryをインストールする
- osqueryのSyslog消費を有効にする
- 基本的なosquery構成
- ファイル整合性監視osqueryの構成
- テスト
Osqueryは、すべてのプラットフォームのインストール用に独自のリポジトリを提供します。これから行う最初のステップは、公式のosqueryリポジトリからosqueryパッケージをインストールすることです。
osqueryキーをシステムに追加します。
export OSQUERY_KEY=1484120AC4E9F8A1A577AEEE97A80C63C9D8B80B
sudo apt-key adv --keyserver keyserver.ubuntu.com --recv-keys $OSQUERY_KEY
osqueryリポジトリを追加し、パッケージをインストールします。
sudo add-apt-repository 'deb [arch=amd64] https://pkg.osquery.io/deb deb main'
sudo apt install osquery -y
CentOSの場合
osqueryキーをシステムに追加します。
curl -L https://pkg.osquery.io/rpm/GPG | sudo tee /etc/pki/rpm-gpg/RPM-GPG-KEY-osquery
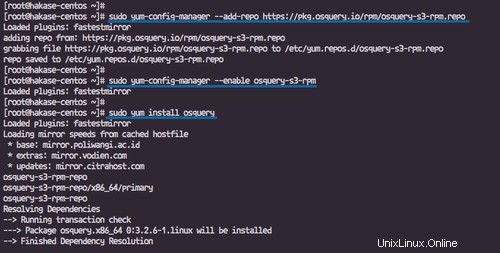
osqueryリポジトリを追加して有効にし、パッケージをインストールします。
sudo yum-config-manager --add-repo https://pkg.osquery.io/rpm/osquery-s3-rpm.repo
sudo yum-config-manager --enable osquery-s3-rpm
sudo yum install osquery -y
すべてのパッケージがインストールされるのを待ちます。
注:
yum-config-managerコマンドに関するエラーが発生した場合。
sudo: yum-config-manager: command not found
'yum-utils'パッケージをインストールします。
yum -y install yum-utils
Osqueryは、Apple System Log(ASL)を使用してApple MacOSでシステムログを読み取ったり消費したりする機能を提供し、Linuxの場合はsyslogを使用しています。
このステップでは、rsyslogを介してosqueryのsyslog消費を有効にします。
以下のaptコマンドを使用してrsyslogパッケージをインストールします。
sudo apt install rsyslog -y
CentOSの場合
以下のyumコマンドを使用してrsyslogパッケージをインストールします。
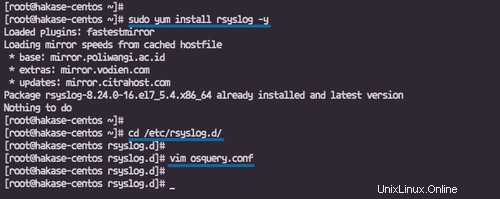
sudo yum install rsyslog -y
インストールが完了したら、「/ etc / rsyslog.d」ディレクトリに移動して、新しい構成ファイルosquery.confを作成します。
cd /etc/rsyslog.d/
vim osquery.conf
次の構成をそこに貼り付けます。
template(
  name="OsqueryCsvFormat"
  type="string"
  string="%timestamp:::date-rfc3339,csv%,%hostname:::csv%,%syslogseverity:::csv%,%syslogfacility-text:::csv%,%syslogtag:::csv%,%msg:::csv%\n"
)
*.* action(type="ompipe" Pipe="/var/osquery/syslog_pipe" template="OsqueryCsvFormat")
保存して終了します。
osqueryのデフォルト設定は「osquery.conf」で、通常は「/ etc/osquery」ディレクトリにあります。 osquery構成のサンプル'/usr/share/osquery/osquery.conf'とosqueryパック構成のサンプルがあります。
このステップでは、osquery構成コンポーネントについて学習し、カスタムosquery構成を作成してから、osquerydをサービスとしてデプロイします。
JSONファイルとしてフォーマットされたosquery構成には、以下に説明するosquery構成仕様が含まれています。
- オプション:osqueryd CLIコマンドの一部であり、アプリの起動と初期化を決定します。
- スケジュール:スケジュールされたクエリ名からクエリの詳細へのフローを定義します。
- デコレータ:結果とスナップショットログに「デコレーション」を追加するために使用されます。
- パック:スケジュールクエリのグループ。
- 詳細:ファイルパス、YARA、Prometheus、Views、EC2、Chef構成。
'/ etc / osquery'ディレクトリに移動し、新しいカスタム構成'osquery.conf'を作成します。
cd /etc/osquery/
vim osquery.conf
次の構成をそこに貼り付けます。
{
    "options": {
        "config_plugin": "filesystem",
        "logger_plugin": "filesystem",
        "logger_path": "/var/log/osquery",
        "disable_logging": "false",
        "log_result_events": "true",
        "schedule_splay_percent": "10",
        "pidfile": "/var/osquery/osquery.pidfile",
        "events_expiry": "3600",
        "database_path": "/var/osquery/osquery.db",
        "verbose": "false",
        "worker_threads": "2",
        "enable_monitor": "true",
        "disable_events": "false",
        "disable_audit": "false",
        "audit_allow_config": "true",
        "host_identifier": "hakase-labs",
        "enable_syslog": "true",
        "syslog_pipe_path": "/var/osquery/syslog_pipe",
        "force": "true",
        "audit_allow_sockets": "true",
        "schedule_default_interval": "3600"
    },


    "schedule": {
        "crontab": {
            "query": "SELECT * FROM crontab;",
            "interval": 300
        },
        "system_info": {
            "query": "SELECT hostname, cpu_brand, physical_memory FROM system_info;",
            "interval": 3600
        },
        "ssh_login": {
            "query": "SELECT username, time, host FROM last WHERE type=7",
            "interval": 360
        }
    },

    "decorators": {
        "load": [
            "SELECT uuid AS host_uuid FROM system_info;",
            "SELECT user AS username FROM logged_in_users ORDER BY time DESC LIMIT 1;"
        ]
    },

    "packs": {
        "osquery-monitoring": "/usr/share/osquery/packs/osquery-monitoring.conf"
    }
}
保存して終了します。
注:
- 「ファイルシステム」を構成およびロガープラグインとして使用しています。
- 「/var/ log/osquery」ディレクトリへのロガーパスを定義します。
- 「/var/ syslog/syslog_pipe」ファイルへのsyslogpipを有効にします。
- スケジューラでは、crontab、システム情報、およびsshログインをチェックするための3つのクエリを定義します。
- 「osquery-monitoring」という名前のosqueryパックを有効にし、「/ usr / share / osquery/packs」ディレクトリにあるファイルをパックします。
次に、osquerydデーモンサービスを開始し、システムの起動時に毎回起動できるようにします。
systemctl start osqueryd
systemctl enable osqueryd
そして、rsyslogサービスを再起動します。
systemctl restart rsyslog
基本構成osqueryが完了しました。
ステップ4-osqueryを使用してファイル整合性監視(FIM)を構成する
Osqueryは、inotifyとFSEventsを使用して、LinuxとMacOSDarwinでファイル整合性監視を提供します。単純に、「file_path」を使用して定義されたディレクトリ上のファイルの変更を監視および検出し、すべてのアクティビティをfile_eventsテーブルに保存します。
このステップでは、ホーム、sshディレクトリなどの重要なディレクトリ、tmp、およびカスタムFIMパックを使用したwwwWebルートディレクトリを監視するようにosqueryを構成します。
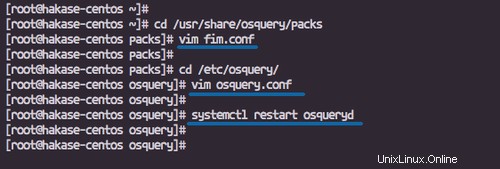
'/ usr / share / osquery / packs'ディレクトリに移動し、新しいパック構成ファイル'fim.conf'を作成します。
cd /usr/share/osquery/packs
vim fim.conf
以下に構成を貼り付けます。
{
  "queries": {
    "file_events": {
      "query": "SELECT * FROM file_events;",
      "removed": false,
      "interval": 300
    }
  },
  "file_paths": {
    "homes": [
      "/root/.ssh/%%",
      "/home/%/.ssh/%%"
    ],
      "etc": [
      "/etc/%%"
    ],
      "home": [
      "/home/%%"
    ],
      "tmp": [
      "/tmp/%%"
    ],
      "www": [
      "/var/www/%%"
      ]
  }
}
保存して終了します。
ここで、「/ etc / osquery」構成ディレクトリに戻り、osquery.confファイルを編集します。
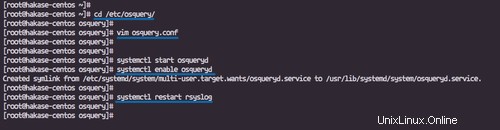
cd /etc/osquery/
vim osquery.conf
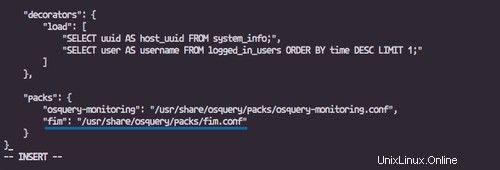
'packs'セクション内にFileIntegrityMonitoringパック構成を追加します。
    "packs": {
        "osquery-monitoring": "/usr/share/osquery/packs/osquery-monitoring.conf",
        "fim": "/usr/share/osquery/packs/fim.conf"
} 
保存して終了し、osquerydサービスを再起動します。
systemctl restart osqueryd
注:
JSONリンター「http://jsonlint.com/」を使用してJSON構成ファイルをチェックし続け、エラーがないことを確認します。
定義されたディレクトリ「home」と「www」に新しいファイルを作成して、FileIntegrityMonitoringパックをテストします。
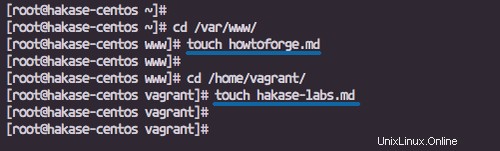
'/ var / www /'ディレクトリに移動し、'howtoforge.md'という名前の新しいファイルを作成します。
cd /var/www/
touch howtoforge.md
'/ home / youruser /'ディレクトリに移動し、'hakase-labs.md'という名前の新しいファイルを作成します。
cd /home/vagrant/
touch hakase-labs.md
次に、リアルタイムインタラクティブモードosqueryiを使用してすべてのログ監視とosquery結果のログを確認します。
osqueryi
以下のosqueryiコマンドを実行します。
osqueryi --config-path /etc/osquery/osquery.conf
次に、「file_events」テーブルのファイル変更に関するすべてのログを確認します。
グローバルな変更の場合。
select * from file_events;
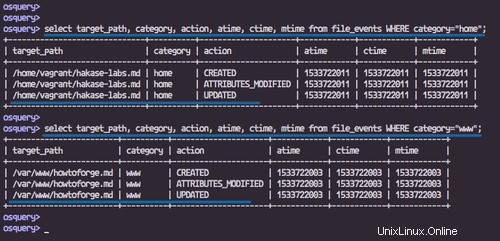
「ホーム」ディレクトリの場合。
select target_path, category, action, atime, ctime, mtime from file_events WHERE category="home";
'www'Webルートディレクトリの場合。
select target_path, category, action, atime, ctime, mtime from file_events WHERE category="www";
osqueryd結果ログ
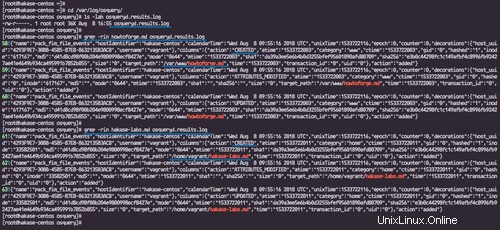
'/ var / log / osquery'ディレクトリに移動すると、'osqueryd.results.log'ファイルが取得されます。
cd /var/log/osquery/
ls -lah osqueryd.results.log
'grep'コマンドを使用してosqueryログをフィルタリングします。
grep -rin howtoforge.md osqueryd.results.log
grep -rin hakase-labs.md osqueryd.results.log
これらのファイルが作成されたという情報が表示されます。
osqueryを使用したLinuxサーバーUbuntuおよびCentOSでのファイル整合性監視(FIM)のインストールと構成が正常に完了しました。