すでにご存知のように、GitHubリポジトリには毎日何百もの新しい追加があります。しかし、多くの優れたプロジェクトは見過ごされており、それに値する注目を集めることはありません。今日、私は Ramrootという名前のクールなプロジェクトに出くわしました 。 Ramrootを使用すると、ArchLinuxを完全にRAMから実行できます。はい、あなたはその権利を読んでいます。
Ramrootは、システムの起動時にルートファイルシステム全体をRAMにロードします。 ArchLinux用に特別に設計されています。 Ubuntuで試しましたが、うまくいきませんでした。開発者が他のLinuxディストリビューションでも動作するようになることを願っています。
Ramrootを使用してRAMからArchLinuxを実行する
RamrootはAURで利用できます 、したがって、 Paruなどの任意のAURヘルパープログラムを使用してインストールできます。 またはYay 。
$ Paru -S ramroot
または、
$ yay -S ramroot
次に、次のコマンドを使用してRamrootを有効にします。
$ ramroot enable
出力例:
:: Detected root UUID: 6517af02-68e9-484e-9dae-f0ed61822ad3
:: No /boot UUID detected.
:: zram added to mkinitcpio.conf MODULES
:: ext4 added to mkinitcpio.conf MODULES
:: vfat added to mkinitcpio.conf MODULES
:: ramroot added to mkinitcpio.conf HOOKS
:: Enabling ramroot...
[sudo] password for sk:
==> Building image from preset: /etc/mkinitcpio.d/linux.preset: 'default'
-> -k /boot/vmlinuz-linux -c /etc/mkinitcpio.conf -g /boot/initramfs-linux.img
==> Starting build: 4.17.6-1-ARCH
-> Running build hook: [base]
-> Running build hook: [udev]
-> Running build hook: [ramroot]
-> Running build hook: [autodetect]
-> Running build hook: [modconf]
-> Running build hook: [block]
-> Running build hook: [filesystems]
-> Running build hook: [keyboard]
-> Running build hook: [fsck]
==> Generating module dependencies
==> Creating gzip-compressed initcpio image: /boot/initramfs-linux.img
==> Image generation successful
==> Building image from preset: /etc/mkinitcpio.d/linux.preset: 'fallback'
-> -k /boot/vmlinuz-linux -c /etc/mkinitcpio.conf -g /boot/initramfs-linux-fallback.img -S autodetect
==> Starting build: 4.17.6-1-ARCH
-> Running build hook: [base]
-> Running build hook: [udev]
-> Running build hook: [ramroot]
-> Running build hook: [modconf]
-> Running build hook: [block]
==> WARNING: Possibly missing firmware for module: wd719x
==> WARNING: Possibly missing firmware for module: aic94xx
-> Running build hook: [filesystems]
-> Running build hook: [keyboard]
-> Running build hook: [fsck]
==> Generating module dependencies
==> Creating gzip-compressed initcpio image: /boot/initramfs-linux-fallback.img
==> Image generation successful
:: ramroot enabled.
なんらかの理由で機能しない場合は、GitHubリポジトリからRamrootバイナリを取得し、以下の説明に従って実行します。
コマンドを使用してRamrootリポジトリのクローンを作成します:
$ git clone https://github.com/arcmags/ramroot.git
Cloning into 'ramroot'...
remote: Counting objects: 94, done.
remote: Compressing objects: 100% (52/52), done.
remote: Total 94 (delta 41), reused 82 (delta 32), pack-reused 0
Unpacking objects: 100% (94/94), done.
上記のコマンドは、現在の作業ディレクトリに「ramroot」という名前のフォルダを作成し、Ramrootプロジェクトのすべてのコンテンツをその中に保存します。
次に、Ramroot binに移動します ディレクトリ:
$ cd ramroot/bin/
次のファイルを実行可能にします。
$ chmod +x ramroot-build
$ chmod +x ramroot-enable
最後に、次のコマンドを実行してRamrootを有効にします。
$ ./ramroot-enable
sudoを入力してください またはroot プロンプトが表示されたらパスワード。
次に、システムを再起動します。起動プロセスで、ファイルシステムをRAMにロードするように求められます。 「はい」と入力します 続行します。
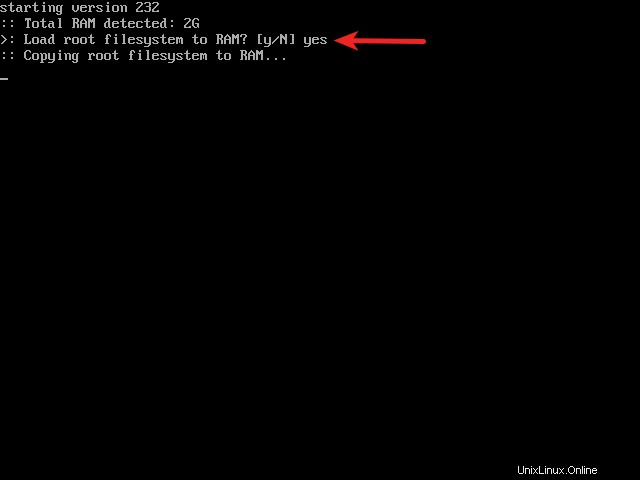
ルートファイルシステムをRAMにロードする
このプロンプト(y / N)のデフォルトははいであることに注意してください 4G の場合、15秒のタイムアウト 以上のRAMが検出されました。 2GiB RAMを使用しているため、 "Y"と入力する必要がありました。 続行します。
ロードプロセスが完了するまでしばらく待ちます。ルートファイルシステム全体をRAMにロードするには数分かかります。システムに十分なRAMがインストールされていることを確認してください。
より高速なRAM同期時間を維持したい場合は、クリーンでトリムダウンされたシステムを維持するようにしてください。古い不要なパッケージを削除し、パッケージキャッシュフォルダをクリーンに保ちます。
更新:
最新のRamrootバージョンを使用する場合、インストールされているRAMサイズはルートファイルシステムのサイズより少なくとも500MB大きい必要があります 。ファイルシステムのサイズよりも少なくとも500MB多いRAMがある場合、ユーザーはルートファイルシステムをRAMにロードするように求められます。ルートファイルシステムのサイズがインストールされているメモリよりも小さい場合、最新のRamrootバージョンはRAMにルートファイルシステムをロードしません。ファイルシステムをRAMにロードする必要があるかどうかを確認するメッセージも表示されません。ファイルシステムはローカルディスクに自動的にマウントされ、ArchLinuxは正常に起動します。
ルートファイルシステムがRAMにロードされると、 rootfsに移動します。 促す。 再起動後は何も保存されないことに注意してください 。 Arch Linuxは、ローカルディスクからではなく、RAMから完全にロードしているためです。
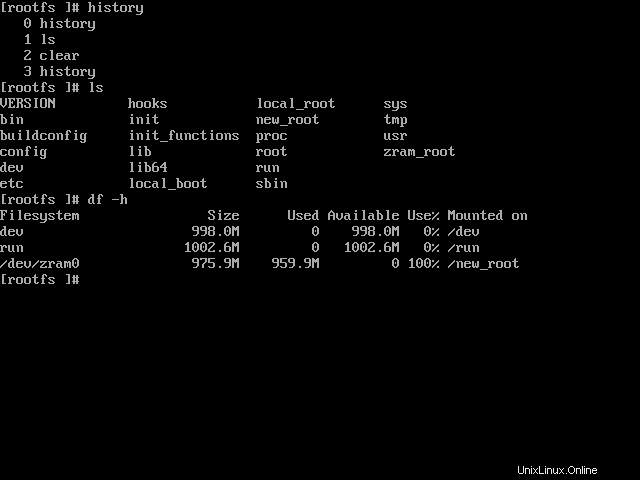
RAMにロードされたルートファイルシステム
Ramrootヘルプを表示する
Ramrootヘルプセクションを表示するには、次を実行します。
$ ramroot --help
出力例:
NAME
ramroot - load root (and /boot) filesystem entirely to RAM during boot

SYNOPSIS
ramroot <ACTION> [OPTIONS]

ACTIONS
disable
Remove ramroot from /etc/mkinitcpio.conf HOOKS.
Remove ext4, vfat, and zram from /etc/mkinitcpio.conf MODULES.
Rebuild linux cpio boot image.

enable
Rebuild build and runtime hooks in /usr/lib/initcpio.
Add ramroot to /etc/mkinitcpio.conf HOOKS.
Add ext4, vfat, and zram to /etc/mkinitcpio.conf MODULES.
Rebuild linux cpio boot image.

remove
Disable ramroot.
Remove build and runtime hooks from /usr/lib/initcpio.

status
Print ramroot and root filesystem status to screen.
Return exit status 0 if enabled and currently loaded to RAM.
Return exit status 1 if enabled and not loaded RAM.
Return exit status 2 if disabled.

OPTIONS
-b, --boot <UUID>
Specify /boot partition UUID to use when building hooks.

-D, --dryrun
Execute ACTION without making any changes.

-F, --fstab
Mount all other partitions in /etc/fstab normally.

-H, --help
Display help text and exit.

-K, --keep
Keep copies of new build and runtime hooks in ~/.cache/ramroot.

-M, --message
Print 'Arch on RAM' message at tty login by using custom /etc/issue.

-N, --no
Change startup prompt default to not load filesystem to RAM.

-r, --root <UUID>
Specify root partition UUID to use when building hooks.

-t, --timeout <SECONDS>
Set RAM boot prompt timeout (default=15).
Ramrootを削除
システムを再起動し、 "n"と入力します ArchLinuxシステムに正常にログインするためにファイルシステムをRAMにロードするように要求されたとき。 ramroot/binに移動します フォルダを作成し、次のファイルを実行可能ファイルにします。
$ cd ramroot/bin/
$ chmod +x ramroot-disable
$ chmod +x ramroot-remove
最後に、コマンドを使用してArchLinuxシステムからRamrootを削除します。
$ ./ramroot-disable
$ ./ramroot-remove
AURからRamrootをインストールした場合は、次のコマンドを使用して削除します。
$ ramroot disable
$ ramroot remove
そして、最後にRamrootパッケージを削除します:
$ sudo pacman -Rns ramroot
結論
Ramrootは、ArchLinuxボックスでテストを行いたい人に役立つかもしれません。また、プライベートセッションでLinuxコマンドを学習したい場合は、Ramrootが間違いなく役立ちます。試してみてください。このプロジェクトについての考えを下のコメントセクションで共有することを忘れないでください。