ONLYOFFICEは、チームがプロジェクト、顧客関係、およびドキュメントを1か所で管理できるようにする無料のオープンソースソフトウェアです。 Ubuntuは最もよく知られているLinuxディストリビューションですが、他のディストリビューションのユーザーが寒さに取り残されていると感じてほしくないのです。このガイドでは、RED Hat/CentOSにONLYOFFICEコラボレーションシステムをインストールするための手順を説明します。
ONLYOFFICEの正しい作業のために、マシンはいくつかのシステム要件を満たし、いくつかの追加コンポーネントがインストールされている必要があります:
- RAM:2GB以上
- スワップファイル:2GB以上
- HDD:少なくとも2GBの空き容量
- モノラル:バージョン3.2以降
- MySQL:バージョン5.6以降
- nginx
いくつかの前提条件をインストールし、(CentOS 7の場合)追加のリポジトリを有効にします:
yum -y install nano yum-utils
yum -y install epel-release
yum install http://dev.mysql.com/get/mysql-community-release-el7-5.noarch.rpm
システムリポジトリにあるコンポーネントは、yum installコマンドを使用してONLYOFFICEインストール時に自動的にインストールされます。
これらのコンポーネントの一部が欠落している場合は、公式Webサイトの指示に従ってください。
MySQLサービスを有効にして、mysqlを起動します:
systemctl enable mysqld.service
systemctl start mysqld.service
MySQLパスワードを設定し(初期パスワードは空です)、テストデータベースを削除します:
mysql_secure_installation
このコマンドは、以下に説明するように、mysqlの保護プロセスをインタラクティブにガイドします。
[[email protected] ~]# mysql_secure_installation
NOTE: RUNNING ALL PARTS OF THIS SCRIPT IS RECOMMENDED FOR ALL MySQL
 SERVERS IN PRODUCTION USE! PLEASE READ EACH STEP CAREFULLY!
In order to log into MySQL to secure it, we'll need the current
password for the root user. If you've just installed MySQL, and
you haven't set the root password yet, the password will be blank,
so you should just press enter here.
Enter current password for root (enter for none):
OK, successfully used password, moving on...
Setting the root password ensures that nobody can log into the MySQL
root user without the proper authorisation.
Set root password? [Y/n] Y
New password:
Re-enter new password:
Password updated successfully!
Reloading privilege tables..
 ... Success!
By default, a MySQL installation has an anonymous user, allowing anyone
to log into MySQL without having to have a user account created for
them. This is intended only for testing, and to make the installation
go a bit smoother. You should remove them before moving into a
production environment.
Remove anonymous users? [Y/n] y
 ... Success!
Normally, root should only be allowed to connect from 'localhost'. This
ensures that someone cannot guess at the root password from the network.
Disallow root login remotely? [Y/n] y
 ... Success!
By default, MySQL comes with a database named 'test' that anyone can
access. This is also intended only for testing, and should be removed
before moving into a production environment.
Remove test database and access to it? [Y/n] y
 - Dropping test database...
ERROR 1008 (HY000) at line 1: Can't drop database 'test'; database doesn't exist
 ... Failed! Not critical, keep moving...
 - Removing privileges on test database...
 ... Success!
Reloading the privilege tables will ensure that all changes made so far
will take effect immediately.
Reload privilege tables now? [Y/n] y
 ... Success!
All done! If you've completed all of the above steps, your MySQL
installation should now be secure.
Thanks for using MySQL!
Cleaning up...
ONLYOFFICEのインストール
ステップ1.Ctrl+ Alt+Tを使用してターミナルを開きます
ステップ2.yumONLYOFFICEリポジトリーを追加します。
これを行うには、/ etc/yum.repos.dを作成します。次の内容の/onlyoffice.repoファイル:
nano /etc/yum.repos.d/onlyoffice.repo
[onlyoffice]
name=onlyoffice repo
baseurl=http://download.onlyoffice.com/repo/centos/noarch/
gpgcheck=0
enabled=1
ステップ3.リポジトリからONLYOFFICEをインストールします
次のコマンドを実行するだけです:
sudo yum install onlyoffice
ONLYOFFICEの構成
ONLYOFFICEを初めて開始する前に、データベースを作成し、データベースへの接続を構成する必要があります。
これを行うには、構成スクリプトを実行します:
chmod +x /var/www/onlyoffice/configure.sh
/var/www/onlyoffice/configure.sh
MySQL接続パラメータの入力、データベースの作成、構成ファイルの更新、およびすべてのサービスの実行をインタラクティブに要求します。
注意:スクリプトはデータベースのユーザーを作成せず、既存のユーザーのパスワードを変更しません。
[[email protected] ~]# /var/www/onlyoffice/configure.sh
-bash: /var/www/onlyoffice/configure.sh: Permission denied
[[email protected] ~]# chmod +x /var/www/onlyoffice/configure.sh
[[email protected] ~]# /var/www/onlyoffice/configure.sh
Configuring MySQL access...
Host: localhost
Database name: onlyoffice
User: root
Password: <- enter the mysql root password here
Trying to establish MySQL connection... OK
Installing MySQL database... Warning: Using a password on the command line interface can be insecure.
Warning: Using a password on the command line interface can be insecure.
Warning: Using a password on the command line interface can be insecure.
Warning: Using a password on the command line interface can be insecure.
OK
Restarting services... OK
次に、行を変更します
listen 80 default_server;
に
listen 81 default_server;
ファイル/etc/nginx/nginx.confで、ONLYOFFICEがポート80で独自のデフォルトの仮想ホストを定義し、nginxを有効にして開始します:
nano /etc/nginx/nginx.conf
次に、nginxを有効にして起動します:
systemctl enable nginx.service
systemctl start nginx.service
ONLYOFFICEの実行
Webブラウザーでオフィスを開くには、ローカルホスト(http://127.0.0.1)を入力するか、ブラウザーのアドレスバーにデスクトップがインストールされていない場合はサーバーの外部IPを入力します。ウェルカムページが開きます:
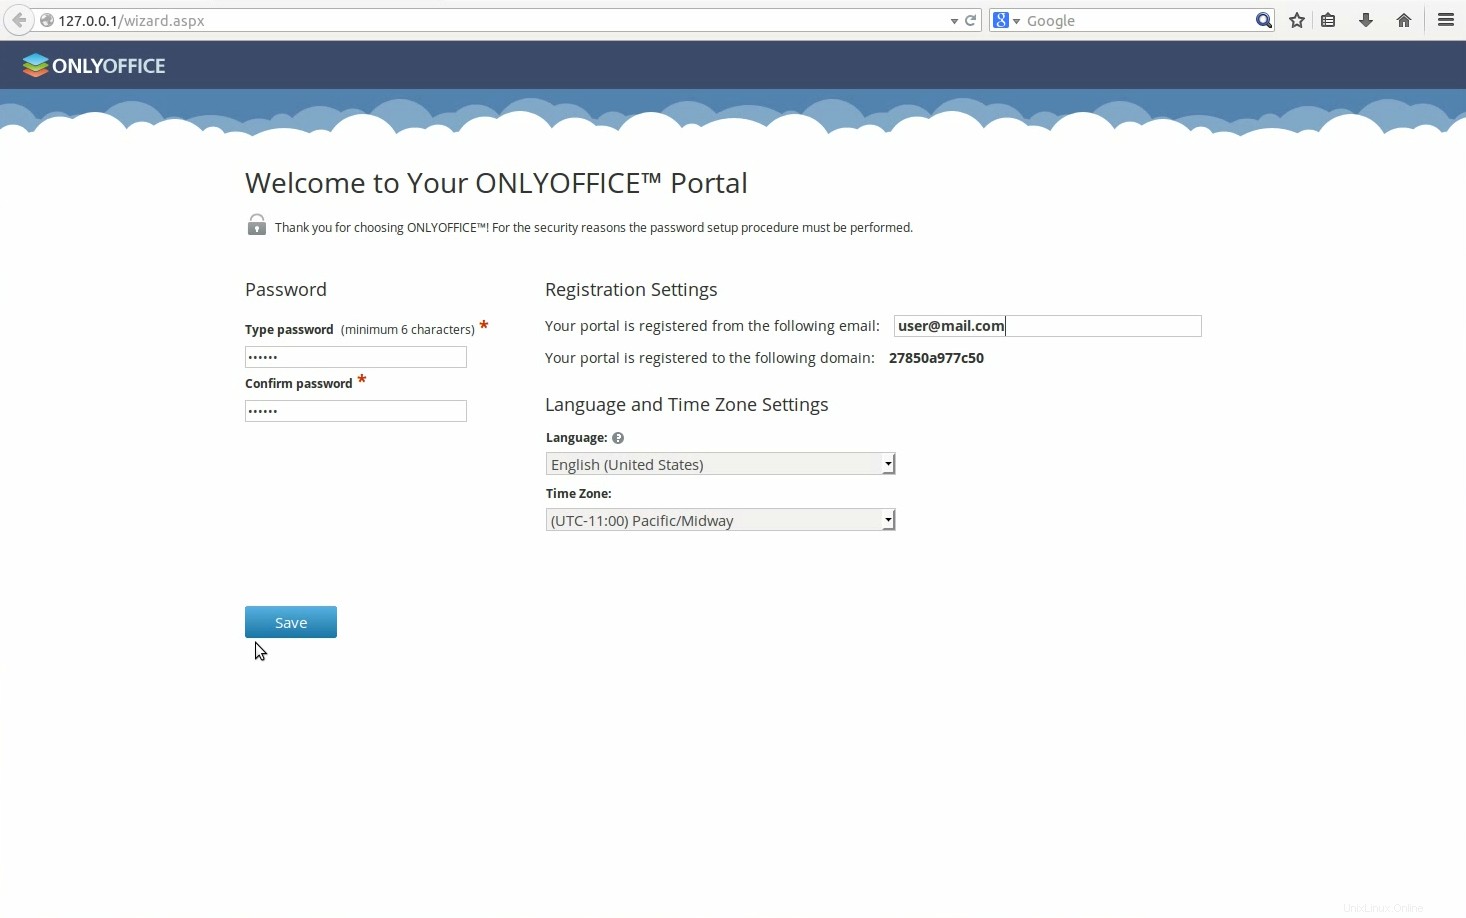
パスワードを入力し、次回ONLYOFFICEにアクセスするために使用するメールアドレスを指定します。
完了!作業を開始できます!
- ヒント1.ONLYOFFICEは、Mono v。3.2以降を使用してインストールし、公式の手順を確認してください。現在のバージョンを確認するためにインストールされている場合は、次のコマンドを実行します:mono--version。
- ヒント2.nginxの最新バージョンをインストールするには、公式の指示に従ってください。
- ヒント3.ONLYOFFICEにはMySQLバージョン5.6以降が必要です。マシンにインストールするには、公式の手順を参照してください。
- ヒント4.ONLYOFFICEをインストールしたら、ニーズに合うようにカスタマイズおよび管理する必要がある場合があります。必要な手順はすべて、ONLYOFFICEの公式ウェブサイトにあります。
- ヒント5.グラフィカルユーザーインターフェイスを使用してONLYOFFICEをインストールするには、SourceForgeからインストールファイルをダウンロードします。
- ヒント6.ONLYOFFICEをインストールするための最も簡単で安全な方法を探している場合は、Dockerサービスを使用してください。
- ONLYOFFICE