cPanelコントロールパネルの概要
cPanel コントロールパネルは、サーバー上の個別のホスティングアカウントを管理するために設計されています。エンドユーザー/クライアントは次のことができます:- ウェブサイトのファイルをアップロードして管理する
- ドメインのDNSレコードを編集する
- アドオンドメインとサブドメインを追加/削除
- Softaculousスクリプトインストーラーを使用してCMSをインストールする
- メールアカウントを作成する
- メール設定と迷惑メール保護を管理する
- ウェブサイトの統計を確認する
- データベースやバックアップなどを管理します。
ホスティングサーバーにcPanel11.86がインストールされています。そのすべての機能をカバーする最新のドキュメントはここにあります。
cPanelの基本テーマのcPanel構造の概要を見つけることができます。 およびcPanelレトロテーマの場合 以下のこのガイドで。
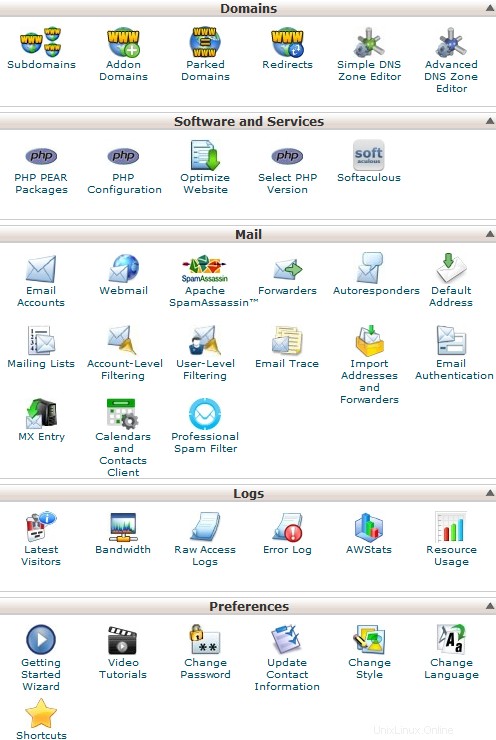
cPanelの基本テーマの場合:
基本的に、cPanelには異なる機能を持つ2つの垂直セクションがあります:
左の列 これは、ウェブホスティングサービスの具体的な側面と右の列に基づいて、特定のグループに便利に構成されたさまざまな機能を提供します。 これにはさまざまな統計が含まれます アカウントに関する情報。さらに、ヘッダーが表示されます 両方のセクションの上:
ヘッダーと右の列:
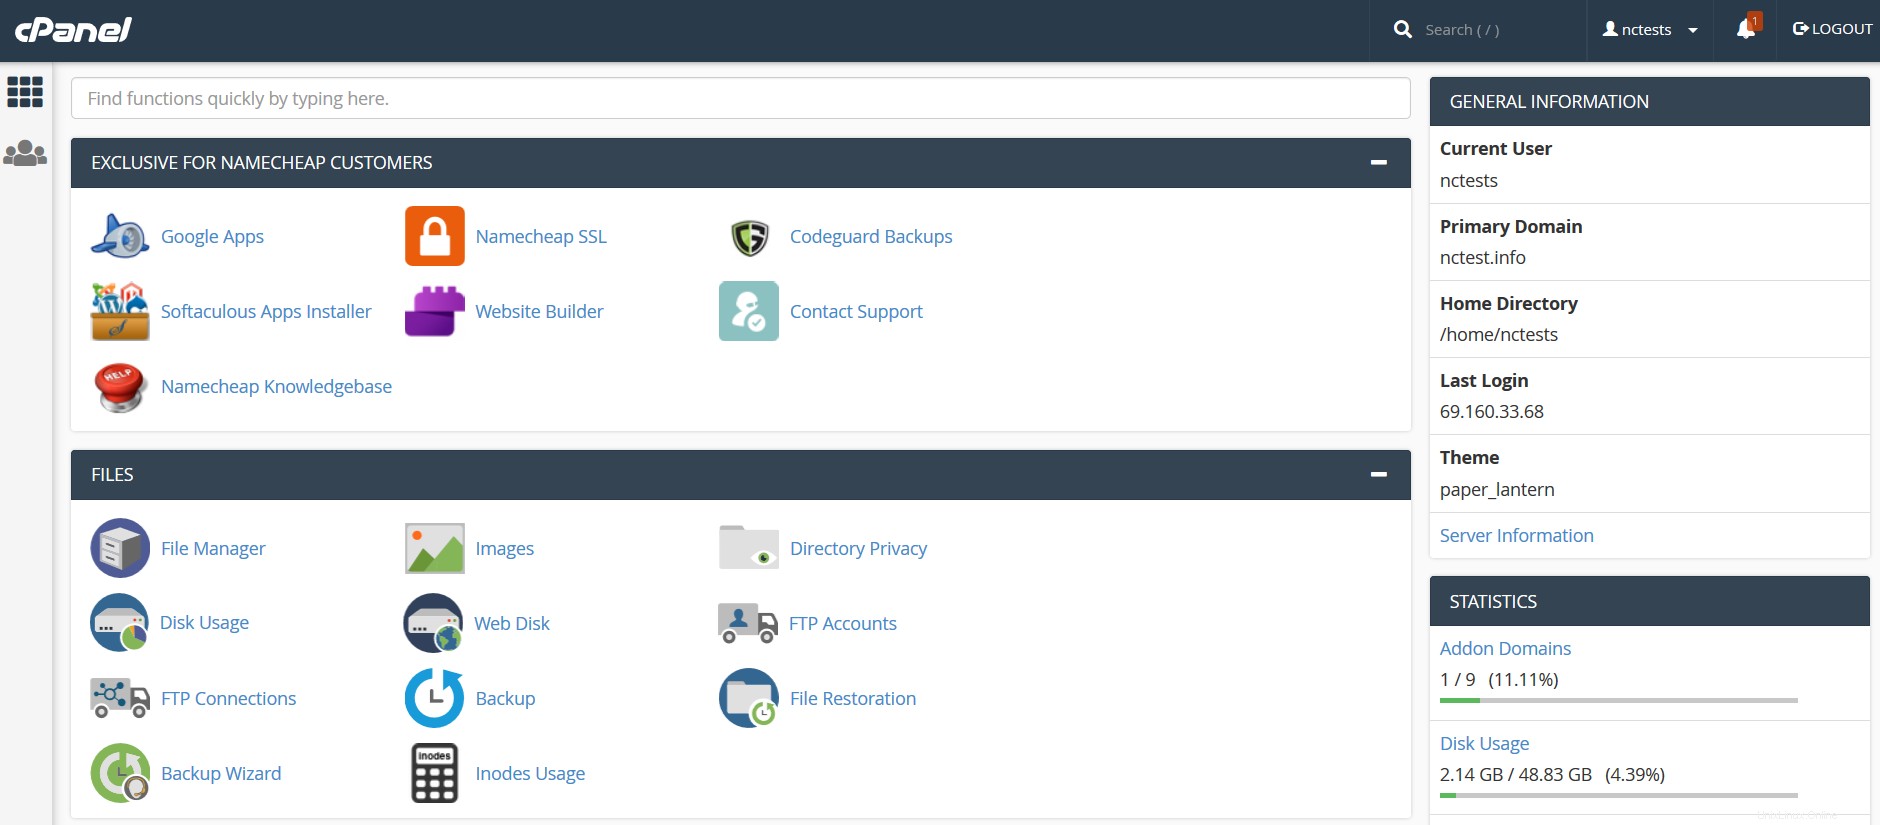
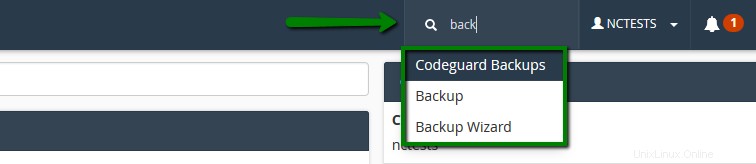
- 検索
- ユーザー
- 統計
左の列:
- Namecheapのお客様専用
- ファイル
- データベース
- メール
- ドメイン
- 指標
- セキュリティ
- ソフトウェア
- 高度
- 設定
ヘッダーと右の列:
Search User Stats
Search: cPanelの機能をすばやく見つけることができる検索バー。対応するメニューを割り当てるために必要なツールの名前を入力し始めるだけです:
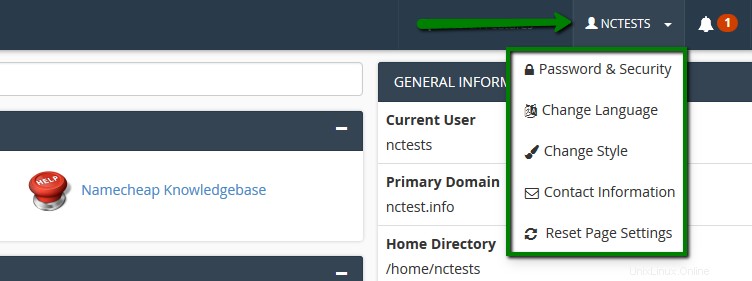
ユーザー: このメニューには、cPanelユーザーとアカウント自体に関連するいくつかのオプションがあります。cPanelのパスワード、連絡先情報、スタイル、言語を変更したり、現在のすべてのアカウント構成をデフォルトの状態にリセットしたりできます。
統計: ここに、cPanelアカウントに関連する一般的な情報があります:
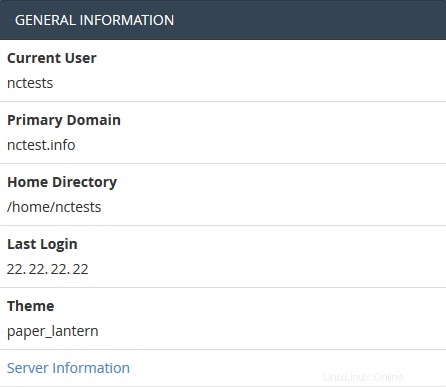
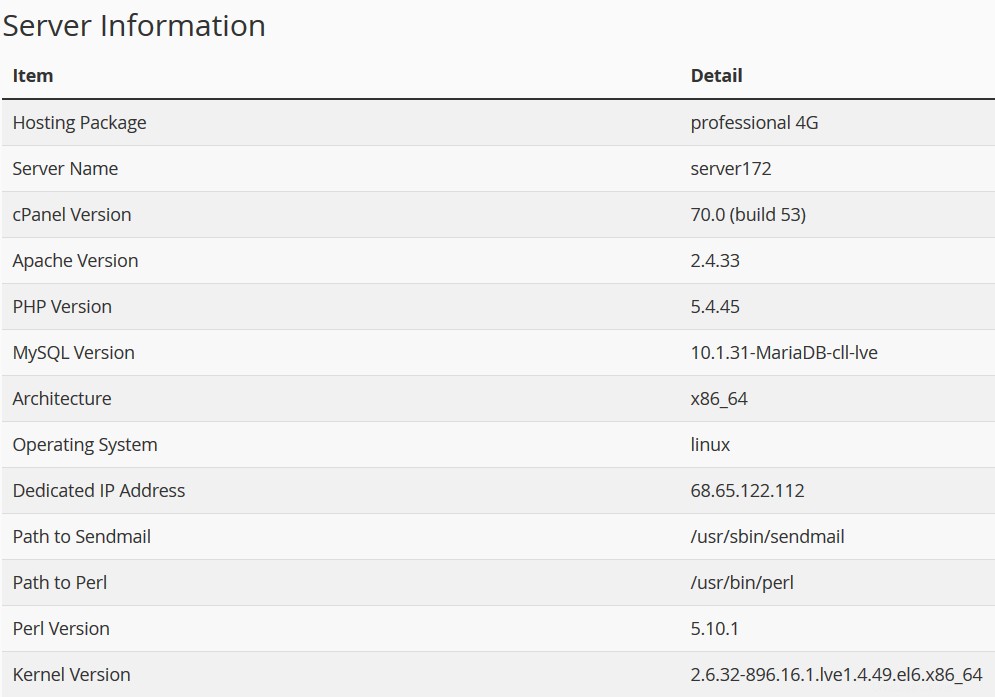
サーバー情報 メニューには、ホスティングアカウントパッケージと、cPanelアカウントに割り当てられたIPアドレス、サーバーにインストールされているソフトウェア、コアサービスのステータスなどの追加のサーバー側の詳細が一覧表示されます。
統計 列には、cPanelのサービスと割り当て、および現在のアカウントのリソース使用量が収集されます。
左の列:
Namecheapのお客様専用
ファイルデータベースメールドメイン指標セキュリティソフトウェア高度な設定
Namecheapのお客様専用
自動バックアップ: これは、PremiumおよびBusinessHostingを使用しているお客様が完全なcPanelバックアップをすぐに取得できるようにするcPanelプラグインです。
 Googleアプリ: このツールを使用すると、数回クリックするだけでドメインのGoogle Appsサービスを構成できます。詳細については、このカテゴリを確認してください。
  Namecheap SSL: このメニューでは、Namecheap SSL cPanelプラグインを使用できます。詳細については、このガイドを確認してください。
  CodeGuardバックアップ: このツールは、バックアッププロセスを可能な限り簡単にするために設計されました。 CodeGuardシステムは常にWebサイトを監視し、変更を通知し、ファイルの全自動バックアップを実行して、ダウンタイムの可能性を回避します。詳細については、次の記事を参照してください。
- CodeGuardを使用してバックアップを作成する方法
- CodeGuardを使用してWordPressサイトをバックアップする方法
 Softaculous Appsインストーラー: この機能を使用すると、Wordpress / Joomla / Magentoなどの最も一般的なCMSを含むSoftaculousスクリプトインストーラーを使用できます。他のスクリプトインストーラーよりもはるかに高速で、数回クリックするだけでCMSをインストールできます。 Softaculousアプリケーションは、すべての共有ホスティングプランのcPanelアカウントで提供されます。利用可能なスクリプトとそのデモは、ここで確認できます。Softaculousインストーラーを使用する場合は、次のガイドが役立ちます。
- Softaculousでスクリプトを操作する方法
- Softaculousを使用してWordPressをインストールする方法
- SoftaculousでJoomlaをインストールする方法
Node.jsアプリのセットアップ: Node.jsを使用してアプリを実行するためにNode.jsの特定のバージョンを選択できます。
 PHPバージョンを選択: このメニューを使用して、必要なPHPバージョンを選択したり、特定のPHPモジュールおよび関数を有効/無効にしたりすることができます。
Pythonアプリのセットアップ: この機能を使用すると、ApacheWebサーバーの実行中にPythonアプリケーションをcPanelにデプロイできます。
Rubyアプリのセットアップ: この機能を使用すると、ApacheWebサーバーの実行中にcPanelにRubyアプリケーションをデプロイできます。
 ウェブサイトビルダー :このツールを使用すると、ドラッグアンドドロップエディタを使用して、コードを知らなくても、特別なソフトウェアをインストールしなくても、Webサイト全体を簡単に作成できます。
  サポートにお問い合わせください :カスタマーサポートチームとのライブチャットを開きます。
  Namecheapナレッジベース: このボタンをクリックすると、ナレッジベースサイトセクションに移動します。
 シェルの管理: このプラグインを使用すると、数回クリックするだけで、それぞれのホスティングアカウントのSSHアクセスを有効または無効にできます。
PHPの調整: ビジネスサーバー(StellarBusinessおよび古いBusinessSSDプラン)でPHP設定を管理できます。
ファイル
 ファイルマネージャー: ここでは、アカウントに保存されているファイルを管理できます。これらのガイドは、このメニューを操作するときに役立ちます。
- cPanelでファイルマネージャーを使用する方法
- サイトをアップロードするにはどうすればよいですか?
 画像: このツールを使用すると、アカウントの画像を表示および変更できます。
  ディレクトリプライバシー: ユーザーがWebからサイトにアクセスしようとしたときに、ユーザー名とパスワードの要件を設定できます。サイトの特定の部分へのアクセスを制限する必要がある場合に使用できます。このガイドで詳細を確認できます。
  ディスク使用量: このメニューでは、アカウントのディスク容量使用量に関する詳細情報を確認できます。個々のファイルやデータベースではなく、アカウントのディレクトリとそのすべてのデータベースのディスク使用量の合計が表示されます。ディスク容量の最適化の詳細については、この記事を参照してください。
 Webディスク: この機能は、WebDavプロトコルのcPanel実装であり、Webサイトのファイルを、パーソナルコンピュータのローカルであるかのように管理、アップロード、およびダウンロードできます。 WebDiskの設定に関する詳細な手順は、次の記事に記載されています。
- Windows7でWebディスクを設定する方法
- Windows8でWebディスクを設定する方法
 FTPアカウント: このオプションを使用すると、FTPアカウントを作成および管理できます。 FTPアカウントを作成するには、この記事を確認してください。 FTP接続の手順については、次の一連のガイドを参照してください。
- FTP経由でアカウントにアクセスする方法
- FileZillaの設定方法
- Cyberduckの設定方法
- iWebの設定方法
- AdobeMuseの設定方法
- Dreamweaverのセットアップ方法
- CoreFTPクライアントの設定方法
- CuteFTPの設定方法
 FTP接続: このツールを使用すると、FTP経由で現在サイトにログインしているユーザーを監視できます。また、ここからFTP接続を終了することもできます。
 バックアップ: この機能を使用すると、アカウント全体またはアカウントの特定の部分(ホームディレクトリ、データベース、電子メールフォワーダーの構成、電子メールフィルターの構成など)のzip形式のコピーをダウンロードできます。 cPanelでバックアップを作成する方法の詳細については、こちらをご覧ください。
 バックアップウィザード: サイト全体のバックアップ、部分的なバックアップを作成するため、または最後に保存されたバックアップからサイトを復元できるようにするためのユーザーフレンドリーなインターフェイス。 復元に注意してください このメニューで提供されるオプションは、すべての共有サーバーでデフォルトで無効になっています。
Gitバージョン管理: この機能を使用すると、cPanelアカウントでGitリポジトリを簡単にホストできます。
 iノードの使用法: アカウントのiノード(ファイル)の使用状況の統計を提供します。このツールの詳細については、こちらをご覧ください。
 データベース
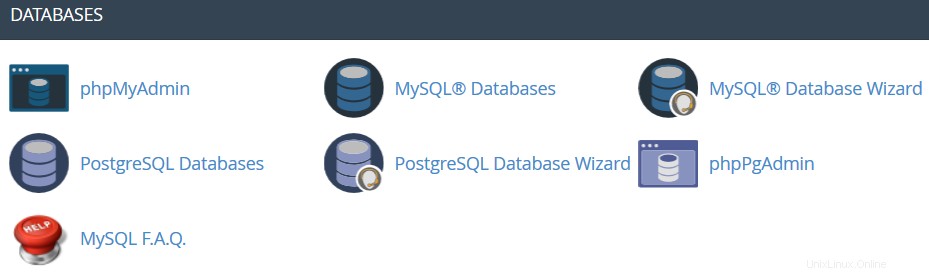
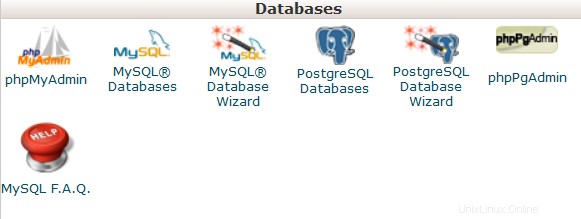
 phpMyAdmin: これはデータベース管理ツールであり、アカウント内のMySQLデータベースにさまざまな変更を加えることができます。データベースの操作方法の詳細については、このガイドのphpMyAdminを参照してください。
 MySQLデータベース: このメニューでは、cPanelアカウントでMySQLデータベースを作成および管理できます。詳細については、このガイドを参照してください。
 MySQLデータベースウィザード: MySQLデータベースと同じ機能を提供します メニュー、ただし簡略化された方法で。
 PostgreSQLデータベース: このオプションを使用すると、cPanelでPostgreSQLデータベースを作成および管理できます。
 PostgreSQLデータベースウィザード: PostgreSQLデータベースと同じ機能を備えています メニューですが、すべての変更をより簡単な方法で行うことができます。
 phpPgAdmin: これはデータベース管理ツールであり、アカウント内のPostgreSQLデータベースにさまざまな変更を加えることができます。 MySQL F.A.Q .: このボタンをクリックすると、MySQLの質問専用の対応するナレッジベースセクションに移動します。
メール
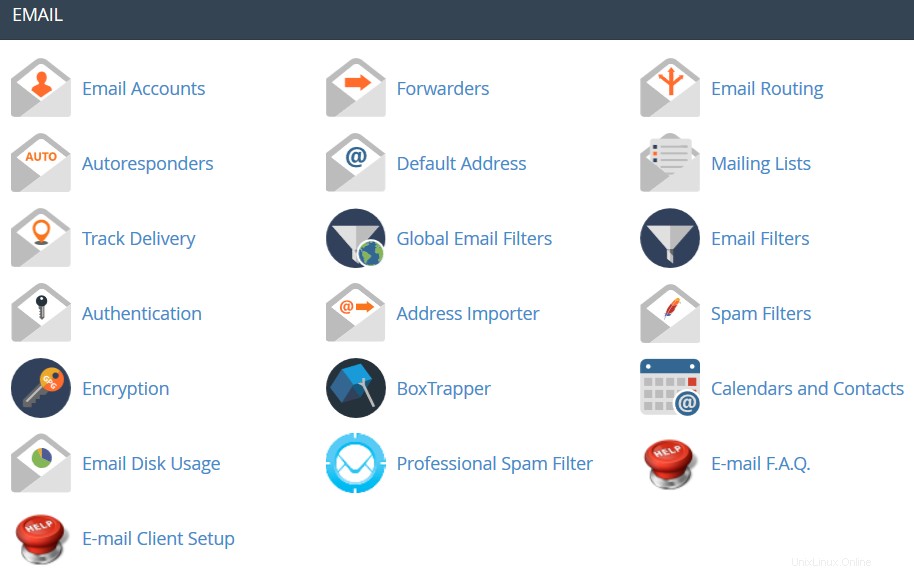
 メールアカウント: このメニューでは、アカウントでホストされているドメイン名に関連付けられたメールボックスを作成および管理できます。メールアカウントを作成するには、このガイダンスを確認してください。電子メールクライアントで新しく作成された電子メールアカウントの設定の詳細については、一連の記事「cPanel電子メール:クライアントの設定」を参照してください。
  フォワーダー: フォワーダー機能を設定すると、あるメールアドレスから別のメールアドレスにすべてのメールのコピーを送信する機会が得られます。たとえば、2つの異なるメールアカウントがあり、毎回両方をチェックしたくない場合は、[email protected]から[email protected]にメールを転送できます。元のアドレスは引き続き転送されたメールを受信することに注意してください。
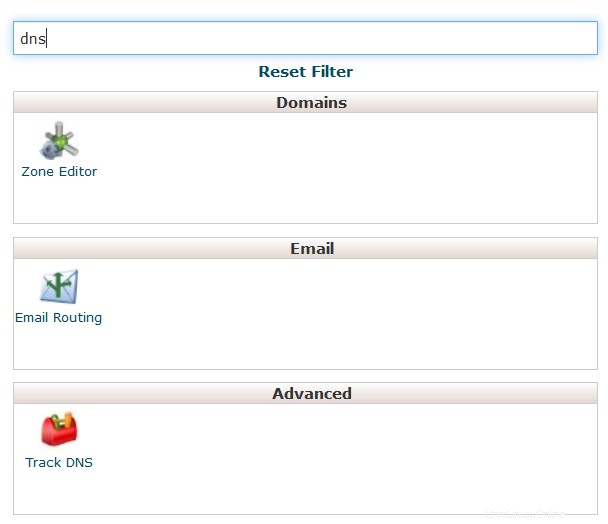
 メールルーティング: ここでは、cPanelアカウントでホストされているドメインのメールルーティングを設定できます。詳細については、このガイドをご覧ください。
 オートレスポンダー: この機能を使用すると、特定の電子メールアカウントで受信した受信電子メールに返信してメッセージを自動的に送信できます。これは、休日や利用できない場合、または送信する一般的なメッセージがある場合に非常に便利です。このガイドで詳細を確認できます。
 デフォルトアドレス: このメニューでは、電子メールアドレスを管理できます。これは、ドメインに存在しない電子メールアカウントに送信されたメッセージをフェッチするためにcPanelによって使用されます(「キャッチオールアドレス」とも呼ばれます)。詳細については、こちらをご覧ください。
 メーリングリスト: このオプションを使用すると、単一のアドレスを作成して、電子メール、ニュースレター、およびその他の更新を複数の電子メールアドレスに同時に送信できます。詳細については、この記事を参照してください。
 配達の追跡: このメニューを使用すると、アカウントのメール配信を監視できます。
 グローバルメールフィルター: この機能を使用すると、ホストされているドメインに到着するすべての電子メールのフィルターを構成できます。
 メールフィルター: このオプションを使用すると、ドメインのメールアカウントごとにフィルターを作成できます。フィルタリングツールの詳細については、この記事をご覧ください。
 メール配信可能性: このツールは、スパムを防ぐのに役立ちます。アカウントのDKIMおよびSPFレコードを設定すると、サーバーが着信メッセージと発信メッセージの性質を自動的に検出できるように、電子メールメッセージに検証可能な情報が提供されます。この機能の使用に関する詳細なガイダンスはここにあります。
 アドレスインポーター: このメニューでは、2種類のファイル( .xls )を使用できます。 および.csv )アカウントの複数のメールアドレスまたはメールフォワーダーを同時に作成するためにデータをインポートする場合。
 スパムフィルター: これは、受信メールのさまざまなスパム特性を調べるユーザーフレンドリーな電子メールユーティリティです。さまざまなネットワークテストとスパムフィルタリングを使用して全体的なスコアを取得し、メールをスパムと見なすかどうかを決定します。 SpamAssassinツールは、すべての共有およびリセラーホスティングプランにデフォルトで提供されています。これらの記事は、SpamAssasin機能の設定に役立ちます:
- SpamAssassin FAQ
- cPanelでSpamAssassinを設定する方法
 暗号化: このオプションを使用すると、公開鍵アプローチを使用する公開暗号化スキームであるGnuPGを設定できます。このシステムは公開鍵を使用してメッセージを暗号化し、メッセージの意図された受信者が保持する秘密鍵を使用してメッセージを復号化できます。
  BoxTrapper: このツールは、ホワイトリストに含まれていないすべての電子メール送信者に、メールを受信する前に確認電子メールへの返信を要求することにより、受信トレイをスパムから保護できます。
  カレンダーと連絡先: このメニューは、個人のデバイスでそれらにアクセスするために、カレンダー用のCalDAVおよび連絡先用のCardDAVに接続するようにクライアントを構成するのに役立ちます。詳細な手順は、このガイダンスに記載されています。
 メールディスクの使用量: このユーティリティを使用すると、メールボックスから古いメッセージを削除してディスク容量を回復できます。
  プロフェッショナルスパムフィルター: このメニューでは、SpamExpertsを構成できます。これは、受信スパムと送信スパムの両方からアカウントを保護できる、ユーザーフレンドリーな電子メールフィルタリングソリューションです。この機能の詳細については、この記事を参照してください。 EメールF.A.Q.: このボタンをクリックすると、電子メールの質問専用の対応するナレッジベースセクションに移動します。 電子メールクライアントのセットアップ: このボタンをクリックすると、さまざまなメールクライアントとデバイスを使用したメールアカウントの設定専用の対応するナレッジベースセクションに移動します。
ドメイン

 サイト発行者 :このインターフェースを使用して、利用可能なテンプレートのセットからWebサイトをすばやく作成できます。これにより、訪問者はWebサイトの開発を続けながら、いくつかの基本的な情報を見ることができます。
 ドメイン: このインターフェースにより、単一のcPanelインターフェースから複数のドメインを作成および管理できます。
 アドオンドメイン: このメニューを使用すると、ホスティングアカウントにドメインを追加できます。アドオンドメインには、ホスティングアカウントに割り当てられているメインドメインと同じ機能があります。 cPanelへのドメインの追加の詳細については、こちらをご覧ください。
  サブドメイン: このメニューでは、サブドメインを作成して、Webサイトまたは他のIPのさまざまなセクションを指すことができます。このメニューの詳細な手順は、この記事にあります。
 エイリアス: この機能を使用すると、既存のホスティングアカウントに追加のドメイン名を「パーク」できます。プライマリドメインと同じウェブサイトを表示し、ウェブ統計も共有します。新しいパーキングドメインを設定するときに、このガイドを参照できます。
 リダイレクト: ここでは、特定のドメイン/ページから別のドメイン/ページへのリダイレクトを作成し、後者のコンテンツを表示できます。詳細については、こちらをご覧ください。
 ゾーンエディター: cPanelアカウントのドメインのDNSゾーンを編集できます。次のレコードを追加できます:A、AAAA、CNAME、SRV、TXT、MX。 cPanelでのDNSレコードの設定の詳細については、この記事を確認してください。 ドメインF.A.Q.: このボタンをクリックすると、ドメインの管理に関する質問専用の対応するナレッジベースセクションに移動します。
メトリクス
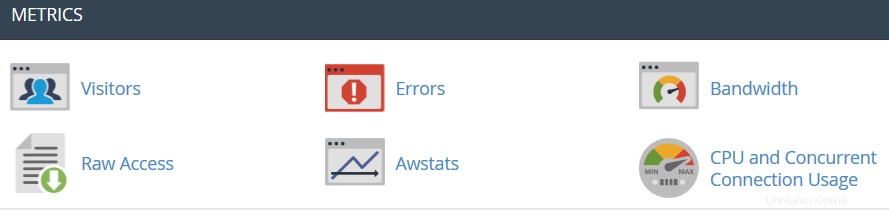
 訪問者: テーブルビューで提供されるアカウントのアクセスログ。
 エラー: ここで、アカウントのエラーログを確認して、アカウントでホストされているWebサイトによって生成されたエラーに関連する最新の300行のコンテンツを表示できます。
 帯域幅: アカウントで使用されている帯域幅の詳細情報を提供します。
 Rawアクセス: アカウントのRAWアクセスログ。
 Awstats: このツールは、アカウントのアクセスインデックス(ユーザー、ロボット、アクセスされたページなど)を監視する機会を提供します。この記事でより詳細な説明を見つけることができます。
 CPUと同時接続の使用: アカウントによって消費されたリソースに関する情報を表示します。このガイドでは、リソースの使用に関する追加情報を見つけることができます。
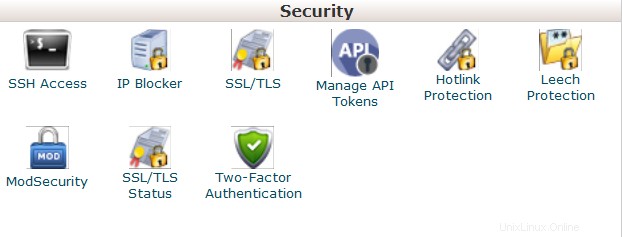
セキュリティ
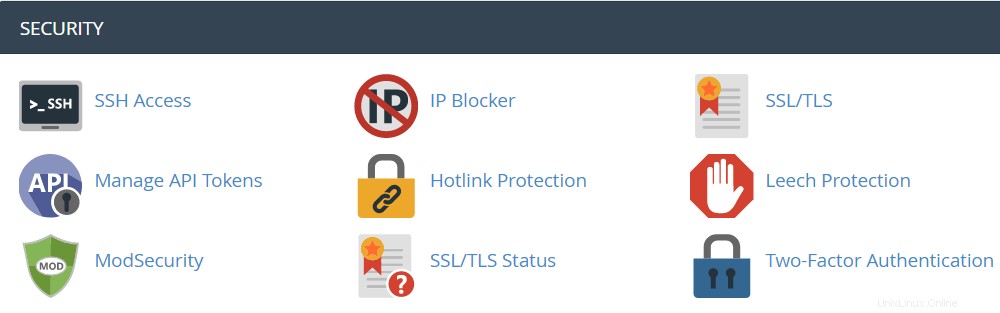
 SSHアクセス: ここでは、SSHキーを使用して接続するために、アカウントのアクセスキーを生成できます。 SSHキーの設定の詳細については、この記事を参照してください。
  IPブロッカー: このツールを使用すると、IPアドレスの範囲をブロックして、サイトへのアクセスを防ぐことができます。この件については、このガイドを参照してください。
 SSL / TLS: このツールは、SSL証明書のインストールと管理に役立ちます。詳細なガイドはここにあります。
 ホットリンク保護: このメニューでは、Webサイトのホットリンク保護を有効にできます(つまり、誰かがあなたの画像を別のWebサイトに直接リンクして、その結果、ホスティングアカウントの帯域幅を消費するのを防ぐことができます)。詳細については、このガイダンスを確認してください。
 ヒル保護: ユーザーがサイトの制限された領域のパスワードを配布または公開できるかどうかを制御できます。侵害されたアカウントを選択したURLにリダイレクトしたり、一時停止したりするために使用できます。
 ModSecurity: このメニューでは、ドメインとサブドメインのModSecurityを無効または有効にできます。
  SSL / TLSステータス: このインターフェースを使用して、ドメインのSSLステータスを表示します。
 2要素認証: このツールを使用すると、2FAを有効にできます。これは、パスワードと生成されたセキュリティコードの2つの形式の識別を必要とするセキュリティ対策の改善です。 2FAを有効にすると、スマートフォンのアプリが、ログインするためにパスワードとともに入力する必要のあるコードを提供します。2FAの有効化について詳しくは、こちらをご覧ください。
ソフトウェア
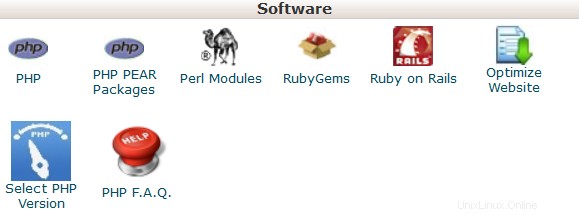
 PHP PEARパッケージ: このオプションを使用すると、ホスティングアカウントのPHPPEARパッケージをインストールして維持できます。
 Perlモジュール: ここでは、アカウントで利用可能なPerlモジュールを管理できます。 Perlモジュールは、Perlプログラミング言語用のソフトウェアの個別のコンポーネントです。 Perlは、すべての共有/リセラーサーバーでサポートされています。この記事では、この機能の詳細について説明します。
 RubyGems: このメニューには、Rubyでタスクを実行できる一連の関数があります。 Rubyプログラム内で使用する前にGemをインストールする必要があります。
 Ruby on Rails: このメニューを使用すると、RubyonRailsの機能を使用できます。 Ruby on Railsは、Rubyプログラミング言語用の無料のWebアプリケーションフレームワークです。これは、「Rails」または「RoR」と呼ばれることがよくあります。 Stellar Plus、Stellar BusinessでRoRをサポートします およびリセラー パッケージ(および古いProfessional 、究極 、ビジネスSSD、リセラー パッケージ)。詳細については、このガイドを参照してください。
 ウェブサイトの最適化: この機能を使用すると、Apacheがリクエストを処理する方法を微調整することで、Webサイトの圧縮を有効/無効にし、構成できます。これにより、Webサイトのパフォーマンスが向上します。
 Node.jsアプリのセットアップ: Node.jsを使用してアプリを実行するために、Node.jsの特定のバージョンを選択できます。
PHPバージョンを選択: ここで、cPanelアカウントに適用されているPHPのバージョンを変更できます。詳細については、この記事を参照してください。 Pythonアプリのセットアップ: この機能を使用すると、ApacheWebサーバーの実行中にPythonアプリケーションをcPanelにデプロイできます。
Rubyアプリのセットアップ: この機能を使用すると、ApacheWebサーバーの実行中にRubyアプリケーションをcPanelにデプロイできます。
PHP F.A.Q .: このボタンをクリックすると、PHP関連の質問専用のナレッジベースサイトセクションに移動します。詳細
ターミナル: このインターフェイスを使用すると、ブラウザ内のターミナルアプリケーションにアクセスして、cPanelセッション内でコマンドラインに直接アクセスできます。
 Cron Jobs: ここでは、スケジュールに基づいて実行されるスクリプトを設定できます。 CronJobの設定の詳細については、このガイダンスを参照してください。 DNSの追跡: このツールを使用すると、任意のドメインに関するDNS情報を確認したり、サイトが存在するサーバーからcPanelにアクセスしているコンピューターまでのルートを追跡したりできます。
 インデックス: このメニューでは、訪問者がWeb上のディレクトリを表示する方法をカスタマイズできます。
 エラーページ: この機能を使用すると、Webサイトに表示できるデフォルトのエラーページのコードを編集できます。
 Apacheハンドラー: ここでは、特定のファイル形式を処理するためにさまざまなApacheハンドラーを構成できます。
 MIMEタイプ: システムで事前定義されたMIMEタイプに関する情報と、独自にMIMEタイプを追加するオプションを提供します。
 ウイルススキャナー: このツールを使用すると、ClamAVウイルススキャナーを使用してアカウントのウイルスをスキャンできます。 ClamAVは、電子メールスキャン、Webスキャン、エンドポイントセキュリティなどのさまざまな状況で使用されるオープンソース(GPL)アンチウイルスエンジンです。柔軟でスケーラブルなマルチスレッドデーモン、コマンドラインスキャナー、データベースの自動更新用の高度なツールなど、多数のユーティリティを提供します。
 設定
 パスワードとセキュリティ: このメニューでは、元のパスワードがわかっている場合は、cPanelのメインパスワードを変更できます。それ以外の場合は、このガイドの手順に従ってパスワードをリセットできます。
 Change Language: this feature provides you with an opportunity to change your cPanel interface language.
 Change style: here you can change the overall look and feel of the interface by selecting one of the several preinstalled styles.
 Contact Information: in this menu you can specify an email address that will receive system email notifications.
  User Manager: allows you to manage your Subaccounts. Subaccounts use the same login and password information for email, FTP, and Web Disk.
For cPanel Retro Theme:
Basically cPanel has two vertical sections with different features:
Left column which includes different Stats information about the account, the possibility to switch cPanel theme, the search bar and frequently accessed menus and Right column which provides a number of various features that are conveniently structured to specific groups based on the concrete aspect of the web hosting service.
Below you can find a list of each menu for your convenience:
Left Column:
- Find
- Stats
- Preferences
- Domains
- Files
- Metrics
- Security
- Databases
- Software
- Advanced
- Exclusive for Namecheap Customers
Left Column
In this column you will find following options:
Find: it is a search bar that allows to find cPanel features in the quickest way. Just start entering the name of the needed tool to allocate the corresponding menu:
Stats: here you will find all the information related to the statistics of your hosting account. At the bottom of this section you will find Expand Stats button, which allows you to review the full statistics:
If you see the expanded stats menu, you will find Collapse Stats button at the bottom of this section in order to switch to the short menu version:
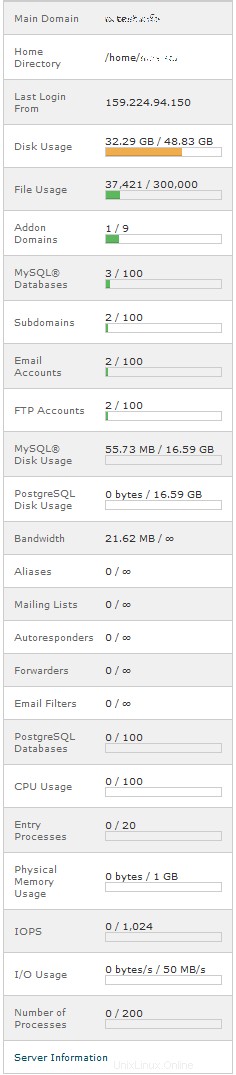
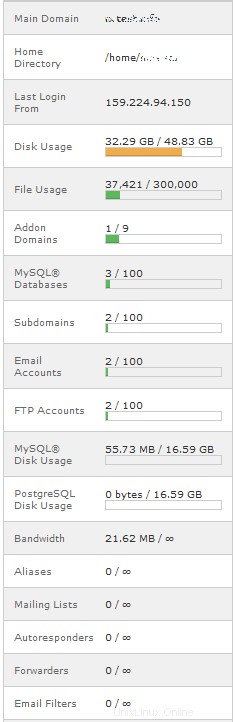
Here is an overview of all indexes:
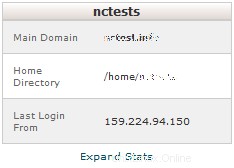
- Main Domain: the primary domain name associated with your hosting account.
- Home Directory: the path the home directory of your account on the server where your websites' folders and files reside.
- Last Login: the last IP address your cPanel has been accessed from.
- Disk Usage: the amount of server disk space provided with your cPanel account. This index displays disk space used by your websites' content, databases, emails, etc.
- File Usage: the current number of files (inodes) and your cPanel account's inode limit.
- Addon Domains: the current number of already added addon domains and the total number allowed for your cPanel account.
- MySQL Databases: the current number of MySQL or MariaDB databases created your cPanel account.
- Subdomains: the current number of already created subdomains and the total number allowed for your cPanel account.
- Email Accounts: the current number of already created email accounts and the total number of email accounts allowed for your cPanel account.
- FTP Accounts: the current number of already created FTP accounts and the total number allowed for your cPanel account.
- MySQL Disk Usage: the amount of disk space used by your MySQL or MariaDB databases.
- PostgreSQL Disk Usage: the amount of disk space used by your PostgreSQL databases.
- Bandwidth: the current amount of data transferred to and from your cPanel account for the month and the total amount of your cPanel account's monthly bandwidth limit.
- Aliases: the current number of already created alias domains and the total number allowed for your cPanel account.
- Mailing Lists: the current number of already created mailing lists and the total number allowed for your cPanel account.
- Autoresponders: the current number of created email autoresponders and the maximum number allowed.
- Forwarders: the amount of email forwarders created and the maximum number allowed.
- Email filters: the number of email filters created vs. the maximum number allowed.
- PostgreSQL Databases: the current number of PostgreSQL databases created in your cPanel account.
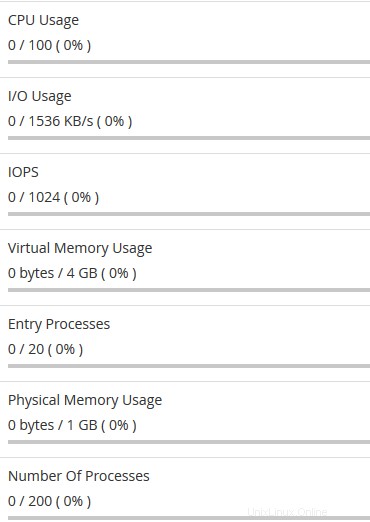
- CPU Usage: this value specifies how much of the allocated CPU resources you are currently using. The amount of CPU resources we provide to each account is the percentage of the server’s resources.
- Entry Processes: this is the number of processes that enter your account. For example, every PHP page that is accessed by a user will usually generate a single entry process.
- Physical Memory Usage: the actual memory allocated for your account. Virtual memory is usually a file on a disk drive that the operating system uses to store information (swap-to-from) when the real memory becomes full, for instance the page (swap) file on a Linux system. Therefore, if you try to publish a big post, it might take all physical memory to do so, but after some time it will be normalized.
- I/O Usage: this index represents how much I/O (or disk activity) your account is using. Any task which makes use of the servers disk drive (such as reading or writing to the server) will consume I/O. More details about resource limits can be found here.
- Number of Processes: this limit is similar to the above but includes all the processes generated by the account rather than the specific PHP, SSH or cron jobs.
Right Column
Preferences
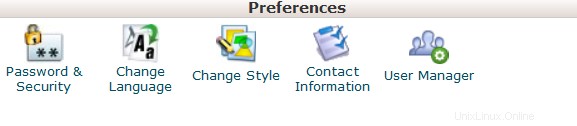
This group of features provides you with the general information on cPanel management and allows you to make basic changes to your cPanel account.
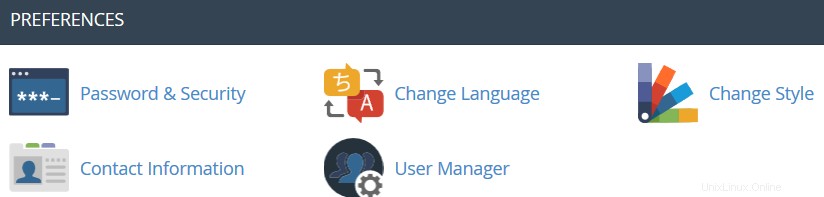
 Password &Security: this menu allows you to change your cPanel main password if know the original one. Otherwise, you can reset the password following the steps in this guide.
  Change Language: this feature provides you with an opportunity to change your cPanel interface language.
  Change style: here you can change the overall look and feel of the interface by selecting one of the several preinstalled styles.
 Contact Information: in this menu you can specify an email address that will receive system email notifications.
  User Manager: allows you to manage your Subaccounts. Subaccounts use the same login and password information for email, FTP, and Web Disk.
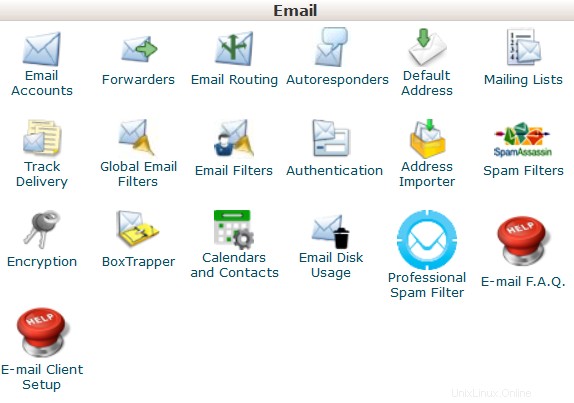
This group of features allows you to create email accounts for your domain names and manage email settings.
 Email Accounts: in this menu you can create and manage mailboxes associated with the domain names hosted in your account.In order to create an email account, feel free to check this guidance.More details about setting up a newly created email account with email clients can be found in the set of articles cPanel Email:Client Setup.
  Forwarders: setting up Forwarders feature provides you with an opportunity to send a copy of all emails from one email address to another. For example, you have two different email accounts and you don’t want to check both of them every time, so you could forward emails from [email protected] to [email protected]. Note, that the original address will still receive the forwarded emails.
  Email Routing: here you can set email routing for the domains hosted in your cPanel account, more details can be found in this guide.
  Autoresponders: this feature allows you to automatically send messages in reply to incoming emails received on a specific email account. This is pretty useful when you are on holidays or unavailable, or if you have any generic messages to send. You will find more information in this guide.
 Default Address: in this menu you can manage an email address, which is used by cPanel to fetch any message sent to email accounts which do not exist at your domain (also known as 'catch-all address'). More details can be found here.
  Mailing Lists: with this option you can create a single address to send emails, newsletters and other updates to multiple email addresses simultaneously. Feel free to refer to this article to get more information.
  Track Delivery: this menu allows you to monitor emails delivery for your account.
 Global Email Filters: this feature allows you to configure filters of all the emails arriving to your hosted domains.
  Email Filters: with this option you can create filters for each email account for your domain. You can find more details about filtering tools in this article.
  Email Deliverability : this tool will help you to prevent spam. Setting up DKIM and SPF records for your account equip email messages with verifiable information so that your server can automatically detect the nature of incoming and outgoing messages.The detailed guidance about using this feature can be found here.
 Address Importer: this menu allows you to use two types of files (.xls and .csv ) for importing data in order to simultaneously create multiple email address or email forwarders for your account.
  Spam Filters: it is a user-friendly email utility which examines incoming mail for different spam characteristics. It uses various network tests and spam filtering to get an overall score in order to decide whether the mail should be considered as spam or not.SpamAssassin tool is provided by default with all our shared and reseller hosting plans.These articles can be found useful for setting up SpamAssasin feature:
- SpamAssassin FAQs
- How to configure SpamAssassin in cPanel
 Encryption :this option allows you to set up GnuPG, which is a publicly-available encryption scheme that uses the public key approach. This system uses a public key to encrypt messages and you can decrypt them with the private key, which the intended recipient of the message retains.
 BoxTrapper :this tool can protect your Inbox from spam by requiring all email senders not on your Whitelist reply to a verification email before you can receive their mail.
 Calendars and Contacts: this menu helps to configure your client to connect to CalDAV for calendars and CardDAV for contacts in order to access them on your personal devices. The detailed instructions can be found in this guidance.
  Email Disk Usage :this utility allows you to recover disk space by deleting old messages from your mailbox.
 Professional Spam Filter: this menu allows you to configure SpamExperts, a user-friendly email filtering solution that allows to protect your account from both incoming and outgoing spam. More information about this feature is provided in this article. E-mail F.A.Q. :this button will take you to the corresponding Knowledgebase section dedicated to email questions. E-mail Client Setup :this button will take you to the corresponding Knowledgebase section dedicated to email account setup with different email clients and devices.
Domains
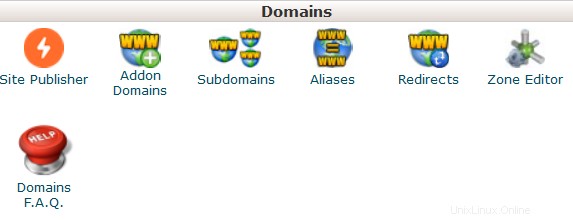
 Site Publisher :you can use this interface to quickly create a website from a set of available templates. This allows visitors to see some basic information while you continue to develop your website.
 Domains: this interface allows creating and managing multiple domains from a single cPanel interface.
 Addon Domains: with the help of this menu you can add more domains to the hosting account. Addon domains have the same functionality as the main domain assigned to your hosting account. More details about adding domains to cPanel are provided here.
 Subdomains: in this menu you can create subdomains and point them to different sections of your website or other IPs. Detailed instructions about this menu can be found in this article. Aliases: this feature allows you to 'park' additional domain names to your existing hosting account. They display the same website as your primary domain and share web statistics as well. You can refer to this guide when setting up a new parked domain.
  Redirects: here you can create a redirect for a specific domain/page to another domain/page and display the contents of the latter. More details can be found here.
 Zone Editor: allows you to edit the DNS zone of the domain(s) in your cPanel account. The following records can be added:A record, AAAA record, CNAME record, SRV record, TXT record. Feel free to check this article to get more information about setting up DNS records in cPanel. Domains F.A.Q .:this button will take you to the corresponding Knowledgebase section dedicated to domains' management questions.
Files
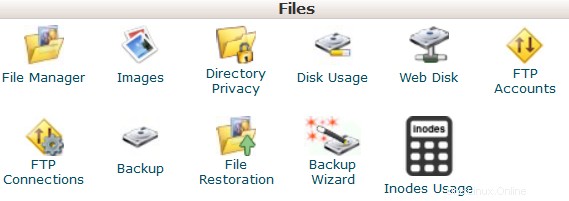
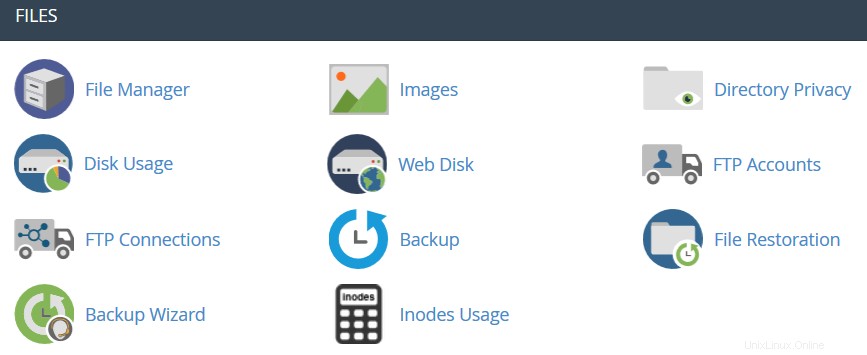
 File Manager: here you can manage the files stored in your account. These guides can be found helpful while working with this menu:
- How to use File Manager in cPanel
- How do I upload my site?
 Images :this tool allows you to view and modify images in your account.
 Directory Privacy :allows you to set a requirement for a username and password when users attempt to access your site from the web. It can be used when you need to limit access to a certain part of your site. You can get more details in this guide.
 Disk Usage: in this menu you will be able to check a detailed information about the disk space usage of your account. It shows disk usage totals for your account’s directories and all of its databases, not for individual files or databases. More details about Disk Space usage optimization are provided in this article.
  Web Disk: this feature is a cPanel implementation of the WebDav protocol, which allows you to manage, upload, and download your website’s files as though they were local to your personal computer. More detailed instructions about setting up WebDisk can be found in these articles:
- How to set up Web Disk on Windows 7
- How to set up Web Disk on Windows 8
 FTP Accounts: this option allows you to create and manage your FTP accounts. In order to create an FTP account, feel free to check this article. For FTP connection instructions, refer to this set of guides:
- How to access an account via FTP
- How to set up FileZilla
- How to set up Cyberduck
- How to set up iWeb
- How to set up Adobe Muse
- How to set up Dreamweaver
- How to set up CoreFTP Client
- How to set up CuteFTP
 FTP Connections: using this tool you can monitor the users who are currently logged into your site via FTP. Also, it’s possible to terminate an FTP connection from here.
 Backup: this feature allows you to download a zipped copy of your entire account or specific parts of it, such as your home directory, databases, email forwarder configuration, or your email filters configuration. More details guidance about how to make backups in cPanel can be found here.
  Backup Wizard: a user-friendly interface for creating a backup of your entire site, a partial backup, or allowing a site restoration from the last backup saved. Note, that Restore option provided in this menu is disabled by default on all our shared servers.
 Git Version Control: this feature allows you to easily host Git repositories on your cPanel account.
 Inodes Usage: provides the statistics of your account inodes (files) usage.You will find more details about this tool here.
Metrics

 Visitors: the access log of your account provided in a table view.
  Errors: here you can check the error log for your account, showing the latest 300 lines of content related to the errors generated by any website hosted in your account.
 Bandwidth: provides you with the detailed information the bandwidth used by your account.
  Raw Access: the RAW access log for your account Awstats: this tool provides you with an opportunity to monitor the access indexes on your account – users, robots, accessed pages and many, many more. You will find a more detailed explanation in this article.
  CPU and Concurrent Connection Usage: shows information on the resources consumed by your account.
Security
 SSH Access: here you can generate an access key for your account in order to connect using SSH keys. More details about setting up SSH keys can be found in this article.
  IP Blocker :with the help of this tool you can block a range of IP addresses to prevent them from accessing your site. Feel free to refer to this guide on the matter.
 SSL/TLS: this tool will help you to install and manage your SSL Certificates. You will find a more detailed guide here.
  Hotlink Protection: in this menu you can enable hotlink protection for your website (that is to prevent someone from direct linking of your images to another website and, as a result, consuming your hosting account bandwidth). Feel free to check this guidance for additional information.
  Leech Protection: allows you to control whether users can give out or publicly post their passwords for restricted areas of your site. It can be used to redirect compromised accounts to the URL of your choice, or suspend them.
  ModSecurity: in this menu you can disable or enable ModSecurity for your domains and subdomains.
 SSL/TLS Status :use this interface to view the SSL status of your domains.
 Two-Factor Authentication: this tool lets you enable 2FA, an improved security measure that requires two forms of identification:your password and a generated security code. When 2FA is enabled, an app on your smartphone supplies a code you must enter with your password to log in. You can learn more about enabling 2FA here.
Databases
 phpMyAdmin: the database management tool, which allows you to make different changes to MySQL databases in your account. You can find more information about how to work with databases via phpMyAdmin this guide.
  MySQL Databases: in this menu you can create and manage MySQL databases in cPanel account.
  MySQL Databases Wizard: provides the same functionality as MySQL Databases menu, in a simplified way though. More details about how to use both menus can be found here.
 PostgreSQL Databases: this option allows you to create and manage PostgreSQL databases in cPanel.
  PostgreSQL Databases Wizard: has the same functionality as PostgreSQL Databases menu, but allows to make all the changes in a simpler way.
  phpPgAdmin: the database management tool, which allows you to make different changes to PostgreSQL databases in your account. MySQL F.A.Q.: this button will take you to the corresponding Knowledgebase section dedicated to MySQL questions.
 Software and Services
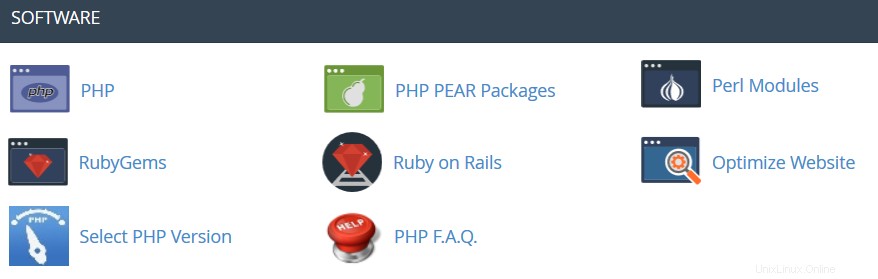
 PHP PEAR Packages: this options allows you to install and maintain PHP PEAR packages for your hosting account.
  Perl Modules: here you can manage Perl modules available for your account. A Perl module is a discrete component of software for the Perl programming language. Perl is supported on all of our shared/reseller servers.This article will provide you with more details about this feature.
 RubyGems: in this menu you will find the set of functions that allow you to perform tasks in Ruby. It’s needed to install a Gem before you can use it inside a Ruby program.
 Ruby on Rails: with this menu you can use Ruby on Rails features. Ruby on Rails is a free web application framework for the Ruby programming language. It is often referred to as 'Rails' or 'RoR'. We support RoR with our Stellar Plus, Stellar Business and Reseller packages (and old Professional , Ultimate , Business SSD, Reseller packages). The following versions are working on our servers:Ruby – 1.8.7, Rails – 2.3.18. More information can be found in this guide.
  Optimize Website: this feature allows you to enable/disable and configure the compression of your website by tweaking the way Apache handles requests, which can increase the performance of your website.
 Setup Node.js App: allows for the choosing a specific version of Node.js in order to run the apps using Node.js.
Select PHP Version: here you can change PHP version applied to your cPanel account. You can find more information in this article. Setup Python App: this feature allows you to deploy Python applications on your cPanel while running the Apache web server.
Setup Ruby App: this feature allows you to deploy Ruby applications on your cPanel while running Apache web server.
PHP F.A.Q.: this button will take you to our Knowledgebase site section dedicated to PHP-related questions.Advanced
Terminal: this interface allows you to access an in-browser terminal application for direct command-line access within a cPanel session.
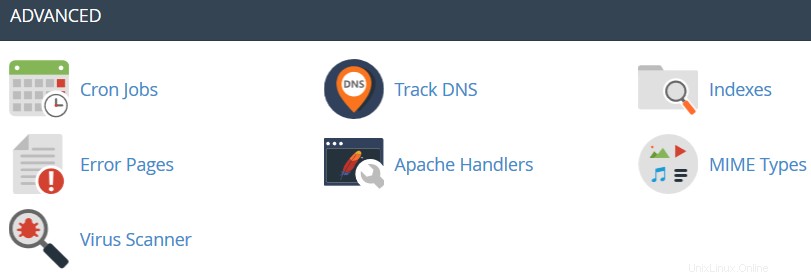
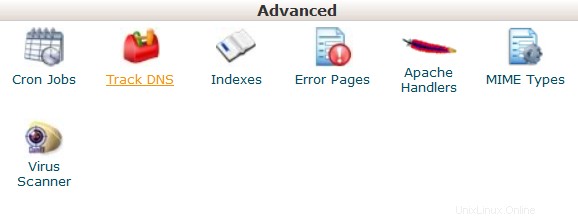
 Cron Jobs: here you can set up scripts running on a scheduled basis. For more details about setting up CronJobs refer to this guidance.
  Track DNS :using this tool you can check DNS information about any domain, or to trace the route from the server your site is on to the computer you are accessing cPanel from.
 Indexes: in this menu you can customize the way in which visitors can view a directory on the web.
  Error Pages: this feature allows you to edit the code for the default errors pages your website can display.
 Apache Handlers: here you can configure different Apache handlers for dealing with certain file formats.
 MIME Types: provides you with the information about the system predefined MIME types and the option to add a MIME Type on your own.
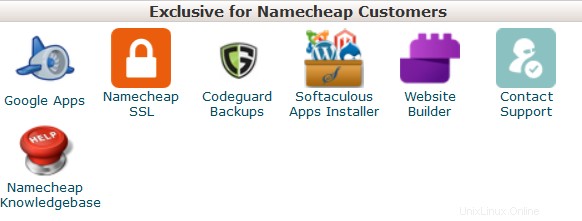 Virus Scanner: this tool will allow you to scan your account for viruses with ClamAV virus scanner. ClamAV is an open source (GPL) anti-virus engine used in a variety of situations including email scanning, web scanning, and endpoint security. It provides a number of utilities including a flexible and scalable multi-threaded daemon, a command line scanner and an advanced tool for automatic database updates.
 Exclusive for Namecheap Customers
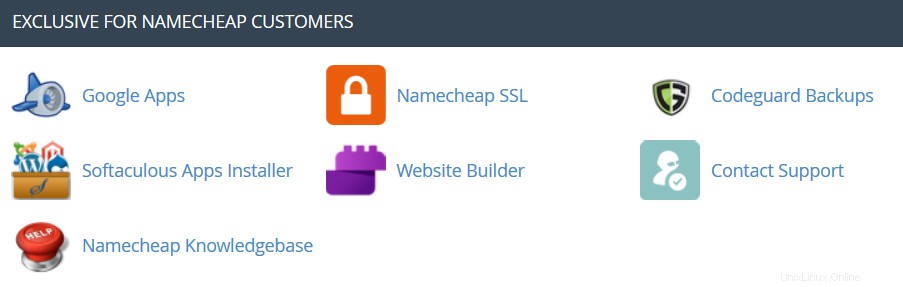
AutoBackup: it is a cPanel plugin that allows customers with Premium and Business Hosting to retrieve a full cPanel backup right away.
Google Apps: with this tool you will be able to configure Google Apps service for your domain in just a few clicks.Feel free to check this category for more information. Namecheap SSL: this menu allows you to use Namecheap SSL cPanel plugin, check this guide for more details. CodeGuard Backup: this tool was designed to make the backup process as easy as possible. CodeGuard system will constantly monitor the website and keep you informed of any changes, performing full automatic backups of your files to avoid any possible downtime.More information is provided in the following articles:- How to make backups using CodeGuard
- How to back up a WordPress site using CodeGuard
Softaculous Apps Installer: this feature allows you to use Softaculous Script Installer, which includes most popular CMS, such as Wordpress/Joomla/Magento etc. It is much faster than other script installers and it installs CMSes in a few clicks. Softaculous application is provided with any cPanel account on all of our shared hosting plans. You can view available scripts and their demo here.You may find these guides useful when working with Softaculous installer:- How to work with scripts in Softaculous
- How to install WordPress using Softaculous
- How to install Joomla with Softaculous
Setup Node.js App: allows for the choosing a specific version of Node.js in order to run the apps using Node.js.
Select PHP Version: using this menu it is possible to select the necessary PHP version as well as enable/disable certain PHP modules and functions.
Setup Python App: this feature allows you to deploy Python applications on your cPanel while running the Apache web server.
Setup Ruby App: this feature allows you to deploy Ruby applications on your cPanel while running Apache web server.
Website Builder :this tool allows you to easily create an entire website using a drag-and-drop editor and without knowing any code or installing special software. Contact Support :opens a Live Chat with our customer support team. Namecheap Knowledgebase: this button will take you to our Knowledgebase site section.Manage Shell: this plugin allows you to enable or disable SSH access for your respective hosting accounts with just a few clicks.
PHP Tweaks: allows managing PHP settings on our Business servers (Stellar Business and old Business SSD plans).