Debian 9 Stretch MySQLのリリースにより、世界で最も人気のあるオープンソースのリレーショナルデータベース管理システムがDebianのリポジトリで利用できなくなり、MariaDBがデフォルトのデータベースシステムになりました。 MariaDBは、MySQLの下位互換性のあるバイナリドロップイン置換です。
このチュートリアルでは、MySQLAptリポジトリからDebian9マシンにMySQLをインストールして保護する方法を示します。アプリケーションに特定の要件がない場合は、Debian9のデフォルトのデータベースシステムであるMariaDBを使用する必要があります。
前提条件#
このチュートリアルを続行する前に、sudo権限を持つユーザーとしてログインしていることを確認してください。
ステップ1:MySQLリポジトリの構成#
MySQL APTリポジトリをシステムに追加するには、リポジトリのダウンロードページに移動し、次のwgetコマンドを使用して最新のリリースパッケージをダウンロードします。
wget http://repo.mysql.com/mysql-apt-config_0.8.10-1_all.debダウンロードが完了したら、次のコマンドを使用してリリースパッケージをインストールします。
sudo apt install ./mysql-apt-config_0.8.10-1_all.debインストールするMySQLのバージョンを選択できる構成メニューが表示されます。
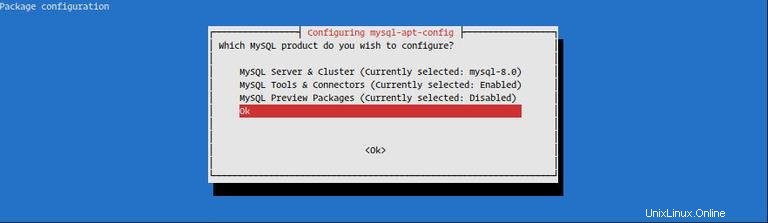
MySQL 8.0が事前に選択されています。別のバージョンのMySQLをインストールする場合は、MySQL Server & Cluster (Currently selected: mysql-8.0)を選択します。 好みのMySQLバージョンを選択してください
MySQLバージョン8.0をインストールします。最後のオプションOKを選択します Enterを押します (上の画像に示されているように)構成を保存します。
ステップ2:MySQLのインストール#
MySQLをDebian9サーバーにインストールする前に、まずパッケージリストを次のように更新します。
sudo apt updateパッケージリストが更新されたら、次のコマンドを実行してMySQLをDebianサーバーにインストールします。
sudo apt install mysql-serverインストーラーは、MySQLのrootパスワードを設定するように求めます。ここではパスワードを設定しないでください(空白のままにしてください)。次のセクションで設定します。
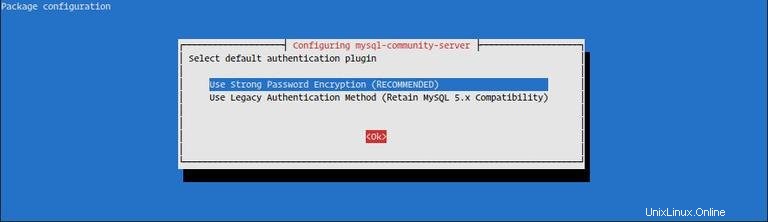
次に、新しいMySQL8認証について通知するメッセージが表示されます。デフォルトのMySQL8認証プラグインを選択する前に、それがアプリケーションでサポートされていることを確認してください。
ステップ3:MySQLのインストールを確認する#
インストールが完了すると、MySQLサービスが自動的に開始されます。
次のように入力して、MySQLサービスのステータスを確認できます。
sudo systemctl status mysql● mysql.service - MySQL Community Server
Loaded: loaded (/lib/systemd/system/mysql.service; enabled; vendor preset:
Active: active (running) since Thu 2018-08-02 17:22:18 UTC; 18s ago
Docs: man:mysqld(8)
http://dev.mysql.com/doc/refman/en/using-systemd.html
Process: 14797 ExecStartPre=/usr/share/mysql-8.0/mysql-systemd-start pre (co
Main PID: 14832 (mysqld)
Status: "SERVER_OPERATING"
Tasks: 37 (limit: 4915)
CGroup: /system.slice/mysql.service
└─14832 /usr/sbin/mysqld
ステップ4:MySQLの保護#
mysql_secure_installationを実行します ルートパスワードを設定し、MySQLインストールのセキュリティを向上させるコマンド:
sudo mysql_secure_installationSecuring the MySQL server deployment.
Connecting to MySQL using a blank password.
VALIDATE PASSWORD COMPONENT can be used to test passwords
and improve security. It checks the strength of password
and allows the users to set only those passwords which are
secure enough. Would you like to setup VALIDATE PASSWORD component?
Press y|Y for Yes, any other key for No:
VALIDATE PASSWORD PLUGINを設定するように求められます これは、MySQLユーザーのパスワードの強度をテストするために使用されます。パスワード検証ポリシーには、低、中、強力の3つのレベルがあります。 ENTERを押します パスワード検証プラグインを設定したくない場合。
Please set the password for root here.

New password:

Re-enter new password:
次のプロンプトで、MySQLrootユーザーのパスワードを設定するように求められます。
By default, a MySQL installation has an anonymous user,
allowing anyone to log into MySQL without having to have
a user account created for them. This is intended only for
testing, and to make the installation go a bit smoother.
You should remove them before moving into a production
environment.

Remove anonymous users? (Press y|Y for Yes, any other key for No) : y
Success.


Normally, root should only be allowed to connect from
'localhost'. This ensures that someone cannot guess at
the root password from the network.

Disallow root login remotely? (Press y|Y for Yes, any other key for No) : y
Success.

By default, MySQL comes with a database named 'test' that
anyone can access. This is also intended only for testing,
and should be removed before moving into a production
environment.


Remove test database and access to it? (Press y|Y for Yes, any other key for No) : y
 - Dropping test database...
Success.

 - Removing privileges on test database...
Success.

Reloading the privilege tables will ensure that all changes
made so far will take effect immediately.

Reload privilege tables now? (Press y|Y for Yes, any other key for No) : y
Success.

All done!
rootパスワードを設定すると、スクリプトは匿名ユーザーを削除し、rootユーザーのローカルマシンへのアクセスを制限し、テストデータベースを削除するように要求します。すべての質問に「Y」(はい)と答える必要があります。
ステップ5:コマンドラインからMySQLに接続します#
ターミナルを介してMySQLと対話するには、MySQLサーバーパッケージの依存関係としてインストールされているMySQLクライアントを使用します。
rootユーザーとしてMySQLサーバーにログインするには、次のように入力します。
mysql -u root -p
mysql_secure_installationのときに、以前に設定したルートパスワードを入力するように求められます。 スクリプトが実行されました。
パスワードを入力すると、以下に示すようにMySQLシェルが表示されます。
Welcome to the MySQL monitor.  Commands end with ; or \g.
Your MySQL connection id is 10
Server version: 8.0.12 MySQL Community Server - GPL

Copyright (c) 2000, 2018, Oracle and/or its affiliates. All rights reserved.

Oracle is a registered trademark of Oracle Corporation and/or its
affiliates. Other names may be trademarks of their respective
owners.

Type 'help;' or '\h' for help. Type '\c' to clear the current input statement.

mysql>
データベースを作成する#
MySQLシェルに接続したら、次のコマンドを入力して新しいデータベースを作成できます。
CREATE DATABASE new_database;Query OK, 1 row affected (0.00 sec)
テーブルの作成#
データベースを作成したので、データを格納するためのテーブルを作成できます。
テーブルを作成するためのSQLステートメントを実行する前に、データベースに接続する必要があります。
use new_database;
この例では、contactsという名前の単純なテーブルを作成します idの3つのフィールド 、name およびemail :
CREATE TABLE contacts (
  id INT PRIMARY KEY,
  name VARCHAR(30),
  email VARCHAR(30)
);
Query OK, 1 row affected (0.00 sec)