最近、GTKとそのRubyバインディングを試しているときに、この機能を紹介するチュートリアルを書くことにしました。この投稿では、 gtk3 を使用して簡単なToDoアプリケーション(Ruby on Railsで作成したもののようなもの)を作成します。 gem(別名、GTK + Rubyバインディング)。
チュートリアルのコードはGitHubにあります。
GTK +とは何ですか?
GTK +のウェブサイトによると:
GTK +、またはGIMP Toolkitは、グラフィカルユーザーインターフェイスを作成するためのマルチプラットフォームツールキットです。ウィジェットの完全なセットを提供するGTK+は、小さな1回限りのツールから完全なアプリケーションスイートに至るまでのプロジェクトに適しています。
このサイトでは、GTK+が作成された理由も説明されています:
GTK +は当初、GIMP(GNU Image Manipulation Program)のために開発され、使用されていました。プロジェクトの起源を記憶するために「GIMPToolKit」と呼ばれています。今日では、略してGTK +として知られ、GNUプロジェクトのGNOMEデスクトップを含む多数のアプリケーションで使用されています。
前提条件
GTK +:
関連コンテンツ
GTK+がインストールされていることを確認してください。チュートリアルのアプリケーションをUbuntu16.04で開発しました。このアプリケーションには、デフォルトでGTK +(バージョン3.18)がインストールされています。
次のコマンドでバージョンを確認できます: dpkg -l libgtk-3-0 。
ルビー:
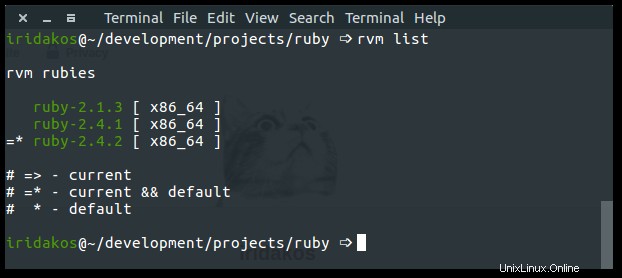
システムにRubyがインストールされている必要があります。 RVMを使用して、システムにインストールされている複数のRubyバージョンを管理しています。これも実行したい場合は、ホームページにRVMのインストール手順があり、関連ドキュメントページにRubyバージョン(別名Rubies)のインストール手順があります。
このチュートリアルでは、Ruby2.4.2を使用します。 ruby --versionを使用してバージョンを確認できます またはrvmlistを使用してRVM経由 。
Glade:
Gladeのウェブサイトによると、「Gladeは、GTK+ツールキットとGNOMEデスクトップ環境のユーザーインターフェースをすばやく簡単に開発できるようにするRADツールです。」
Gladeを使用して、アプリケーションのユーザーインターフェイスを設計します。 Ubuntuを使用している場合は、 gladeをインストールします sudo apt install gladeを使用 。
GTK3 gem:
このgemは、GTK+ツールキットのRubyバインディングを提供します。つまり、Ruby言語を使用してGTK+APIと通信できるようになります。
gem install gtk3を使用してgemをインストールします 。
このチュートリアルで構築するアプリケーションは次のようになります。
- ユーザーインターフェース(デスクトップアプリケーションなど)を用意する
- ユーザーが各アイテムにさまざまなプロパティ(優先度など)を設定できるようにする
- ユーザーがToDoアイテムを作成および編集できるようにする
- すべてのアイテムは、ユーザーのホームディレクトリの
.gtk-todo-tutorialという名前のフォルダーにファイルとして保存されます。
- すべてのアイテムは、ユーザーのホームディレクトリの
- ユーザーがToDoアイテムをアーカイブできるようにする
- アーカイブされたアイテムは、
archivedという独自のフォルダに配置する必要があります
- アーカイブされたアイテムは、
gtk-todo-tutorial # root directory>
|-- application
|-- ui # everything related to the ui of the application
|-- models # our models
|-- lib # the directory to host any utilities we might need
|-- resources # directory to host the resources of our application
gtk-todo # the executable that will start our application
ToDoアプリケーションの構築
アプリケーションが必要とするすべてのファイルを保存するディレクトリを作成します。上記の構造でわかるように、私は私の名前を gtk-todo-tutorialと名付けました。 。
gtk-todoという名前のファイルを作成します (そうです、拡張子はありません)そして以下を追加します:
#!/usr/bin/env ruby
require 'gtk3'
app = Gtk::Application.new 'com.iridakos.gtk-todo', :flags_none
app.signal_connect :activate do |application|
window = Gtk::ApplicationWindow.new(application)
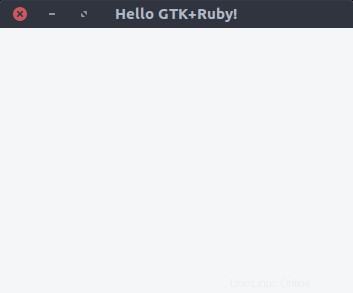
window.set_title 'Hello GTK+Ruby!'
window.present
end
puts app.run
これは、アプリケーションを起動するスクリプトになります。
シェバンに注意してください(#! )最初の行。これは、Unix/Linuxオペレーティングシステムでスクリプトを実行するインタプリタを定義する方法です。このように、 ruby gtk-todoを使用する必要はありません。;スクリプトの名前を使用できます: gtk-todo 。
ただし、ファイルのモードを実行可能に変更していないため、まだ試してはいけません。これを行うには、アプリケーションのルートディレクトリに移動した後、ターミナルで次のコマンドを入力します。
chmod +x ./gtk-todo # make the script executable コンソールから、次を実行します:
./gtk-todo # execute the script
注:
- 上記で定義したアプリケーションオブジェクト(および一般的にすべてのGTK +ウィジェット)は、イベントをトリガーするためのシグナルを発行します。たとえば、アプリケーションの実行が開始されると、
activateをトリガーするシグナルが送信されます。 イベント。私たちがしなければならないのは、この信号が発せられたときに何をしたいのかを定義することです。これは、signal_connectを使用して実現しました。 インスタンスメソッドと、指定されたイベントでコードが実行されるブロックを渡します。チュートリアル全体を通してこれを頻繁に行います。 -
Gtk ::Applicationを初期化したとき オブジェクト、2つのパラメータを渡しました:-
com.iridakos.gtk-todo:これはアプリケーションのIDであり、通常、逆引きDNSスタイルの識別子である必要があります。 GNOMEのwikiで、その使用法とベストプラクティスについて詳しく知ることができます。 -
:flags_none:このフラグは、アプリケーションの動作を定義します。デフォルトの動作を使用しました。すべてのフラグとそれらが定義するアプリケーションのタイプを確認してください。Gio ::ApplicationFlags.constantsで定義されているように、Rubyと同等のフラグを使用できます。 。たとえば、:flags_noneを使用する代わりに 、Gio ::ApplicationFlags ::FLAGS_NONEを使用できます 。
-
以前に作成したアプリケーションオブジェクト( Gtk ::Application ) activateのときにやるべきことがたくさんありました 信号が発信されたか、より多くの信号に接続したかった。巨大なgtk-todoを作成することになります スクリプトファイル。読み取り/保守が困難になります。リファクタリングの時間です。
上記のアプリケーション構造で説明したように、 applicationという名前のフォルダを作成します およびサブフォルダーui 、モデル 、および lib 。
-
ui内 フォルダには、ユーザーインターフェイスに関連するすべてのファイルを配置します。 モデルフォルダには、モデルに関連するすべてのファイルを配置します。-
lib内 フォルダには、これらのカテゴリのいずれにも属さないすべてのファイルが配置されます。
Gtk ::Applicationの新しいサブクラスを定義します アプリケーションのクラス。 application.rbという名前のファイルを作成します application / ui / todoの下 次の内容で:
module ToDo

  class Application < Gtk::Application

    def initialize

      super 'com.iridakos.gtk-todo', Gio::ApplicationFlags::FLAGS_NONE


      signal_connect :activate do |application|

        window = Gtk::ApplicationWindow.new(application)

        window.set_title 'Hello GTK+Ruby!'

        window.present

      end

    end

  end

end
gtk-todoを変更します それに応じたスクリプト:
#!/usr/bin/env ruby


require 'gtk3'


app = ToDo::Application.new


puts app.run
ずっときれいですね。ええ、でもそれはうまくいきません。次のようなものがあります:
./gtk-todo:5:in `<main>': uninitialized constant ToDo (NameError)
問題は、アプリケーションに配置されたRubyファイルが必要ないことです。 フォルダ。スクリプトファイルを次のように変更して、再度実行する必要があります。
#!/usr/bin/env ruby


require 'gtk3'


# Require all ruby files in the application folder recursively

application_root_path = File.expand_path(__dir__)

Dir[File.join(application_root_path, '**', '*.rb')].each { |file| require file }


app = ToDo::Application.new


puts app.run
これで問題ないはずです。
このチュートリアルの冒頭で、Gladeを使用してアプリケーションのユーザーインターフェイスを設計すると述べました。 Gladeはxmlを生成します ユーザーインターフェイスを介して設計したものを反映する適切な要素と属性を持つファイル。設計したUIを取得するには、アプリケーションでこれらのファイルを使用する必要があります。
これらのファイルは、アプリケーションおよび GResourceのリソースです。 APIは、それらをすべてまとめてバイナリファイルにパックする方法を提供します。このバイナリファイルは、すでにロードされているリソースやファイルシステム上の場所などを手動で処理する必要があるのではなく、アプリケーション内から後でアクセスできるという利点があります。 GResource API。
まず、アプリケーションのリソースを説明するファイルを作成する必要があります。 gresources.xmlという名前のファイルを作成します resourcesのすぐ下に配置します フォルダ。
<?xml version="1.0" encoding="UTF-8"?>

<gresources>

  <gresource prefix="/com/iridakos/gtk-todo">

    <file preprocess="xml-stripblanks">ui/application_window.ui</file>

  </gresource>

</gresources>
この説明は基本的に次のように述べています。「uiの下にリソースがあります。 ディレクトリ(この xmlに対して ファイル) application_window.uiという名前 。このリソースをロードする前に、空白を削除してください。」もちろん、Gladeを介してリソースを作成していないため、これはまだ機能しません。ただし、一度に1つずつ心配する必要はありません。
注 : xml-stripblanks ディレクティブはxmllintを使用します 空白を削除するコマンド。 Ubuntuでは、パッケージ libxml2-utilsをインストールする必要があります 。
バイナリリソースファイルを作成するには、 glib-compile-resourcesという別のGLibライブラリユーティリティを使用します。 。 dpkg -l libglib2.0-binを使用してインストールされているかどうかを確認します 。次のように表示されます:
ii libglib2.0-bin 2.48.2-0ubuntu amd64 Programs for the GLib library
そうでない場合は、パッケージをインストールします( sudo apt install libglib2.0-bin Ubuntuで)。
ファイルを作成しましょう。スクリプトにコードを追加して、実行するたびにリソースが構築されるようにします。 gtk-todoを変更します 次のようなスクリプト:
#!/usr/bin/env ruby


require 'gtk3'

require 'fileutils'


# Require all ruby files in the application folder recursively

application_root_path = File.expand_path(__dir__)

Dir[File.join(application_root_path, '**', '*.rb')].each { |file| require file }


# Define the source & target files of the glib-compile-resources command

resource_xml = File.join(application_root_path, 'resources', 'gresources.xml')

resource_bin = File.join(application_root_path, 'gresource.bin')


# Build the binary

system("glib-compile-resources",

       "--target", resource_bin,

       "--sourcedir", File.dirname(resource_xml),

       resource_xml)


at_exit do

  # Before existing, please remove the binary we produced, thanks.

  FileUtils.rm_f(resource_bin)

end


app = ToDo::Application.new

puts app.run
実行すると、コンソールで次のようになります。後で修正します:
/.../gtk-todo-tutorial/resources/gresources.xml: Failed to locate 'ui/application_window.ui' in any source directory. これが私たちがしたことです:
-
requireを追加しましたfileutilsのステートメント ライブラリを使用して、at_exitで使用できるようにします 電話 -
glib-compile-resourcesのソースファイルとターゲットファイルを定義しました コマンド -
glib-compile-resourcesを実行しました コマンド - スクリプトを終了する前(つまり、アプリケーションが終了する前)にバイナリファイルが削除されるようにフックを設定して、次回再度ビルドされるようにします
リソースについて説明し、バイナリファイルにパックしました。次に、それらをロードしてアプリケーションに登録し、使用できるようにする必要があります。これは、 at_exitの前に次の2行を追加するのと同じくらい簡単です。 フック:
resource = Gio::Resource.load(resource_bin)

Gio::Resources.register(resource)
それでおしまい。これからは、アプリケーション内のどこからでもリソースを使用できるようになります。 (後で説明します。)今のところ、生成されていないバイナリをロードできないため、スクリプトは失敗します。我慢して;すぐに興味深い部分に行きます。実は今。
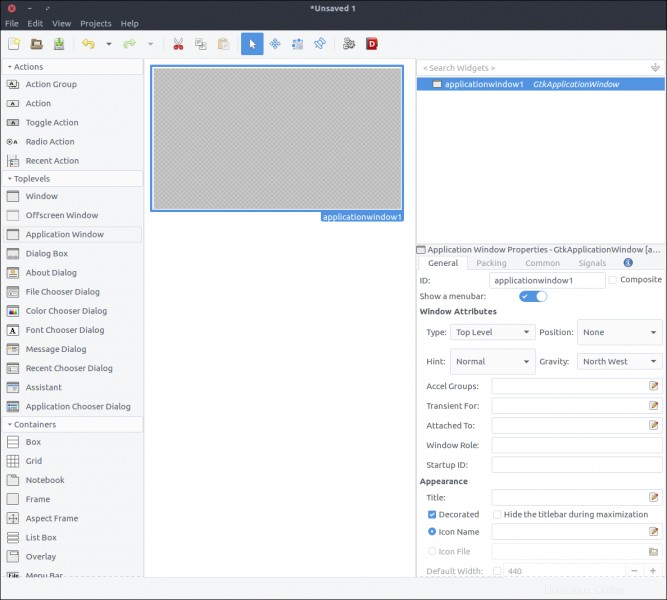
まず、Gladeを開きます。

表示される内容は次のとおりです:
- 左側には、中央のセクションにドラッグアンドドロップできるウィジェットのリストがあります。 (ラベルウィジェット内にトップレベルウィンドウを追加することはできません。)これをウィジェットセクションと呼びます。 。
- 中央のセクションには、(ほとんどの場合)アプリケーションに表示されるウィジェットが含まれています。これをデザインセクションと呼びます 。
- 右側には2つのサブセクションがあります:
- 上部のセクションには、リソースに追加されたウィジェットの階層が含まれています。これを階層セクションと呼びます 。
- 下部のセクションには、上で選択したウィジェットに対してGladeを介して構成できるすべてのプロパティが含まれています。これをプロパティセクションと呼びます 。
Gladeを使用してこのチュートリアルのUIを構築する手順を説明しますが、GTK +アプリケーションの構築に興味がある場合は、ツールの公式リソースとチュートリアルを参照してください。
アプリケーションウィンドウをドラッグするだけで、アプリケーションウィンドウを作成しましょう。 ウィジェットセクションからデザインセクションへのウィジェット。
Gtk ::Builder GTK +アプリケーションで使用されるオブジェクトであり、ユーザーインターフェイスのテキストによる説明(Gladeを介して作成するものなど)を読み取り、説明されたオブジェクトウィジェットを作成します。
[プロパティ]セクションの最初のものはIDです 、デフォルト値は applicationWindow1 。このプロパティをそのままにしておくと、後で Gtk ::Builderを作成します。 Gladeによって生成されたファイルをロードするコードを介して。アプリケーションウィンドウを取得するには、次のようなものを使用する必要があります。
application_window = builder.get_object('applicationWindow1')


application_window.signal_connect 'whatever' do |a,b|

...
application_window オブジェクトはクラスGtk::ApplicationWindowになります;したがって、動作に追加する必要があるもの(タイトルの設定など)は、元のクラスの外部で実行されます。また、上記のスニペットに示されているように、ウィンドウのシグナルに接続するためのコードは、ウィンドウをインスタンス化したファイル内に配置されます。
幸いなことに、GTK +は2013年に複合ウィジェットテンプレートの作成を可能にする機能を導入しました。これにより、(他の利点の中でも)ウィジェットのカスタムクラスを定義できます(最終的には既存の GTK ::Widget<から派生します)。 / code> 一般的なクラス)。混乱しても心配しないでください。コードを記述して結果を表示すると、何が起こっているのかがわかります。
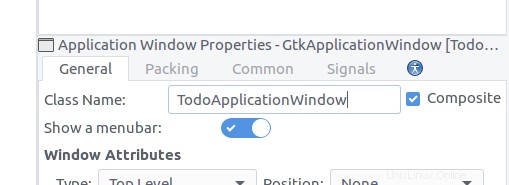
デザインをテンプレートとして定義するには、 Compositeを確認してください プロパティウィジェットのチェックボックス。 IDに注意してください プロパティがクラス名に変更されました 。 TodoApplicationWindowに入力します 。これは、このウィジェットを表すためにコードで作成するクラスです。
application_window.uiという名前でファイルを保存します uiという名前の新しいフォルダにあります resources内 。エディターからファイルを開くと、次のように表示されます。
<?xml version="1.0" encoding="UTF-8"?>

<!-- Generated with glade 3.18.3 -->

<interface>

  <requires lib="gtk+" version="3.12"/>

  <template class="TodoApplicationWindow" parent="GtkApplicationWindow">

    <property name="can_focus">False</property>

    <child>

      <placeholder/>

    </child>

  </template>

</interface>
ウィジェットにはクラスと親属性があります。親クラスの属性規則に従って、クラスは Todoという名前のモジュール内で定義する必要があります 。そこに着く前に、スクリプト( ./ gtk-todo )を実行してアプリケーションを起動してみましょう。 。
うん!始まります!
アプリケーションの実行中にアプリケーションのルートディレクトリの内容を確認すると、 gresource.binが表示されます。 そこにファイルします。リソースビンが存在し、登録できるため、アプリケーションは正常に起動しますが、まだ使用しません。通常のGtk::ApplicationWindowを引き続き開始します application.rbで ファイル。次に、カスタムアプリケーションウィンドウクラスを作成します。
application_window.rbという名前のファイルを作成します application / ui / todoで フォルダを作成し、次のコンテンツを追加します:
module Todo
class ApplicationWindow < Gtk::ApplicationWindow
# Register the class in the GLib world
type_register
class << self
def init
# Set the template from the resources binary
set_template resource: '/com/iridakos/gtk-todo/ui/application_window.ui'
end
end
def initialize(application)
super application: application
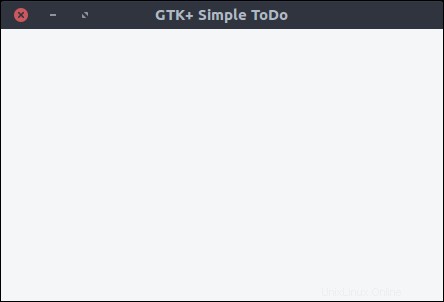
set_title 'GTK+ Simple ToDo'
end
end
end
initを定義しました eigenclassを開いた後のクラスのシングルトンメソッドとしてのメソッド このウィジェットのテンプレートを以前に登録されたリソースファイルにバインドするため。
その前に、 type_registerと呼びました クラスメソッド。カスタムウィジェットクラスをGLibに登録して利用できるようにします。 世界。
最後に、このウィンドウのインスタンスを作成するたびに、そのタイトルを GTK + Simple ToDoに設定します。 。
それでは、 application.rbに戻りましょう。 ファイルを作成し、実装したものを使用します:
module ToDo

  class Application < Gtk::Application

    def initialize

      super 'com.iridakos.gtk-todo', Gio::ApplicationFlags::FLAGS_NONE


      signal_connect :activate do |application|

        window = Todo::ApplicationWindow.new(application)

        window.present

      end

    end

  end

end
スクリプトを実行します。
簡単にするために、ToDoアイテムをJSON形式のファイルで、ユーザーのホームディレクトリの専用の隠しフォルダーに保存します。実際のアプリケーションではデータベースを使用しますが、それはこのチュートリアルの範囲外です。
Todo ::Item モデルには次のプロパティがあります:
- id :アイテムのID
- タイトル :タイトル
- メモ :メモ
- 優先順位 :その優先順位
- creation_datetime :アイテムが作成された日時
- ファイル名 :アイテムが保存されるファイルの名前
item.rbという名前のファイルを作成します application / modelsの下 次の内容のディレクトリ:
require 'securerandom'

require 'json'


module Todo

  class Item

    PROPERTIES = [:id, :title, :notes, :priority, :filename, :creation_datetime].freeze


    PRIORITIES = ['high', 'medium', 'normal', 'low'].freeze


    attr_accessor *PROPERTIES


    def initialize(options = {})

      if user_data_path = options[:user_data_path]

        # New item. When saved, it will be placed under the :user_data_path value

        @id = SecureRandom.uuid

        @creation_datetime = Time.now.to_s

        @filename = "#{user_data_path}/#{id}.json"

      elsif filename = options[:filename]

        # Load an existing item

        load_from_file filename

      else

        raise ArgumentError, 'Please specify the :user_data_path for new item or the :filename to load existing'

      end

    end


    # Loads an item from a file

    def load_from_file(filename)

      properties = JSON.parse(File.read(filename))


      # Assign the properties

      PROPERTIES.each do |property|

        self.send "#{property}=", properties[property.to_s]

      end

    rescue => e

      raise ArgumentError, "Failed to load existing item: #{e.message}"

    end


    # Resolves if an item is new

    def is_new?

      !File.exists? @filename

    end


    # Saves an item to its `filename` location

    def save!

      File.open(@filename, 'w') do |file|

        file.write self.to_json

      end

    end


    # Deletes an item

    def delete!

      raise 'Item is not saved!' if is_new?


      File.delete(@filename)

    end


    # Produces a json string for the item

    def to_json

      result = {}

      PROPERTIES.each do |prop|

        result[prop] = self.send prop

      end


      result.to_json

    end

  end

end
ここでは、次のメソッドを定義しました:
- アイテムを初期化します:
-
:user_data_pathを定義することにより、「新規」として 後で保存されます -
:filenameを定義することにより、「既存」として ロード元。ファイル名は、アイテムによって以前に生成されたJSONファイルである必要があります
-
- ファイルからアイテムを読み込む
- アイテムが新しいかどうかを解決します(つまり、
:user_data_pathに少なくとも1回保存されます かどうか) - JSON文字列をファイルに書き込んでアイテムを保存します
- アイテムを削除する
- アイテムのJSON文字列をそのプロパティのハッシュとして生成します
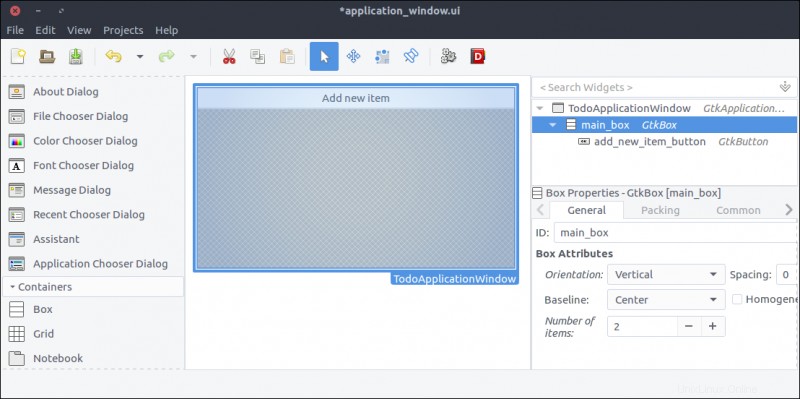
新しいアイテムを追加するためのボタンをアプリケーションウィンドウに追加しましょう。 resources / ui / application_window.uiを開きます Gladeのファイル。
ボタンをドラッグします ウィジェットセクションからデザインセクションへ。- [プロパティ]セクションで、その IDを設定します
add_new_item_buttonの値 。 - 一般の下部付近 [プロパティ]セクションの[タブ]には、オプションの画像を含むラベルのすぐ下にテキスト領域があります。 オプション。その値をボタンから変更します 新しいアイテムを追加する 。
- ファイルを保存してスクリプトを実行します。

心配しないで;後でデザインを改善します。それでは、接続する方法を見てみましょう。 ボタンのクリックの機能 イベント。
まず、アプリケーションウィンドウクラスを更新して、新しい子であるID add_new_item_buttonのボタンについて学習する必要があります。 。次に、子にアクセスしてその動作を変更できます。
initを変更します 次のような方法:
def init

  # Set the template from the resources binary

  set_template resource: '/com/iridakos/gtk-todo/ui/application_window.ui'


  bind_template_child 'add_new_item_button'

end
とても簡単ですよね? bind_template_child メソッドはそれが言うことを正確に実行し、これからは Todo ::ApplicationWindowのすべてのインスタンスを実行します クラスにはadd_new_item_buttonがあります 関連するボタンにアクセスする方法。それでは、 initializeを変更しましょう 次のような方法:
def initialize(application)

  super application: application


  set_title 'GTK+ Simple ToDo'


  add_new_item_button.signal_connect 'clicked' do |button, application|

    puts "OMG! I AM CLICKED"

  end

end
ご覧のとおり、 add_new_item_buttonでボタンにアクセスします メソッドであり、クリックされたときに何を実行するかを定義します。アプリケーションを再起動して、ボタンをクリックしてみてください。コンソールに、メッセージ OMG!が表示されます。クリックしました ボタンをクリックしたとき。
ただし、このボタンをクリックしたときに実行したいのは、ToDoアイテムを保存するための新しいウィンドウを表示することです。あなたは正しいと思いました:それはGlade時です。
- トップバーの左端のアイコンを押すか、ファイル>新規を選択して、Gladeで新しいプロジェクトを作成します。 アプリケーションメニューから。
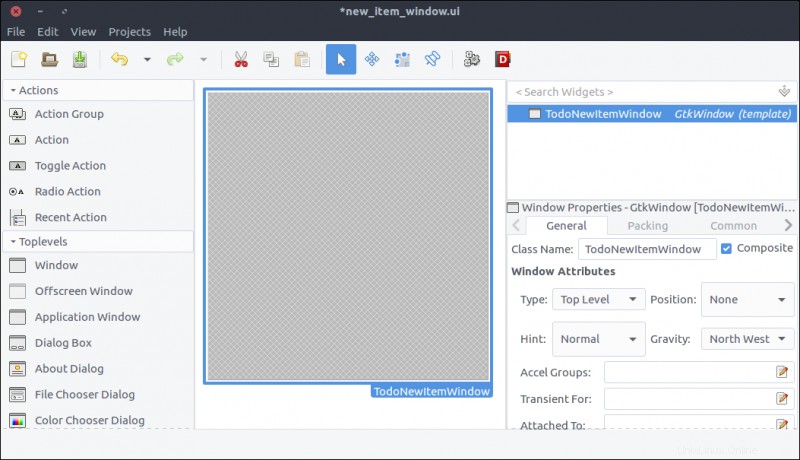
ウィンドウをドラッグします ウィジェットセクションからデザインエリアへ。コンポジットを確認してください プロパティとクラスにTodoNewItemWindowという名前を付けます 。
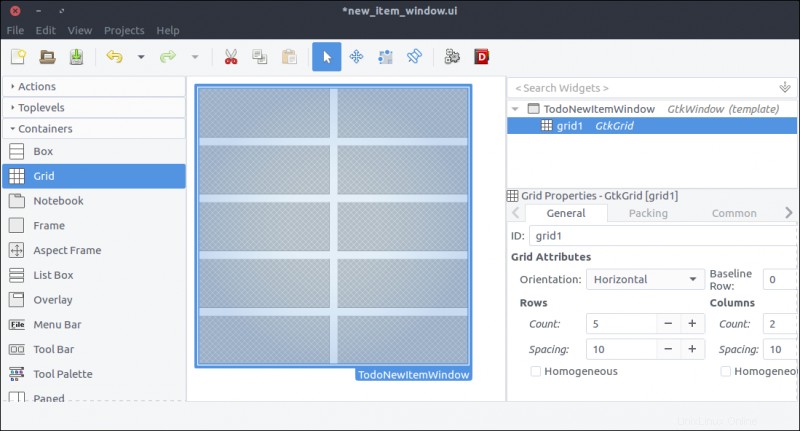
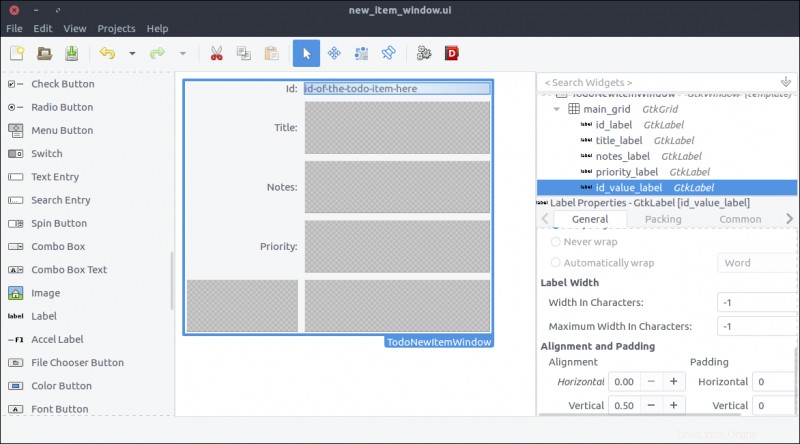
グリッドをドラッグします ウィジェットセクションから、前に追加したウィンドウに配置します。- 5を設定 行と2 ポップアップするウィンドウの列。
- 一般 [プロパティ]セクションのタブで、行と列の間隔を 10に設定します (ピクセル)。
- 共通 [プロパティ]セクションのタブで、
ウィジェットの間隔>マージン>上、下、左、右を設定します すべて10 コンテンツがグリッドの境界にくっつかないようにします。
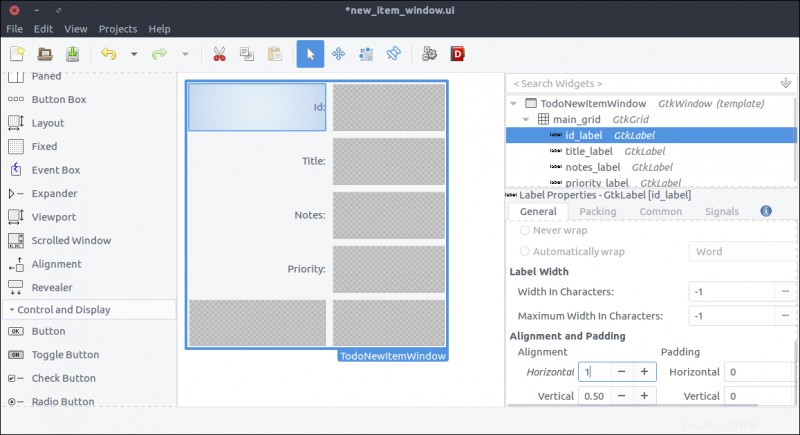
- 4つの
Labelをドラッグします ウィジェットセクションからウィジェットを作成し、グリッドの各行に1つずつ配置します。 ラベルを変更します プロパティ、上から下へ、次のように:-
Id: -
タイトル: -
注: -
優先度:
-
- 一般 [プロパティ]セクションのタブで、[配置とパディング]>[配置]>[水平]を変更します 0.50から1までのプロパティ ラベルテキストを右揃えにするために、プロパティごとに。
- この手順はオプションですが、お勧めします。状態や動作を変更する必要がないため、ウィンドウ内でこれらのラベルをバインドしません。このコンテキストでは、
add_new_item_buttonの場合のように、説明的なIDを設定する必要はありません。 アプリケーションウィンドウのボタン。 しかし デザインに要素を追加します。Gladeのウィジェットの階層は、label1と表示されていると読みにくくなります。 、label2、など。説明的なIDの設定(id_labelなど) 、title_label、notes_label、priority_label)私たちの生活を楽にします。グリッドのIDをmain_gridに設定することもできます IDに数字や変数名を表示するのは好きではないからです。
ラベルをドラッグします ウィジェットセクションからグリッドの最初の行の2番目の列まで。 IDはモデルによって自動的に生成されます。編集は許可されないので、それを表示するラベルで十分です。-
IDを設定しますid_value_labelへのプロパティ 。 - 配置とパディング>配置>水平を設定します 0へのプロパティ したがって、テキストは左側に配置されます。
- このウィジェットをWindowクラスにバインドして、ウィンドウをロードするたびにテキストを変更できるようにします。したがって、Gladeを使用してラベルを設定する必要はありませんが、実際のデータでレンダリングしたときのデザインに近くなります。自分に最も適したラベルを設定できます。
id-of-the-todo-item-hereに設定しました 。
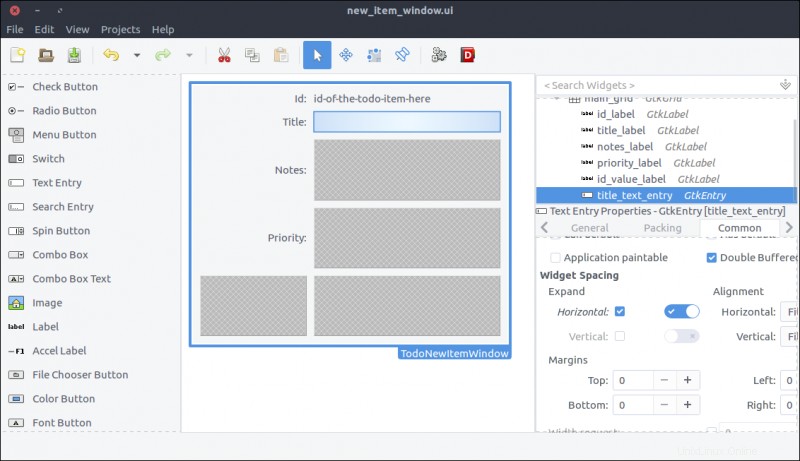
テキストエントリをドラッグします ウィジェットセクションからグリッドの2行目の2列目まで。- IDプロパティを
title_text_entryに設定します 。お気づきかもしれませんが、クラスのコードを読みやすくするために、IDでウィジェットタイプを取得することをお勧めします。 - 共通 [プロパティ]セクションのタブで、
ウィジェットの間隔>展開>水平を確認します チェックボックスをオンにして、その横にあるスイッチをオンにします。このように、ウィジェットは、その親(別名、グリッド)のサイズが変更されるたびに水平方向に拡張されます。
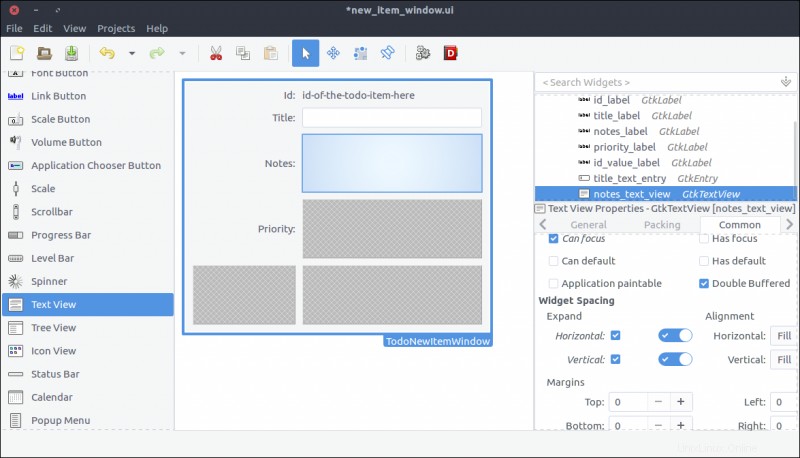
テキストビューをドラッグします ウィジェットセクションからグリッドの3行目の2列目まで。-
IDを設定しますnotes。いいえ、テストするだけです。IDを設定しますnotes_text_viewへのプロパティ 。 - 共通 [プロパティ]セクションのタブで、
ウィジェットの間隔>展開>水平、垂直を確認します チェックボックスをオンにして、その横にあるスイッチをオンにします。このように、ウィジェットは、その親(グリッド)のサイズが変更されるたびに、水平方向および垂直方向に拡張されます。
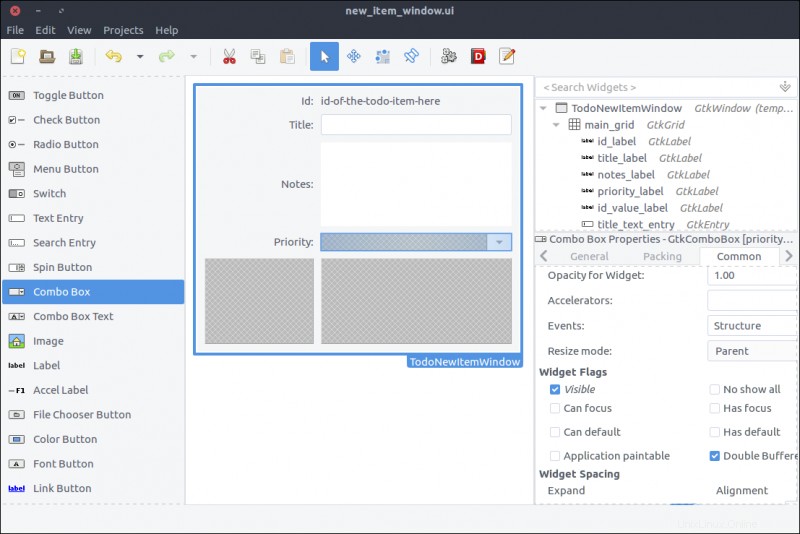
コンボボックスをドラッグします ウィジェットセクションからグリッドの4行目の2列目まで。-
IDを設定しますpriority_combo_boxへ 。 - 共通 [プロパティ]セクションのタブで、
ウィジェットの間隔>展開>水平を確認します チェックボックスをオンにして、右側のスイッチをオンにします。これにより、親(グリッド)のサイズが変更されるたびにウィジェットを水平方向に拡張できます。 - このウィジェットはドロップダウン要素です。ウィンドウクラス内に表示されたときにユーザーが選択できる値を入力します。
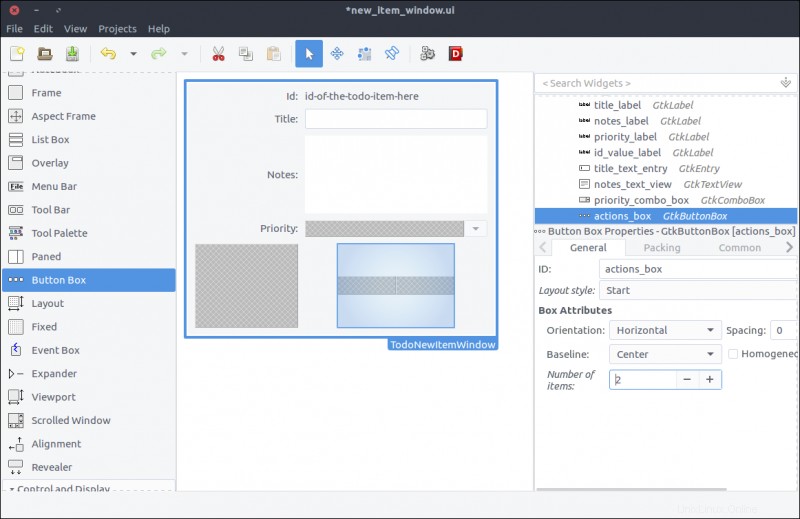
- Drag a
Button Boxfrom the Widget section to the second column of the last row of the grid. - In the pop-up window, select 2 items.
- 一般 tab of the Properties section, set the Box Attributes> Orientation property to Horizontal 。
- 一般 tab of the Properties section, set the Box Attributes> Spacing property to 10 。
- In the Common tab of the Properties section, set the Widget Spacing> Alignment> Horizontal to Center 。
- Again, our code won't alter this widget, but you can give it a descriptive
IDfor readability. I named mineactions_box。
- Drag two
Buttonwidgets and place one in each box of the button box widget we added in the previous step. - Set their
IDproperties tocancel_buttonandsave_button, respectively. - 一般 tab of the Properties window, set their Button Content> Label with option image property to Cancel and Save , respectively.
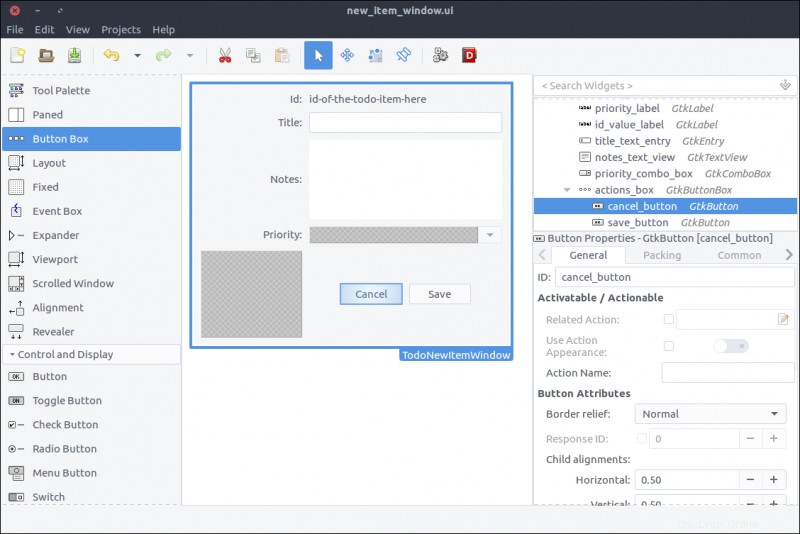
The window is ready. Save the file under resources/ui/new_item_window.ui 。
It's time to port it into our application.
Implement the new item window class
Before implementing the new class, we must update our GResource description file (resources/gresources.xml ) to obtain the new resource:
<?xml version="1.0" encoding="UTF-8"?>

<gresources>

  <gresource prefix="/com/iridakos/gtk-todo">

    <file preprocess="xml-stripblanks">ui/application_window.ui</file>

    <file preprocess="xml-stripblanks">ui/new_item_window.ui</file>

  </gresource>

</gresources>
Now we can create the new window class. Create a file under application/ui/todo named new_item_window.rb and set its contents as follows:
module Todo

  class NewItemWindow < Gtk::Window

    # Register the class in the GLib world

    type_register


    class << self

      def init

        # Set the template from the resources binary

        set_template resource: '/com/iridakos/gtk-todo/ui/new_item_window.ui'

      end

    end


    def initialize(application)

      super application: application

    end

  end

end
There's nothing special here. We just changed the template resource to point to the correct file of our resources.
We have to change the add_new_item_button code that executes on the clicked signal to show the new item window. We'll go ahead and change that code in application_window.rb to this:
add_new_item_button.signal_connect 'clicked' do |button|

  new_item_window = NewItemWindow.new(application)

  new_item_window.present

end
Let's see what we have done. Start the application and click on the Add new item ボタン。 Tadaa!
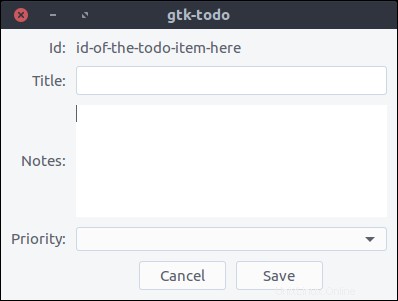
But nothing happens when we press the buttons. Let's fix that.
First, we'll bind the UI widgets in the Todo::NewItemWindow class.
Change the init method to this:
def init

  # Set the template from the resources binary

  set_template resource: '/com/iridakos/gtk-todo/ui/new_item_window.ui'


  # Bind the window's widgets

  bind_template_child 'id_value_label'

  bind_template_child 'title_text_entry'

  bind_template_child 'notes_text_view'

  bind_template_child 'priority_combo_box'

  bind_template_child 'cancel_button'

  bind_template_child 'save_button'

end
This window will be shown when either creating or editing a ToDo item, so the new_item_window naming is not very valid. We'll refactor that later.
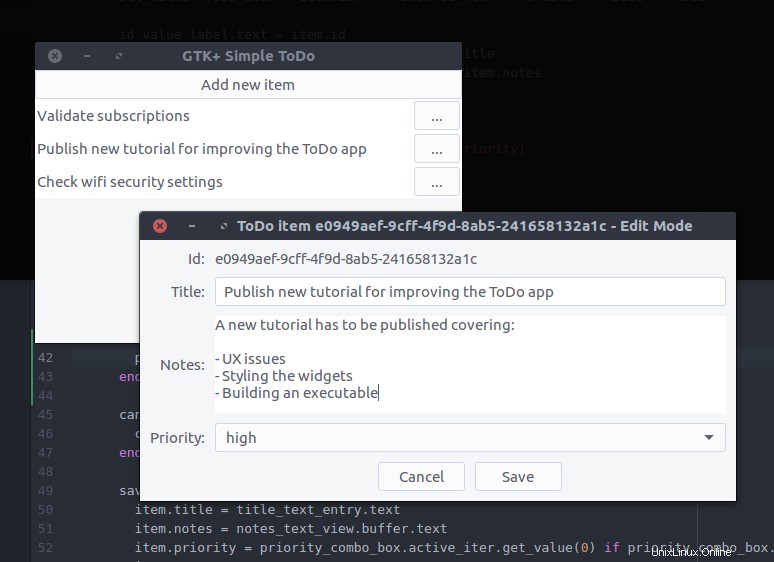
For now, we will update the window's initialize method to require one extra parameter for the Todo::Item to be created or edited. We can then set a more meaningful window title and change the child widgets to reflect the current item.
We'll change the initialize method to this:
def initialize(application, item)

  super application: application

  set_title "ToDo item #{item.id} - #{item.is_new? ? 'Create' : 'Edit' } Mode"


  id_value_label.text = item.id

  title_text_entry.text = item.title if item.title

  notes_text_view.buffer.text = item.notes if item.notes


  # Configure the combo box

  model = Gtk::ListStore.new(String)

  Todo::Item::PRIORITIES.each do |priority|

    iterator = model.append

    iterator[0] = priority

  end


  priority_combo_box.model = model

  renderer = Gtk::CellRendererText.new

  priority_combo_box.pack_start(renderer, true)

  priority_combo_box.set_attributes(renderer, "text" => 0)


  priority_combo_box.set_active(Todo::Item::PRIORITIES.index(item.priority)) if item.priority

end
Then we'll add the constant PRIORITIES in the application/models/item.rb file just below the PROPERTIES constant:
PRIORITIES = ['high', 'medium', 'normal', 'low'].freeze What did we do here?
- We set the window's title to a string containing the current item's ID and the mode (depending on whether the item is being created or edited).
- We set the
id_value_labeltext to display the current item's ID. - We set the
title_text_entrytext to display the current item's title. - We set the
notes_text_viewtext to display the current item's notes. - We created a model for the
priority_combo_boxwhose entries are going to have only oneString価値。 At first sight, aGtk::ListStoremodel might look a little confusing. Here's how it works.- Suppose we want to display in a combo box a list of country codes and their respective country names.
- We would create a
Gtk::ListStoredefining that its entries would consist of two string values:one for the country code and one for the country name. Thus we would initialize the ListStore as:model = Gtk::ListStore.new(String, String) - To fill the model with data, we would do something like the following (make sure you don't miss the comments in the snippet):
[['gr', 'Greece'], ['jp','Japan'], ['nl', 'Netherlands']].each do |country_pair|

  entry = model.append

  # Each entry has two string positions since that's how we initialized the Gtk::ListStore

  # Store the country code in position 0

  entry[0] = country_pair[0]

  # Store the country name in position 1

  entry[1] = country_pair[1]

end - We also configured the combo box to render two text columns/cells (again, make sure you don't miss the comments in the snippet):
country_code_renderer = Gtk::CellRendererText.new

# Add the first renderer

combo.pack_start(country_code_renderer, true)

# Use the value in index 0 of each model entry a.k.a. the country code

combo.set_attributes(country_code_renderer, 'text' => 0)


country_name_renderer = Gtk::CellRendererText.new

# Add the second renderer

combo.pack_start(country_name_renderer, true)

# Use the value in index 1 of each model entry a.k.a. the country name

combo.set_attributes(country_name_renderer, 'text' => 1) - I hope that made it a little clearer.
- We added a simple text renderer in the combo box and instructed it to display the only value of each model's entry (a.k.a., position
0)。 Imagine that our model is something like[['high'],['medium'],['normal'],['low']]and0is the first element of each sub-array. I will stop with the model-combo-text-renderer explanations now…
Configure the user data path
Remember that when initializing a new Todo::Item (not an existing one), we had to define a :user_data_path in which it would be saved. We are going to resolve this path when the application starts and make it accessible from all the widgets.
All we have to do is check if the .gtk-todo-tutorial path exists inside the user's home ~ ディレクトリ。 If not, we will create it. Then we'll set this as an instance variable of the application. All widgets have access to the application instance. So, all widgets have access to this user path variable.
Change the application/application.rb file to this:
module ToDo

  class Application < Gtk::Application

    attr_reader :user_data_path


    def initialize

      super 'com.iridakos.gtk-todo', Gio::ApplicationFlags::FLAGS_NONE


      @user_data_path = File.expand_path('~/.gtk-todo-tutorial')

      unless File.directory?(@user_data_path)

        puts "First run. Creating user's application path: #{@user_data_path}"

        FileUtils.mkdir_p(@user_data_path)

      end


      signal_connect :activate do |application|

        window = Todo::ApplicationWindow.new(application)

        window.present

      end

    end

  end

end
One last thing we need to do before testing what we have done so far is to instantiate the Todo::NewItemWindow when the add_new_item_button is clicked complying with the changes we made. In other words, change the code in application_window.rb to this:
add_new_item_button.signal_connect 'clicked' do |button|

  new_item_window = NewItemWindow.new(application, Todo::Item.new(user_data_path: application.user_data_path))

  new_item_window.present

end
Start the application and click on the Add new item ボタン。 Tadaa! (Note the - Create mode part in the title).

Cancel item creation/update
To close the Todo::NewItemWindow window when a user clicks the cancel_button , we only have to add this to the window's initialize method:
cancel_button.signal_connect 'clicked' do |button|

  close

end
close is an instance method of the Gtk::Window class that closes the window.
Save the item
Saving an item involves two steps:
- Update the item's properties based on the widgets' values.
- Call the
save!method on theTodo::Iteminstance.
Again, our code will be placed in the initialize method of the Todo::NewItemWindow :
save_button.signal_connect 'clicked' do |button|

  item.title = title_text_entry.text

  item.notes = notes_text_view.buffer.text

  item.priority = priority_combo_box.active_iter.get_value(0) if priority_combo_box.active_iter

  item.save!

  close

end
Once again, the window closes after saving the item.
Let's try that out.
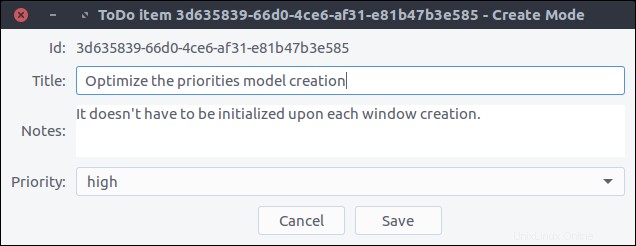
Now, by pressing Save and navigating to our ~/.gtk-todo-tutorial folder, we should see a file. Mine had the following contents:
{

        "id": "3d635839-66d0-4ce6-af31-e81b47b3e585",

        "title": "Optimize the priorities model creation",

        "notes": "It doesn't have to be initialized upon each window creation.",

        "priority": "high",

        "filename": "/home/iridakos/.gtk-todo-tutorial/3d635839-66d0-4ce6-af31-e81b47b3e585.json",

        "creation_datetime": "2018-01-25 18:09:51 +0200"

}
Don't forget to try out the Cancel button as well.
View ToDo items
The Todo::ApplicationWindow contains only one button. It's time to change that.
We want the window to have Add new item on the top and a list below with all of our ToDo items. We'll add a Gtk::ListBox to our design that can contain any number of rows.
Update the application window
- Open the
resources/ui/application_window.uifile in Glade. - Nothing happens if we drag a
List Boxwidget from the Widget section directly on the window.それは正常です。 First, we have to split the window into two parts:one for the button and one for the list box. Bear with me. - Right-click on the
new_item_windowin the Hierarchy section and select Add parent> Box 。 - In the pop-up window, set 2 for the number of items.
- The orientation of the box is already vertical, so we are fine.
- Now, drag a
List Boxand place it on the free area of the previously added box. - Set its
IDproperty totodo_items_list_box。 - Set its
Selection modetoNonesince we won't provide that functionality.

Design the ToDo item list box row
Each row of the list box we created in the previous step will be more complex than a row of text. Each will contain widgets that allow the user to expand an item's notes and to delete or edit the item.
- Create a new project in Glade, as we did for the
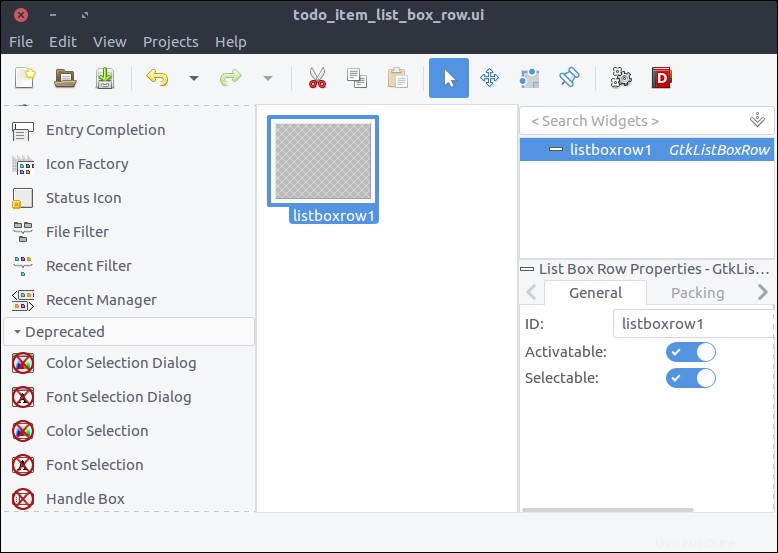
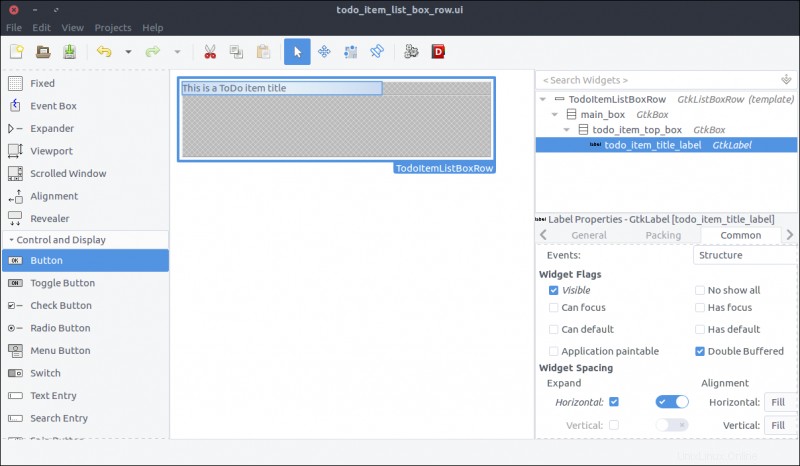
new_item_window.ui。 Save it underresources/ui/todo_item_list_box_row.ui。 - Unfortunately (at least in my version of Glade), there is no List Box Row widget in the Widget section. So, we'll add one as the top-level widget of our project in a kinda hackish way.
- Drag a
List Boxfrom the Widget section to the Design area. - Inside the Hierarchy section, right-click on the
List Boxand selectAdd Row

- In the Hierarchy section, right-click on the newly added
List Box Rownested under theList Boxand selectRemove parent。 There it is! TheList Box Rowis the top-level widget of the project now.
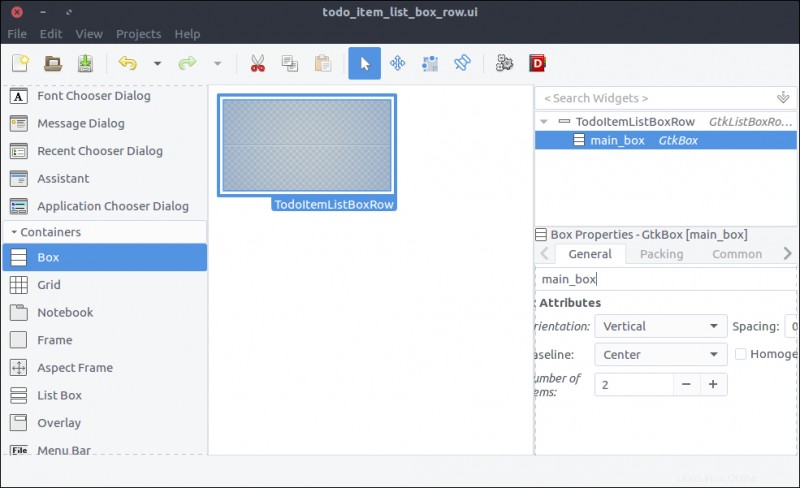
- Check the widget's
Compositeproperty and set its name toTodoItemListBoxRow。 - Drag a
Boxfrom the Widget section to the Design area inside ourList Box Row。 - Set 2 items in the pop-up window.
- Set its
IDproperty tomain_box。
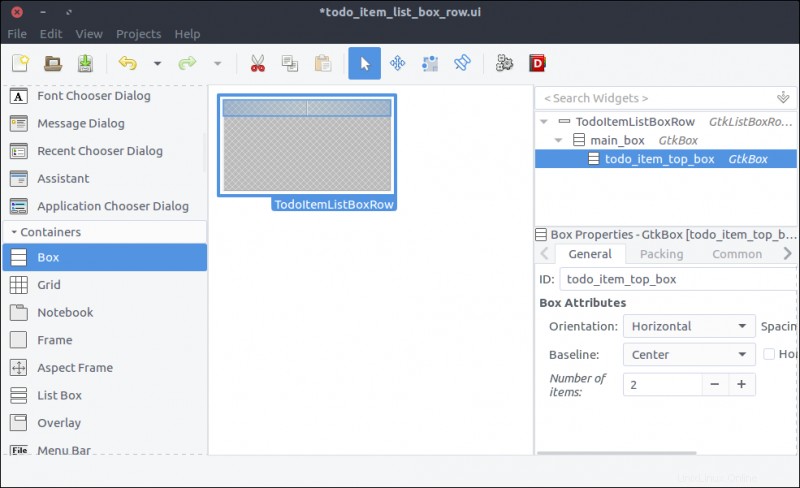
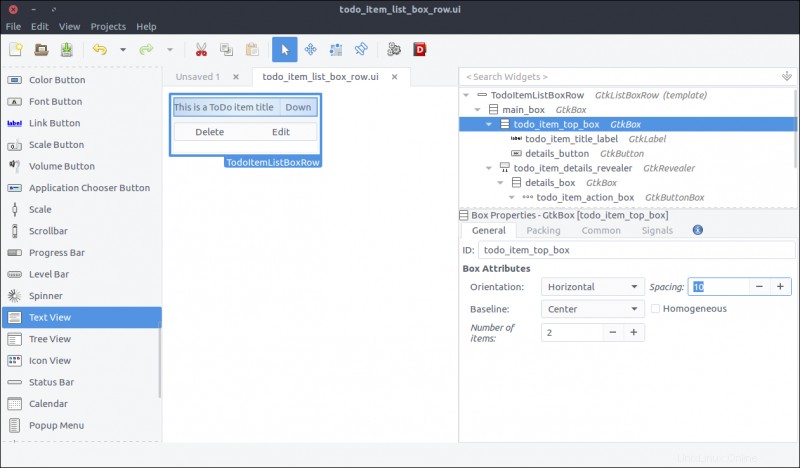
- Drag another
Boxfrom the Widget section to the first row of the previously added box. - Set 2 items in the pop-up window.
- Set its
IDproperty totodo_item_top_box。 - Set its Orientation property to Horizontal 。
- Set its
Spacing(General tab) property to 10 。
- Drag a
Labelfrom the Widget section to the first column of thetodo_item_top_box。 - Set its
IDproperty totodo_item_title_label。 - Set its Alignment and Padding> Alignment> Horizontal property to 0.00 。
- In the Common tab of the Properties section, check the Widget Spacing> Expand> Horizontal checkbox and turn on the switch next to it so the label will expand to the available space.
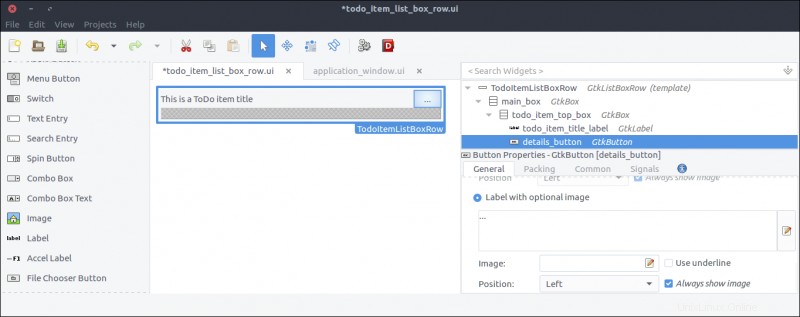
- Drag a
Buttonfrom the Widget section to the second column of thetodo_item_top_box。 - Set its
IDproperty todetails_button。 - Check the Button Content> Label with optional image radio and type
...(three dots).
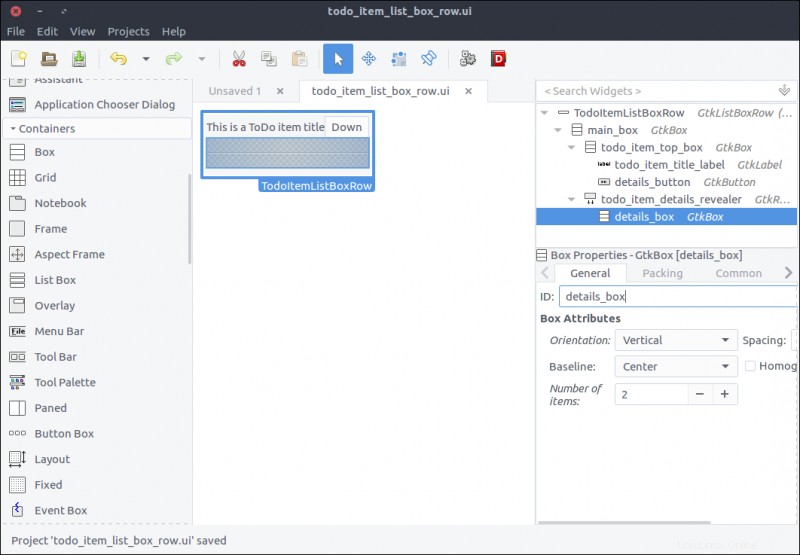
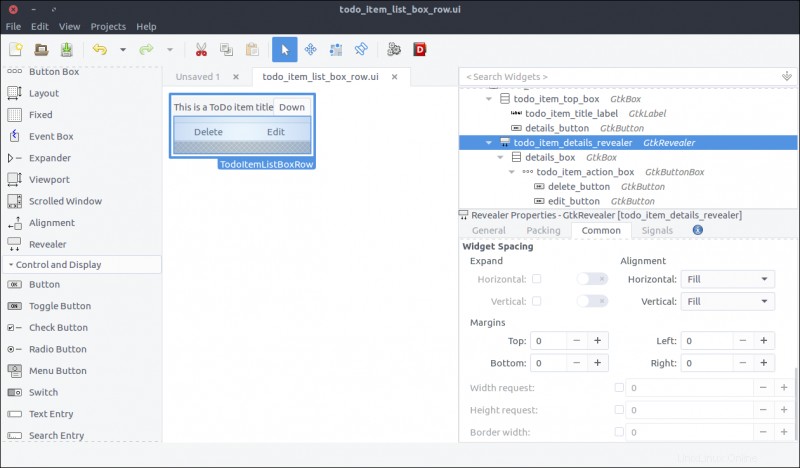
- Drag a
Revealerwidget from the Widget section to the second row of themain_box。 - Turn off the
Reveal Childswitch in the General tab. - Set its
IDproperty totodo_item_details_revealer。 - Set its
Transition typeproperty toSlide Down。
- Drag a
Boxfrom the Widget section to the reveal space. - Set its items to 2 in the pop-up window.
- Set its
IDproperty todetails_box。 - In the Common tab, set its Widget Spacing> Margins> Top property to 10 。
- Drag a
Button Boxfrom the Widget section to the first row of thedetails_box。 - Set its
IDproperty totodo_item_action_box。 - Set its
Layout styleproperty toexpand。
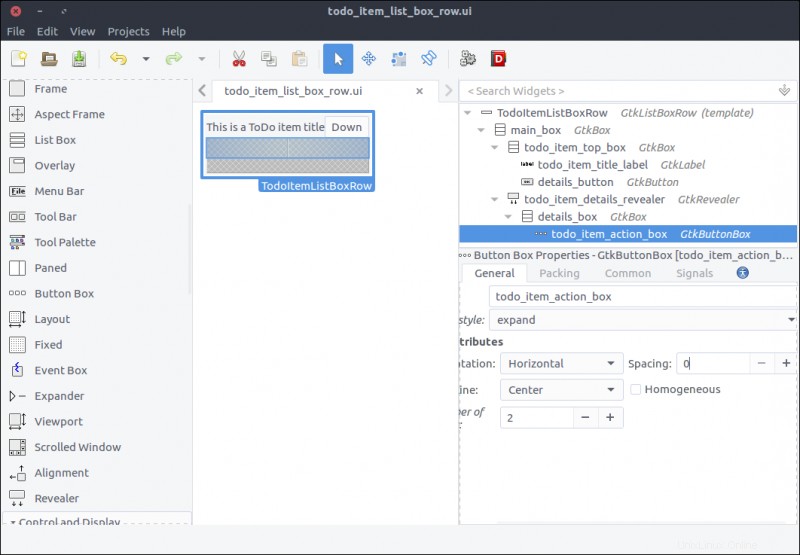
- Drag
Buttonwidgets to the first and second columns of thetodo_item_action_box。 - Set their
IDproperties todelete_buttonandedit_button, respectively. - Set their Button Content> Label with optional image properties to Delete and Edit , respectively.
- Drag a
Viewportwidget from the Widget section to the second row of thedetails_box。 - Set its
IDproperty totodo_action_notes_viewport。 - Drag a
Text Viewwidget from the Widget section to thetodo_action_notes_viewportthat we just added. - Set its
IDtotodo_item_notes_text_view。 - Uncheck its
Editableproperty in theGeneraltab of the Properties section.
Create the ToDo item list-box row class
Now we will create the class reflecting the UI of the list-box row we just created.
First we have to update our GResource description file to include the newly created design. Change the resources/gresources.xml file as follows:
<?xml version="1.0" encoding="UTF-8"?>

<gresources>

  <gresource prefix="/com/iridakos/gtk-todo">

    <file preprocess="xml-stripblanks">ui/application_window.ui</file>

    <file preprocess="xml-stripblanks">ui/new_item_window.ui</file>

    <file preprocess="xml-stripblanks">ui/todo_item_list_box_row.ui</file>

  </gresource>

</gresources>
Create a file named item_list_box_row.rb inside the application/ui folder and add the following:
module Todo

  class ItemListBoxRow < Gtk::ListBoxRow

    type_register


    class << self

      def init

        set_template resource: '/com/iridakos/gtk-todo/ui/todo_item_list_box_row.ui'

      end

    end


    def initialize(item)

      super()

    end

  end

end
We will not bind any children at the moment.
When starting the application, we have to search for files in the :user_data_path , and we must create a Todo::Item instance for each file. For each instance, we must also add a new Todo::ItemListBoxRow to the Todo::ApplicationWindow 's todo_items_list_box list box. One thing at a time.
First, let's bind the todo_items_list_box in the Todo::ApplicationWindow class. Change the init method as follows:
def init

  # Set the template from the resources binary

  set_template resource: '/com/iridakos/gtk-todo/ui/application_window.ui'


  bind_template_child 'add_new_item_button'

  bind_template_child 'todo_items_list_box'

end
Next, we'll add an instance method in the same class that will be responsible to load the ToDo list items in the related list box. Add this code in Todo::ApplicationWindow :
def load_todo_items

  todo_items_list_box.children.each { |child| todo_items_list_box.remove child }


  json_files = Dir[File.join(File.expand_path(application.user_data_path), '*.json')]

  items = json_files.map{ |filename| Todo::Item.new(filename: filename) }


  items.each do |item|

    todo_items_list_box.add Todo::ItemListBoxRow.new(item)

  end

end
Then we'll call this method at the end of the initialize method:
def initialize(application)

  super application: application


  set_title 'GTK+ Simple ToDo'


  add_new_item_button.signal_connect 'clicked' do |button|

    new_item_window = NewItemWindow.new(application, Todo::Item.new(user_data_path: application.user_data_path))

    new_item_window.present

  end


  load_todo_items

end
注: We must first empty the list box of its current children rows then refill it. This way, we will call this method after saving a Todo::Item via the signal_connect of the save_button of the Todo::NewItemWindow , and the parent application window will be reloaded! Here's the updated code (in application/ui/new_item_window.rb ):
save_button.signal_connect 'clicked' do |button|

  item.title = title_text_entry.text

  item.notes = notes_text_view.buffer.text

  item.priority = priority_combo_box.active_iter.get_value(0) if priority_combo_box.active_iter

  item.save!


  close


  # Locate the application window

  application_window = application.windows.find { |w| w.is_a? Todo::ApplicationWindow }

  application_window.load_todo_items

end
Previously, we used this code:
json_files = Dir[File.join(File.expand_path(application.user_data_path), '*.json')] to find the names of all the files in the application-user data path with a JSON extension.
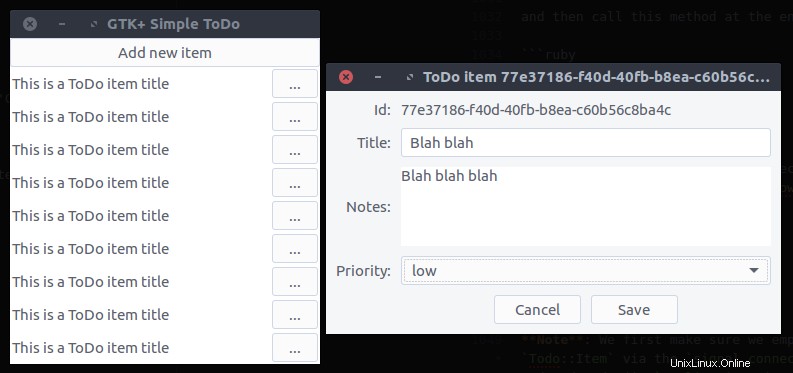
Let's see what we've created. Start the application and try adding a new ToDo item. After pressing the Save button, you should see the parent Todo::ApplicationWindow automatically updated with the new item!
What's left is to complete the functionality of the Todo::ItemListBoxRow 。
First, we will bind the widgets. Change the init method of the Todo::ItemListBoxRow class as follows:
def init

  set_template resource: '/com/iridakos/gtk-todo/ui/todo_item_list_box_row.ui'


  bind_template_child 'details_button'

  bind_template_child 'todo_item_title_label'

  bind_template_child 'todo_item_details_revealer'

  bind_template_child 'todo_item_notes_text_view'

  bind_template_child 'delete_button'

  bind_template_child 'edit_button'

end
Then, we'll set up the widgets based on the item of each row.
def initialize(item)

  super()


  todo_item_title_label.text = item.title || ''


  todo_item_notes_text_view.buffer.text = item.notes


  details_button.signal_connect 'clicked' do

    todo_item_details_revealer.set_reveal_child !todo_item_details_revealer.reveal_child?

  end


  delete_button.signal_connect 'clicked' do

    item.delete!


    # Locate the application window

    application_window = application.windows.find { |w| w.is_a? Todo::ApplicationWindow }

    application_window.load_todo_items

  end


  edit_button.signal_connect 'clicked' do

    new_item_window = NewItemWindow.new(application, item)

    new_item_window.present

  end

end


def application

  parent = self.parent

  parent = parent.parent while !parent.is_a? Gtk::Window

  parent.application

end
- As you can see, when the
details_buttonis clicked, we instruct thetodo_item_details_revealerto swap the visibility of its contents. - After deleting an item, we find the application's
Todo::ApplicationWindowto call itsload_todo_items, as we did after saving an item. - When clicking to edit a button, we create a new instance of the
Todo::NewItemWindowpassing an item as the current item. Works like a charm! - Finally, to reach the application parent of a list-box row, we defined a simple instance method
applicationthat navigates through the widget's parents until it reaches a window from which it can obtain the application object.
Save and run the application. There it is!
This has been a really long tutorial and, even though there are so many items that we haven't covered, I think we better end it here.
Long post, cat photo.

Useful links
- This tutorial's code
- A set of bindings for the GNOME-2.x libraries to use from Ruby
- Gtk3 tutorial for Ruby based on the official C version
- GTK+ 3 Reference Manual
This was originally published on Lazarus Lazaridis's blog, iridakos.com, and is republished with permission.